
28. System Settings
28.1. Admin Security
There are two types of user accounts available for accessing the web admin: admin and user. They represent two user levels: the admin level has full administrative access, while the user level is read-only. The user level can access only the device's status information; users cannot make any changes on the device.
A web login session will be logged out automatically when it has been idle longer than the Web Session Timeout. Before the session expires, you may click the Logout button in the web admin to exit the session.
0 hours 0 minutes signifies an unlimited session time. This setting should be used only in special situations, as it will lower the system security level if users do not log out before closing the browser. The default is 4 hours, 0 minutes.
For security reasons, after logging in to the web admin Interface for the first time, it is recommended to change the administrator password. Configuring the administration interface to be accessible only from the LAN can further improve system security. Administrative settings configuration is located at System > Admin Security.
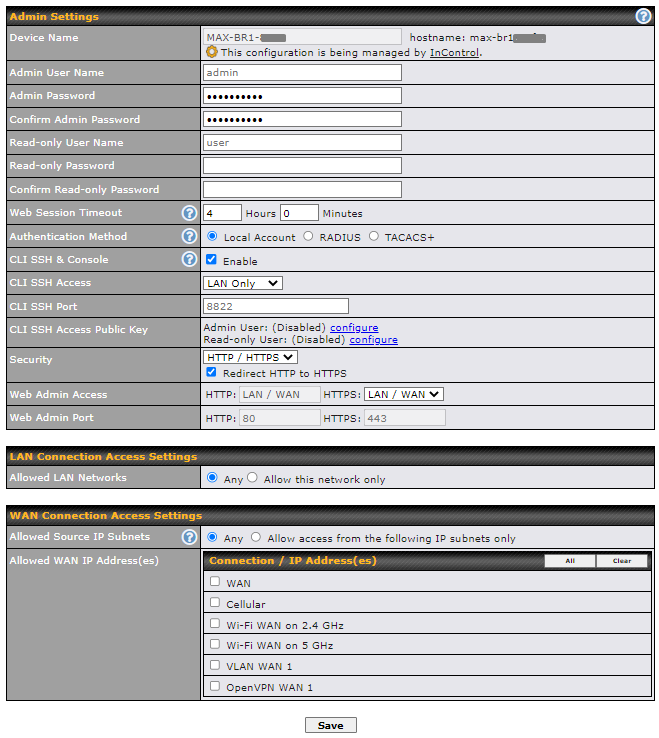
Admin Settings | |||||||||||||||||||||||||||
Device Name | This field allows you to define a name for this Peplink router. By default, Device Name is set as MAX_XXXX, where XXXX refers to the last 4 digits of the unit’s serial number. | ||||||||||||||||||||||||||
Admin User Name | Admin User Name is set as admin by default, but can be changed, if desired. | ||||||||||||||||||||||||||
Admin Password | This field allows you to specify a new administrator password. | ||||||||||||||||||||||||||
Confirm Admin Password | This field allows you to verify and confirm the new administrator password. | ||||||||||||||||||||||||||
Read-only User Name | Read-only User Name is set as user by default, but can be changed, if desired. | ||||||||||||||||||||||||||
Read-only Password | This field allows you to specify a new user password. Once the user password is set, the read-only user feature will be enabled. | ||||||||||||||||||||||||||
Confirm Read-only Password | This field allows you to verify and confirm the new user password. | ||||||||||||||||||||||||||
Web Session Timeout | This field specifies the number of hours and minutes that a web session can remain idle before the Peplink router terminates its access to the web admin interface. By default, it is set to 4 hours. | ||||||||||||||||||||||||||
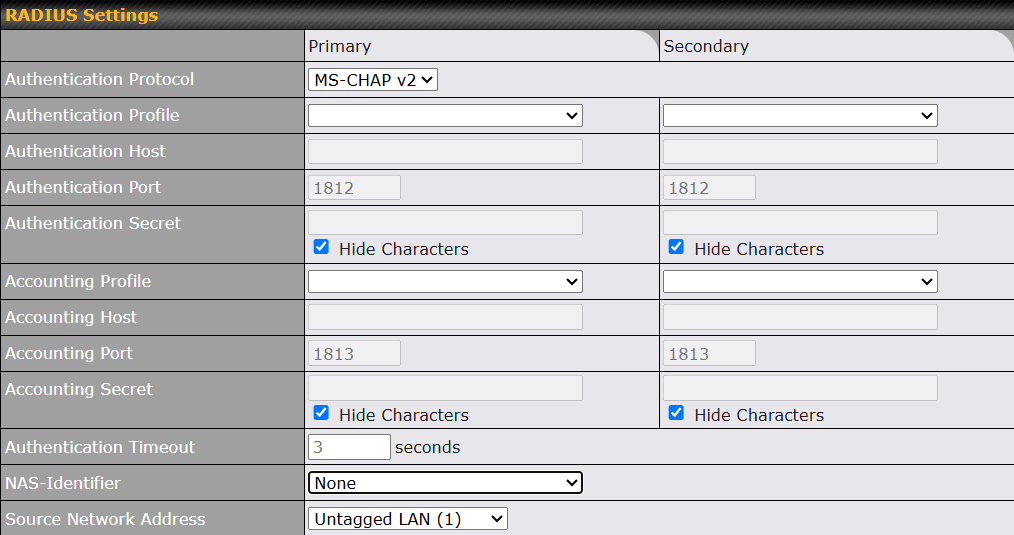
Authentication Method | When this box is checked, the web admin will authenticate using an external RADIUS server. Authenticated users are treated as either "admin" with full read-write permission or “user” with read-only access. Local admin and user accounts will be disabled. When the device is not able to communicate with the external RADIUS server, local accounts will be enabled again for emergency access. Additional authentication options will be available once this box is checked. Available options:
| ||||||||||||||||||||||||||
CLI SSH & Console | The CLI (command line interface) can be accessed via SSH. This field enables CLI support. For additional information regarding CLI, please refer to here. | ||||||||||||||||||||||||||
CLI SSH Access | This menu allows you to choose between granting access to LAN and WAN clients, or to LAN clients only. | ||||||||||||||||||||||||||
CLI SSH Port | This field determines the port on which clients can access CLI SSH. | ||||||||||||||||||||||||||
CLI SSH Access Public Key | This field is for entering the Public Key for Admin Users and Read-only Users to access CLI SSH. | ||||||||||||||||||||||||||
Security | This option is for specifying the protocol(s) through which the web admin interface can be accessed:
HTTP to HTTPS redirection is enabled by default to force HTTPS access to the web admin interface. | ||||||||||||||||||||||||||
Web Admin Access | This option is for specifying the network interfaces through which the web admin interface can be accessed:
If LAN/WAN is chosen, the WAN Connection Access Settings form will be displayed. | ||||||||||||||||||||||||||
Web Admin Port | This field is for specifying the port number on which the web admin interface can be accessed. | ||||||||||||||||||||||||||

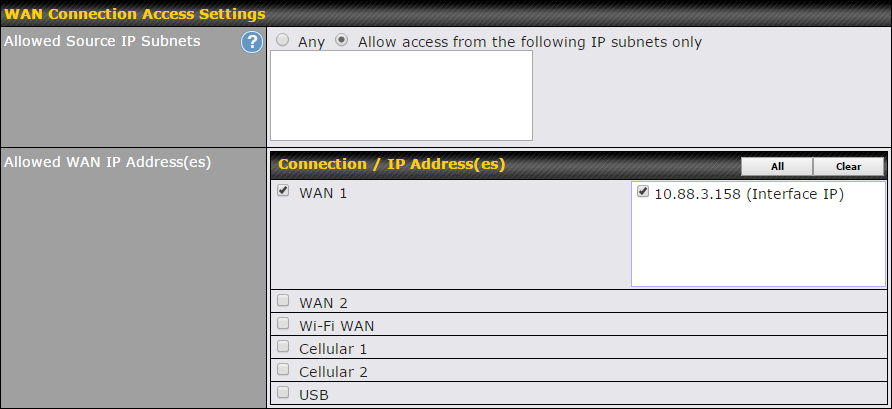
WAN Connection Access Settings | |
Allowed Source IP Subnets | This field allows you to restrict web admin access only from defined IP subnets.
The allowed IP subnet addresses should be entered into this text area. Each IP subnet must be in the form of w.x.y.z/m, where w.x.y.z is an IP address (e.g., 192.168.0.0), and m is the subnet mask in CIDR format, which is between 0 and 32 inclusively (For example, 192.168.0.0/24). To define multiple subnets, separate each IP subnet one in a line. For example:
|
Allowed WAN IP Address(es) | This is to choose which WAN IP address(es) the web server should listen on. |
28.2. Firmware
Web admin interface: automatically check for updates
Upgrading firmware can be done in one of three ways.
Using the router’s interface to automatically check for an update, using the router’s interface to manually upgrade the firmware, or using InControl2 to push an upgrade to a router.
The automatic upgrade can be done from System > Firmware.

If an update is found the buttons will change to allow you to Download and Update the firmware.
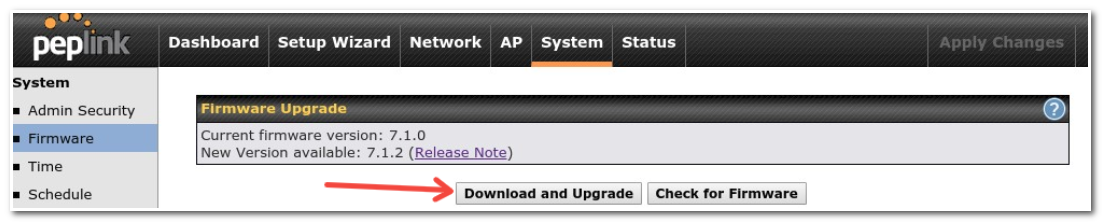
Click on the Download and Upgrade button. A prompt will be displayed advising to download the Current Active Configuration. Please click on the underlined download text. After downloading the current config click the Ok button to start the upgrade process.
The router will download and then apply the firmware. The time that this process takes will depend on your internet connection’s speed.

The firmware will now be applied to the router*. The amount of time it takes for the firmware to upgrade will also depend on the router that’s being upgraded.
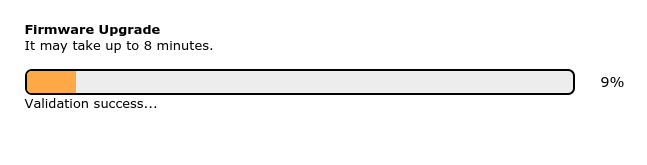
*Upgrading the firmware will cause the router to reboot.
Web admin interface: install updates manually
In some cases, a special build may be provided via a ticket or it may be found in the forum. Upgrading to the special build can be done using this method, or using IC2 if you are using that to manage your firmware upgrades. A manual upgrade using the GA firmware posted on the site may also be recommended or required for a couple of reasons.
All of the Peplink/Peplink GA firmware can be found here. Navigate to the relevant product line (i.e., Balance, Max, FusionHub, etc). Some product lines may have a dropdown that lists all of the products in that product line. Here is a screenshot from the Balance line.
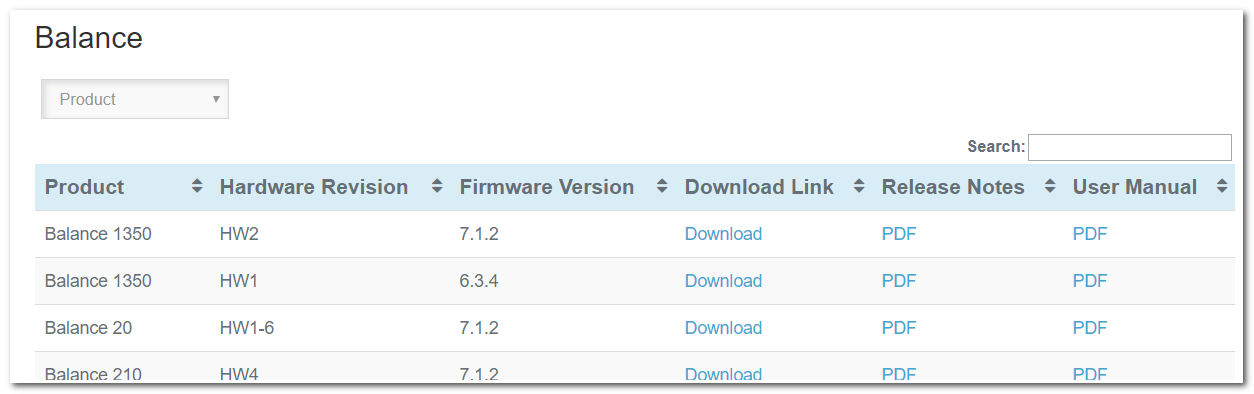
If the device has more than one firmware version the current hardware revision will be required to know what firmware to download.
Navigate to System > Firmware and click the Choose File button under the Manual Firmware Upgrade section. Navigate to the location that the firmware was downloaded to select the “.img” file and click the Open button.
Click on the Manual Upgrade button to start the upgrade process.

A prompt will be displayed advising to download the Current Active Configuration. Please click on the underlined download text. After downloading the current config click the Ok button to start the upgrade process. The firmware will now be applied to the router*. The amount of time it takes for the firmware to upgrade will depend on the router that’s being upgraded.
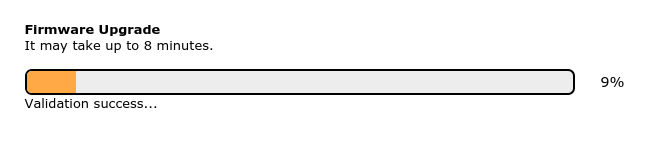
*Upgrading the firmware will cause the router to reboot.
The InControl method
Described in this knowledgebase article on our forum.
28.3. Time
Time Settings enables the system clock of the Peplink router to be synchronized with a specified time server. Time settings are located at System>Time.
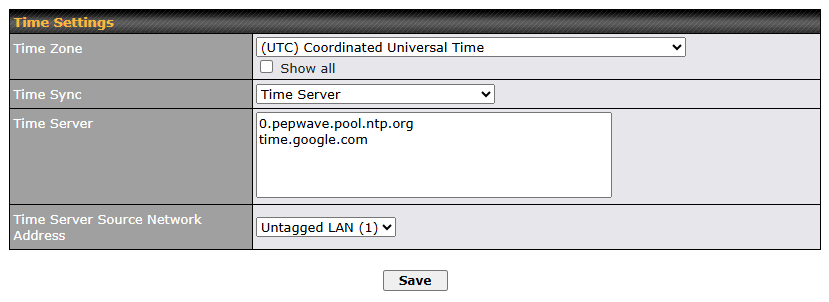
Time Settings | |
Time Zone | This specifies the time zone (along with the corresponding Daylight Savings Time scheme). The Time Zone value affects the time stamps in the Peplink router’s event log and e-mail notifications. Check Show all to show all time zone options. |
Time Sync | This field allows you to select your time sync mode, the available options are:
|
Time Server | This setting specifies the NTP network time server to be utilized by the router. NOTE: Multiple NTP servers can be added starting from firmware version 8.5.3. |
Time Server Source Network Address | This setting is to specify which VLAN network will be used for NTP traffic. |
28.4. Schedule
Enable and disable different functions (such as WAN connections, outbound policy, and firewalls) at different times, based on a user-scheduled configuration profile. The settings for this are located at System > Schedule.

Enable scheduling, and then click on your schedule name or on the New Schedule button to begin.
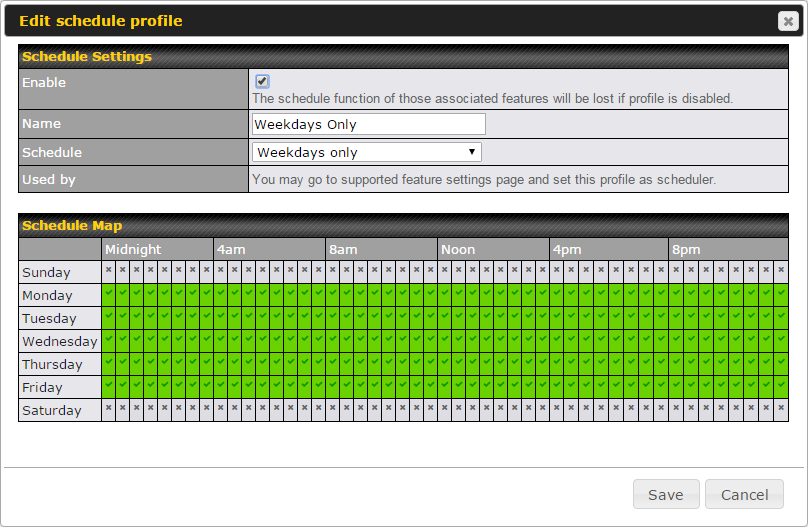
Edit Schedule Profile | |
Enabling | Click this checkbox to enable this schedule profile. Note that if this is disabled, then any associated features will also have their scheduling disabled. |
Name | Enter your desired name for this particular schedule profile. |
Schedule | Click the drop-down menu to choose pre-defined schedules as your starting point. Please note that upon selection, previous changes on the schedule map will be deleted. |
Schedule Map | Click on the desired times to enable features at that time period. You can hold your mouse for faster entry. |
28.5. Email Notification
Email notification functionality provides a system administrator with up-to-date information on network status. The settings for configuring email notifications are found at System>Email Notification.
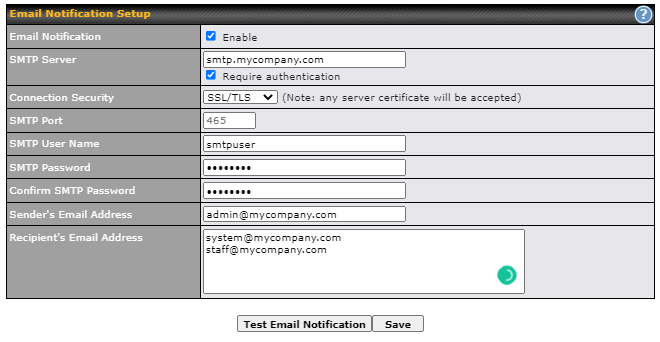
Email Notification Settings | |
Email Notification | This setting specifies whether or not to enable email notification. If Enable is checked, the Peplink router will send email messages to system administrators when the WAN status changes or when new firmware is available. If Enable is not checked, email notification is disabled and the Peplink router will not send email messages. |
SMTP Server | This setting specifies the SMTP server to be used for sending email. If the server requires authentication, check Require authentication. |
Connection Security | This setting specifies via a drop-down menu one of the following valid Connection Security:
|
SMTP Port | This field is for specifying the SMTP port number. By default, this is set to 25. If Connection Security is selected “STARTTLS”, the default port number will be set to 587. If Connection Security is selected “SSL/TLS”, the default port number will be set to 465. You may customize the port number by editing this field. |
SMTP User Name / Password | This setting specifies the SMTP username and password while sending email. These options are shown only if Require authentication is checked in the SMTP Server setting. |
Confirm SMTP Password | This field allows you to verify and confirm the new administrator password. |
Sender’s Email Address | This setting specifies the email address the Peplink router will use to send reports. |
Recipient’s Email Address | This setting specifies the email address(es) to which the Peplink router will send email notifications. For multiple recipients, separate each email address using the enter key. |
After you have finished setting up email notifications, you can click the Test Email Notification button to test the settings before saving. After Test Email Notification is clicked, you will see this screen to confirm the settings:
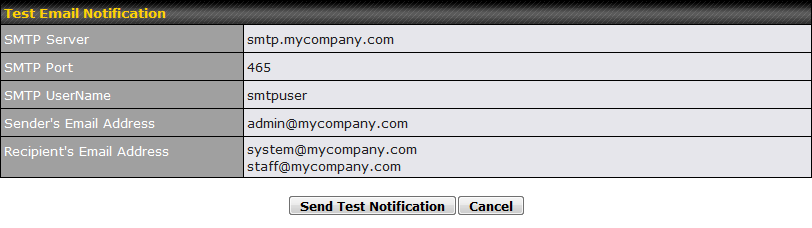
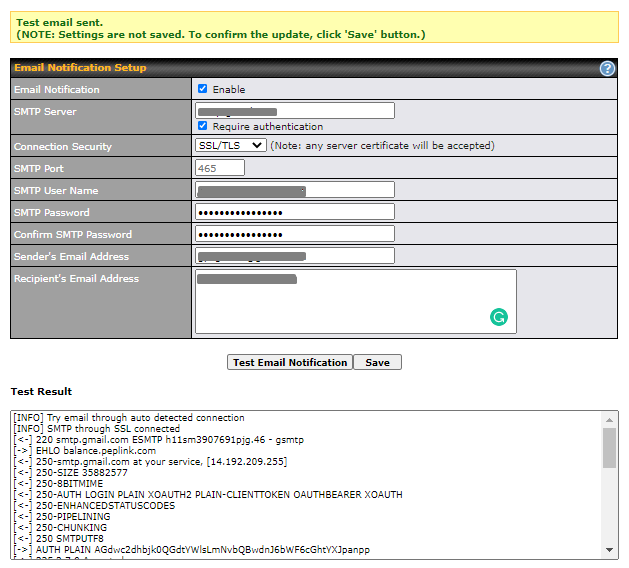
Click Send Test Notification to confirm. In a few seconds, you will see a message with detailed test results.
28.6. Event Log
Event log functionality enables event logging at a specified remote syslog server. The settings for configuring the remote system log can be found at System > Event Log.
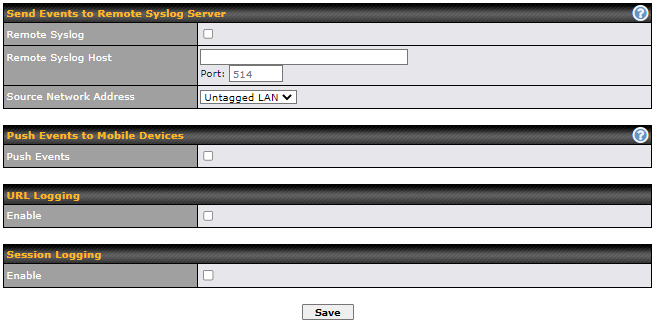
Event Log Settings | |
Remote Syslog | This setting specifies whether or not to log events at the specified remote syslog server. |
Remote Syslog Host | This setting specifies the IP address or hostname of the remote syslog server. |
Source Network Address | Via drop-down list, you may choose the LAN interface for Event Log, URL Logging, Sessions Logging and RADIUS. |
Push Events | The Peplink router can also send push notifications to mobile devices that have our Mobile Router Utility installed. Check the box to activate this feature. |
URL Logging | This setting is to enable event logging at the specified log server. |
URL Logging Host | This setting specifies the IP address or hostname of the URL log server. |
Session Logging | This setting is to enable event logging at the specified log server. |
Session Logging Host | This setting specifies the IP address or hostname of the Session log server. |
| For more information on the Router Utility, go to: www.peplink.com/products/router-utility |

28.7. SNMP
SNMP or simple network management protocol is an open standard that can be used to collect information about the Peplink router. SNMP configuration is located at System > SNMP.
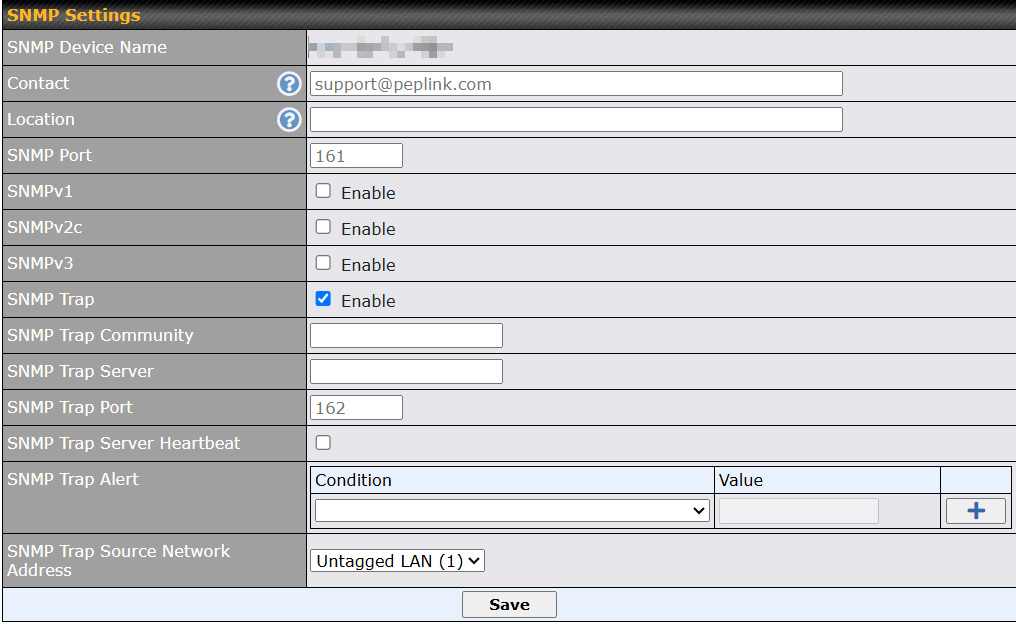
SNMP Settings | |
SNMP Device Name | This field shows the router name defined at System > Admin Security. |
Contact | This field is used to input sysContact. The default contact is [email protected] |
Location | This field is used to input sysLocation. |
SNMP Port | This option specifies the port which SNMP will use. The default port is 161. |
SNMPv1 | This option allows you to enable SNMP version 1. |
SNMPv2 | This option allows you to enable SNMP version 2. |
SNMPv3 | This option allows you to enable SNMP version 3. |
SNMP Trap | This option allows you to enable SNMP Trap. If enabled, the following entry fields will appear. |
SNMP Trap Community | This setting specifies the SNMP Trap community name. |
SNMP Trap Server | Enter the IP address of the SNMP Trap server. |
SNMP Trap Port | This option specifies the port which the SNMP Trap server will use. The default port is 162. |
SNMP Trap Server Heartbeat | This option allows you to enable and configure the heartbeat interval for the SNMP Trap server. |
SNMP Trap Alert | Users can customize SNMP trap alerts for key device health and cellular events from the drop-down menu. |
SNMP Trap Source Network Address | Users can choose the SNMP trap source network address. |
To add a community for either SNMPv1 or SNMPv2, click the Add SNMP Community button in the Community Name table, upon which the following screen is displayed:
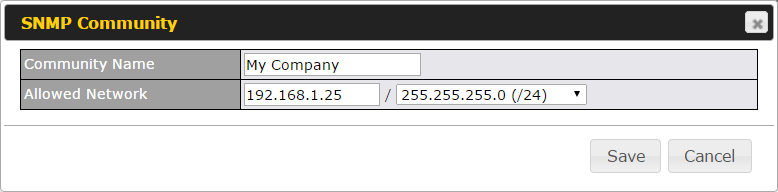
SNMP Community Settings | |
Community Name | This setting specifies the SNMP community name. |
Allowed Source Subnet Address | This setting specifies a subnet from which access to the SNMP server is allowed. Enter subnet address here (e.g., 192.168.1.0) and select the appropriate subnet mask. |
To define a user name for SNMPv3, click Add SNMP User in the SNMPv3 User Name table, upon which the following screen is displayed:
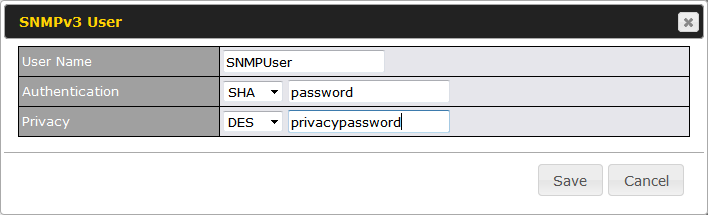
SNMPv3 User Settings | |
User Name | This setting specifies a user name to be used in SNMPv3. |
Authentication Protocol | This setting specifies via a drop-down menu one of the following valid authentication protocols:
When MD5 or SHA is selected, an entry field will appear for the password. |
Privacy Protocol | This setting specifies via a drop-down menu one of the following valid privacy protocols:
When DES is selected, an entry field will appear for the password. |
28.8. SMS Control
SMS Control allows the user to control the device using SMS even if the modem does not have a data connection. The settings for configuring the SMS Control can be found at System > SMS Control.
Supported Models
- Balance/MAX: *-LTE-E, *-LTEA-W, *-LTEA-P, *-LTE-MX
- EPX: *-LW*, *-LP*

When this box is checked, the device will be allowed to take actions according to received commands via SMS.
Make sure your mobile plan supports SMS, and note that some plans may incur additional charges for this.
SMS Control can reboot devices and configure cellular settings over signalling channels, even if the modem does not have a data connection.
For details of supported SMS command sets, please refer to our knowledge base.

SMS Control Settings | |
Enable | Click the checkbox to enable the SMS Control. |
Password | This setting sets the password for authentication - maximum of 32 characters, which cannot include semicolon (;). |
Whitelist | Optionally, you can add phone number(s) or Portal Number to the whitelist. Only matching phone numbers are allowed to issue SMS commands. Phone numbers must be in the E.164 international phone number format. |
28.9. InControl
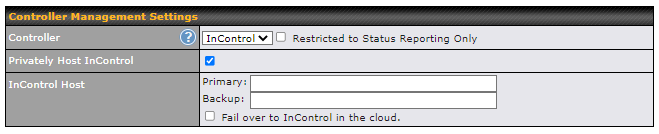
InControl is a cloud-based service which allows you to manage all of your Peplink devices with one unified system. With it, you can generate reports, gather statistics, and configure your devices automatically. All of this is now possible with InControl.
When this check box is checked, the device's status information will be sent to the Peplink InControl system. This device's usage data and configuration will be sent to the system if you enable the features in the system.
Alternatively, you can also privately host InControl. Simply check the “Privately Host InControl” box and enter the IP Address of your InControl Host. If you have multiple hosts, you may enter the primary and backup IP addresses for the InControl Host and tick the “Fail over to InControl in the cloud” box. The device will connect to either the primary InControl Host or the secondary/backup ICA/IC2.
You can sign up for an InControl account at https://incontrol2.peplink.com/. You can register your devices under the account, monitor their status, see their usage reports, and receive offline notifications.
28.10. Configuration
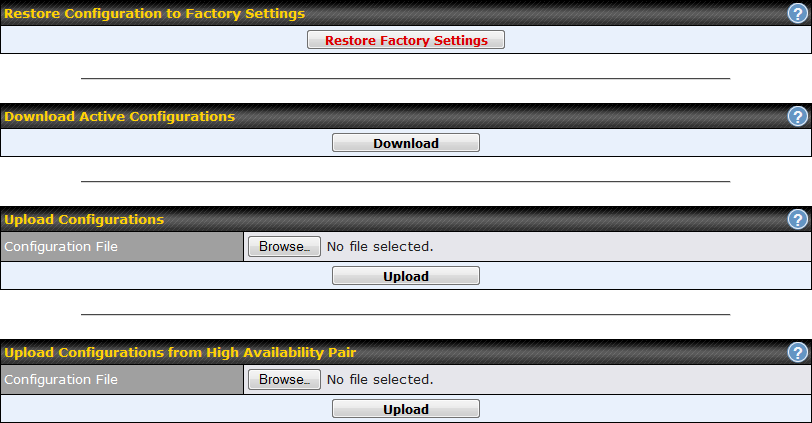
Backing up Peplink router settings immediately after successful completion of initial setup is strongly recommended. The functionality to download and upload Peplink router settings is found at System > Configuration. Note that available options vary by model.
Configuration | |
Restore Configuration to Factory Settings | The Restore Factory Settings button is to reset the configuration to factory default settings. After clicking the button, you will need to click the Apply Changes button on the top right corner to make the settings effective. |
Download Active Configurations | Click Download to back up the current active settings. |
Upload Configurations | To restore or change settings based on a configuration file, click Choose File to locate the configuration file on the local computer, and then click Upload. The new settings can then be applied by clicking the Apply Changes button on the page header, or you can cancel the procedure by pressing discard on the main page of the web admin interface. |
Upload Configurations from High Availability Pair | In a high availability (HA) configuration, a Peplink router can quickly load the configuration of its HA counterpart. To do so, click the Upload button. After loading the settings, configure the LAN IP address of the Peplink router so that it is different from the HA counterpart. |
28.11. Feature Add-ons
Some Peplink routers have features that can be activated upon purchase. Once the purchase is complete, you will receive an activation key. Enter the key in the Activation Key field, click Activate, and then click Apply Changes.

28.12. Reboot
This page provides a reboot button for restarting the system. For maximum reliability, the Peplink router can be equipped with two copies of firmware. Each copy can be a different version. You can select the firmware version you would like to reboot the device with. The firmware marked with (Running) is the current system boot up firmware.
Please note that a firmware upgrade will always replace the inactive firmware partition.
