
10. Configuring the WAN Interface(s)
WAN Interface settings are located at Network > WAN. To reorder WAN priority, drag on the appropriate WAN by holding the left mouse button, move it to the desired priority (the first one would be the highest priority, the second one would be lower priority, and so on), and drop it by releasing the mouse button.
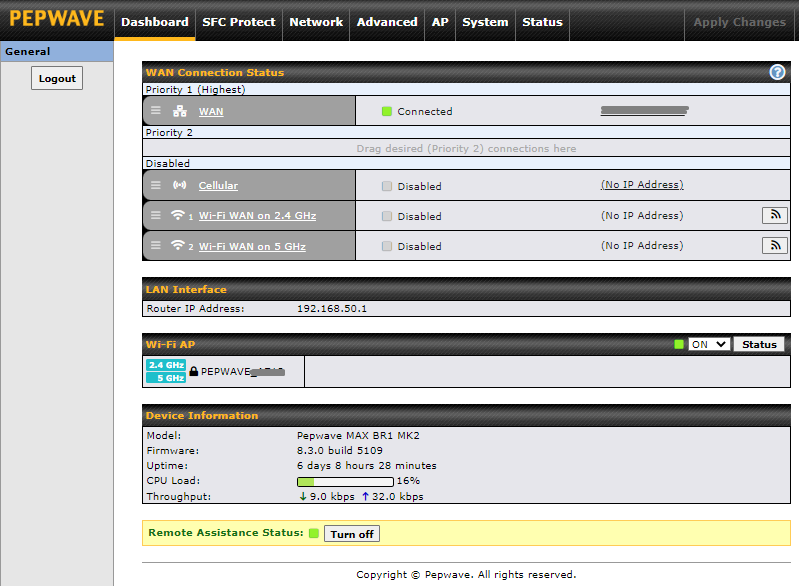
To disable a particular WAN connection, drag on the appropriate WAN by holding the left mouse button, move it to the Disabled row, and drop it by releasing the mouse button.
You can also set priorities on the Dashboard. Click the WAN button in the corresponding row to modify the connection setting.
Important Note |
Connection details will be changed and become effective immediately after clicking the Save and Apply button. |
DNS over HTTPS (DoH)

You can enable DoH (DNS over HTTPS) support in this section.
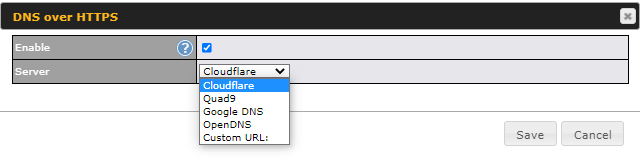
DNS over HTTPS | |
Enable | When this option is enabled, the DNS proxy server will use HTTPS connections to forward DNS requests to the DoH resolver; it will not fall back to traditional UDP DNS options. |
Server | The options to configure DoH with a predefined server are:
|
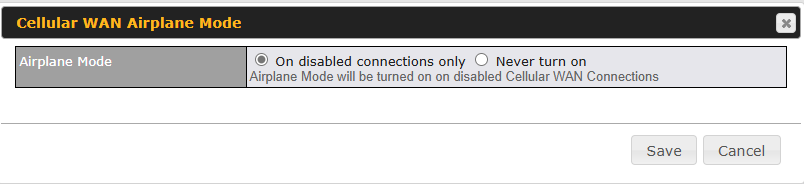
Cellular WAN Airplane Mode

You can enable Airplane Mode in this section (Network > WAN). Airplane mode will be turned ON when Cellular WAN Connections are disabled.
WAN Quality Monitoring
This setting advises how WAN Quality information is being gathered.

By default, WAN Quality will always be observed and gathered automatically. With customized choice of WAN connections, the device will always observe WAN Quality of those selected WAN connections. Other WAN connections may stop observing WAN Quality information if it is not necessary for the underlying features.
Synergy Mode
You can enable the Synergy Controller in this section.

You may click this  to enable the Synergy Controller. By default, the setting is disabled.
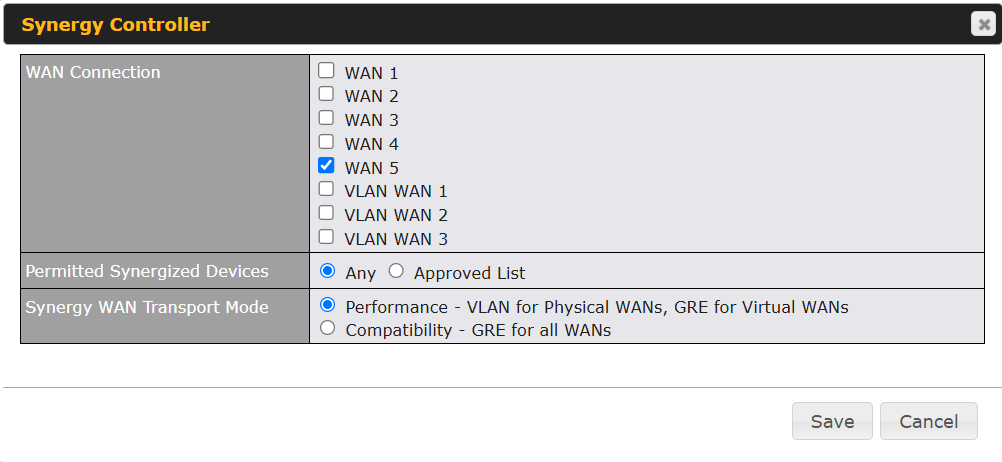
Synergy Controller | |
WAN Connection | You can select the WAN connection to use as a Synergy Link that connects to synergized devices. |
Permitted Synergized Devices | Choose Any to permit any connected device to be synergized. Choose Approved List to synergize based on serial number entries. |
Synergy WAN Transport Mode | Performance mode provides higher throughput by using VLAN transport for physical WANs and GRE transport for virtual WANs. This option is selected by default. Compatibility mode optimizes GRE transport for all WAN connections to provide greater deployment flexibility across different network environments. |
10.1. Orbit WAN
The Orbit WAN section allows users to configure Starlink WAN and OneWeb WAN connections.
On supported models (refer to Firmware 8.4.0 – Release Notes, #30479), the Starlink option is available.
OneWeb is supported on all models.
To choose the WAN port for connecting to Starlink and/or OneWeb equipment, click the ‘EDIT’ ( ) icon as shown below:

The ‘Orbit WAN - Starlink - WAN Connection’ and ‘Orbit WAN - OneWeb - WAN Connection’ selections will pop up, displaying the available options below.
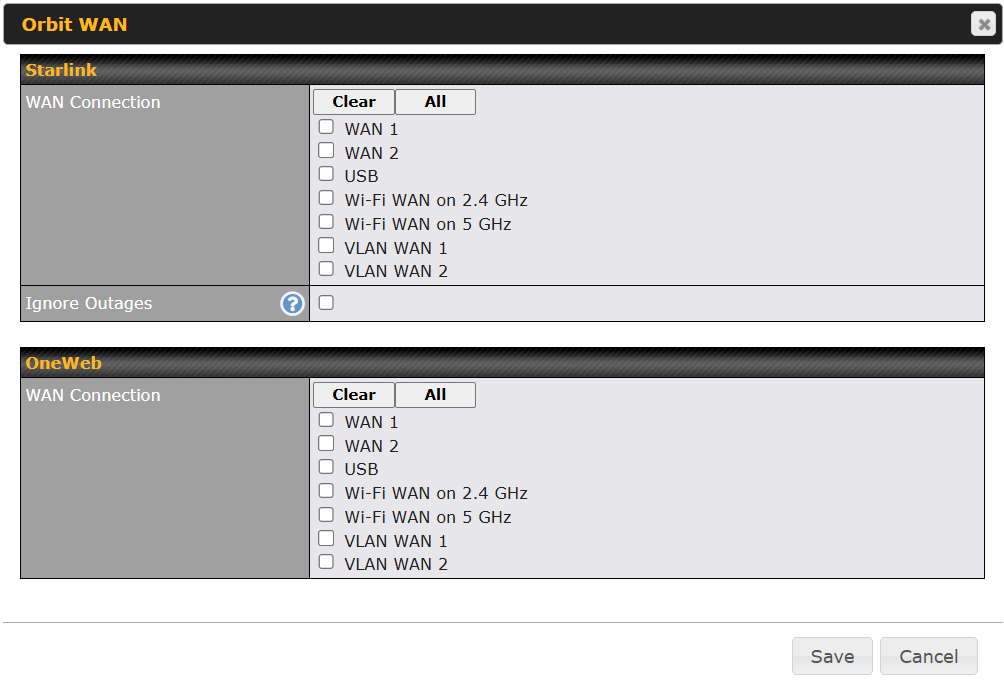
Orbit WAN | |
Starlink |
WAN option to enable Starlink management.
Enable the device to ignore all outages (e.g., obstructed, no downlink, no pings). The WAN will only go down when its health check fails. |
OneWeb |
WAN option to enable OneWeb management. |
IPv6
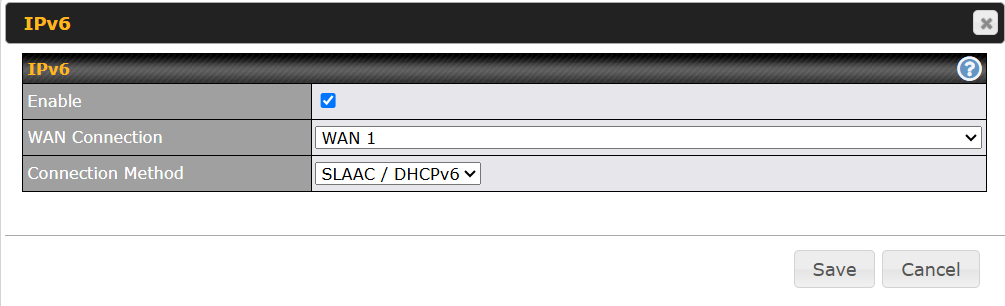
IPv6 support can be enabled on one of the available Ethernet WAN ports/Cellular WAN. On this screen, you can choose which WAN will support IPv6. Available connection methods are SLAAC/DHCPv6 and Passthrough.
To enable IPv6 support on a WAN, the WAN router must respond to Stateless Address Autoconfiguration advertisements and DHCPv6 requests. IPv6 clients on the LAN will acquire their IPv6, gateway, and DNS server addresses from it. The device will also acquire an IPv6 address for performing ping/traceroute checks and accepting web admin access.
On supported cellular models (refer to Firmware 8.6.0 RC4 – Release Notes, #21555).
10.2. Ethernet WAN
There are four possible connection methods for the Ethernet WAN connection:
- 1.DHCP
- 2.Static IP
- 3.PPPoE
- 4.L2TP
- 5.GRE
10.2.1. DHCP Connection
The DHCP connection method is suitable if the ISP provides an IP address automatically using DHCP (e.g., satellite modem, WiMAX modem, cable, Metro Ethernet, etc.).
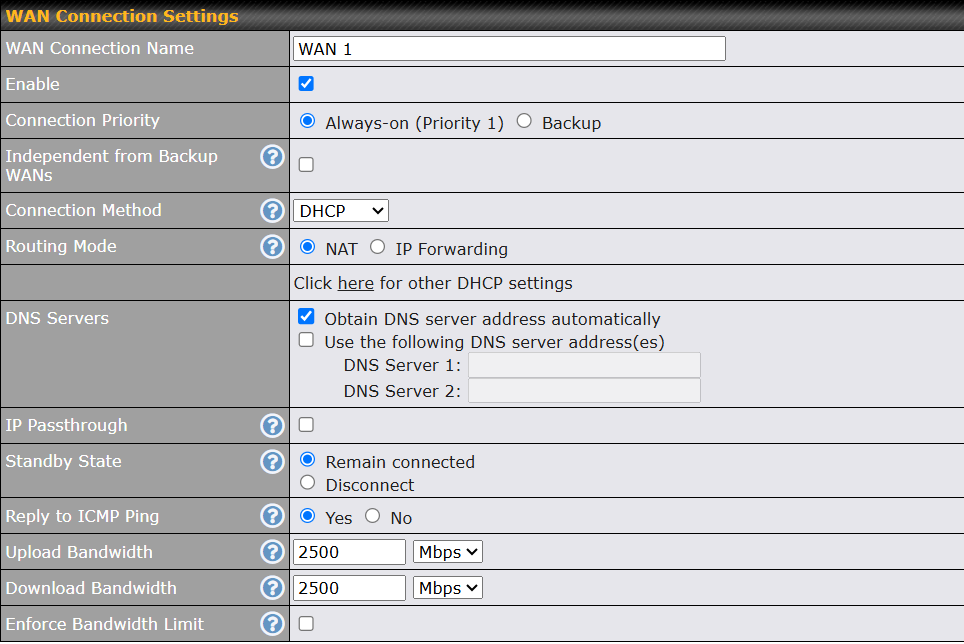
DHCP Connection Settings | |
WAN Connection Name | Enter a name to represent this WAN connection. |
Enable | This setting enables the WAN connection. If schedules have been defined, you will be able to select a schedule to apply to the connection. |
Connection Priority | This option allows you to configure the WAN connection whether for normal daily usage or as a backup connection only. If Always-on is chosen, the WAN connection will be kept on continuously, regardless of the priority of other WAN connections. If Backup is chosen, the WAN connection will depend on other WAN connections. It will not be used when one or more higher priority dependent WAN connections are connected. |
Independent from Backup WANs | If this is checked, the connection will be working independent from other Backup WAN connections. Those in Backup Priority will ignore the status of this WAN connection, and will be used when none of the other higher priority connections are available. |
Routing Mode | NAT allows substituting the real address in a packet with a mapped address that is routable on the destination network. By clicking the help |
Management IP Address | Management IP Address is available for configuration when you click here for other DHCP settings. This option allows you to configure the management IP address for the DHCP WAN connection. |
Custom Hostname | If your service provider's DHCP server requires you to supply a hostname value upon acquiring an IP address, you may enter the value here. If your service provider does not provide you with the value, you can safely bypass this option. |
DNS Servers | Each ISP may provide a set of DNS servers for DNS lookups. This setting specifies the DNS (Domain Name System) servers to be used when a DNS lookup is routed through this connection. Selecting Obtain DNS server address automatically results in the DNS servers being assigned by the WAN DHCP server to be used for outbound DNS lookups over the connection. (The DNS servers are obtained along with the WAN IP address assigned from the DHCP server.) When Use the following DNS server address(es) is selected, you may enter custom DNS server addresses for this WAN connection into the DNS Server 1 and DNS Server 2 fields. |
IP Passthrough | When this IP Passthrough option is active, after the Ethernet WAN connection is up, the router's DHCP server will offer the connection's IP address to one LAN client. All incoming or outgoing traffic will be routed without NAT. Regardless of the WAN connection's state, the router always binds to the LAN IP address (Default: 192.168.50.1). So when the Ethernet WAN is connected, the LAN client could access the router's web admin by manually configuring its IP address to the same subnet as the router's LAN IP address (e.g. 192.168.50.10). Note: when this option is first enabled, the LAN client may not be able to refresh its IP address to the Ethernet WAN IP address in a timely fashion. The LAN client may have to manually renew its IP address from DHCP server. After this option is enabled, the DHCP lease time will be 2 minutes. I.e. the LAN client could refresh its IP address and access the network at most one minute after the Ethernet WAN connection goes up. |
Standby State | This option allows you to choose whether to remain connected when this WAN connection is no longer in the highest priority and has entered the standby state. When Remain connected is chosen, upon bringing up this WAN connection to active, it will be immediately available for use. If this WAN connection is charged by connection time, you may want to set this option to Disconnect so that connection will be made only when needed. SpeedFusion VPN may use connected standby WAN for failover if a link failure is detected on the higher priority WAN, you can set this option to Disconnect to avoid data passing through. |
Reply to ICMP PING | If the checkbox is unticked, this option is disabled and the system will not reply to any ICMP ping echo requests to the WAN IP addresses of this WAN connection. Default: ticked (Yes) |
Upload Bandwidth | This field refers to the maximum upload speed. This value is referenced when default weight is chosen for outbound traffic and traffic prioritization. A correct value can result in effective traffic prioritization and efficient use of upstream bandwidth. |
Download Bandwidth | This field refers to the maximum download speed. Default weight control for outbound traffic will be adjusted according to this value. |
Enforced Bandwidth Limit | When enabled, actual WAN traffic is limited based on the upload and download values configured above. Note: These bandwidth values are always enforced when one or more Application Queues are in use, regardless of whether this option is enabled. |
 icon in this field, you can display the IP Forwarding option, if your network requires it.
10.2.2. Static IP Connection
The Static IP connection method is suitable if your ISP provides a static IP address to connect directly.
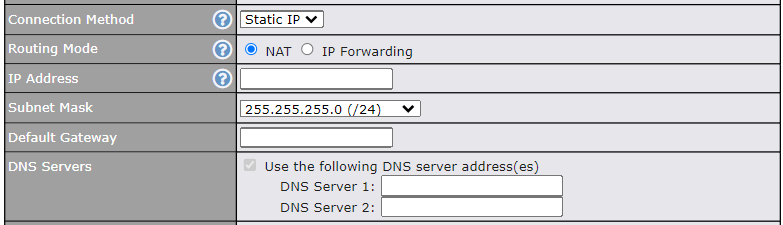
Static IP Settings | |
Routing Mode | NAT allows substituting the real address in a packet with a mapped address that is routable on the destination network. By clicking the help icon in this field, you can display the IP Forwarding option, if your network requires it. |
IP Address / Subnet Mask / Default Gateway | These settings allow you to specify the information required in order to communicate on the Internet via a fixed Internet IP address. The information is typically determined by and can be obtained from the ISP. |
DNS Servers | Each ISP may provide a set of DNS servers for DNS lookups. This setting specifies the DNS (Domain Name System) servers to be used when a DNS lookup is routed through this connection. Selecting Obtain DNS server address automatically results in the DNS servers being assigned by the WAN DHCP server to be used for outbound DNS lookups over the connection. (The DNS servers are obtained along with the WAN IP address assigned from the DHCP server.) When Use the following DNS server address(es) is selected, you may enter custom DNS server addresses for this WAN connection into the DNS Server 1 and DNS Server 2 fields. |
10.2.3. PPPoE Connection
The PPPoE connection method is suitable if your ISP provides a login ID/password to connect via PPPoE.
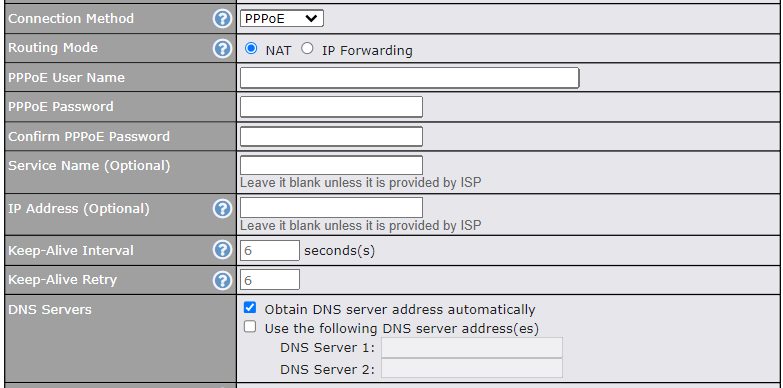
PPPoE Settings | |
Routing Mode | NAT allows substituting the real address in a packet with a mapped address that is routable on the destination network. By clicking the help icon in this field, you can display the IP Forwarding option, if your network requires it. |
PPPoE Username / Password | Enter the required information in these fields in order to connect via PPPoE to the ISP. The parameter values are determined by and can be obtained from the ISP. |
Confirm PPPoE Password | Verify your password by entering it again in this field. |
Service Name (Optional) | Service name is provided by the ISP. Note: Leave this field blank unless it is provided by your ISP. |
IP Address (Optional) | If your ISP provides a PPPoE IP address, enter it here. Note: Leave this field blank unless it is provided by your ISP. |
Keep Alive Interval | This is the time interval between each Keep-Alive packet. |
Keep-Alive Retry | This is the number of consecutive Keep-Alive check failures before treating PPPoE connection as down. |
DNS Servers | Each ISP may provide a set of DNS servers for DNS lookups. This setting specifies the DNS (Domain Name System) servers to be used when a DNS lookup is routed through this connection. Selecting Obtain DNS server address automatically results in the DNS servers being assigned by the WAN DHCP server to be used for outbound DNS lookups over the connection. (The DNS servers are obtained along with the WAN IP address assigned from the DHCP server.) When Use the following DNS server address(es) is selected, you may enter custom DNS server addresses for this WAN connection into the DNS Server 1 and DNS Server 2 fields. |
10.2.4. L2TP Connection
L2TP has all the compatibility and convenience of PPTP with greater security. Combine this with IPsec for a good balance between ease of use and security.
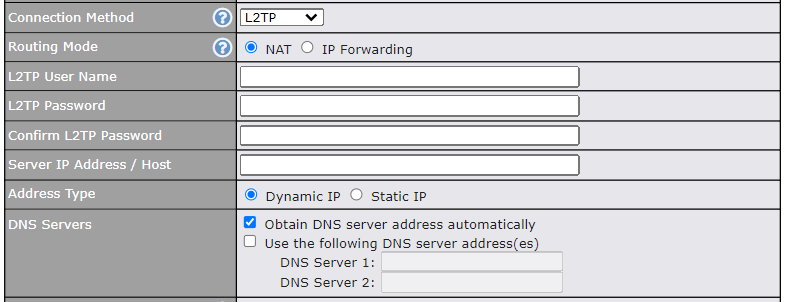
L2TP Settings | |
Routing Mode | NAT allows substituting the real address in a packet with a mapped address that is routable on the destination network. By clicking the help icon in this field, you can display the IP Forwarding option, if your network requires it. |
L2TP Username / Password | Enter the required information in these fields in order to connect via L2TP to your ISP. The parameter values are determined by and can be obtained from your ISP. |
Confirm L2TP Password | Verify your password by entering it again in this field. |
Server IP Address / Host | L2TP server address is a parameter which is provided by your ISP. Note: Leave this field blank unless it is provided by your ISP. |
Address Type | Your ISP will also indicate whether the server IP address is Dynamic or Static. Please click the appropriate value. |
DNS Servers | Each ISP may provide a set of DNS servers for DNS lookups. This setting specifies the DNS (Domain Name System) servers to be used when a DNS lookup is routed through this connection. Selecting Obtain DNS server address automatically results in the DNS servers assigned by the PPPoE server to be used for outbound DNS lookups over the WAN connection. (The DNS servers are obtained along with the WAN IP address assigned from the PPPoE server.) When Use the following DNS server address(es) is selected, you can enter custom DNS server addresses for this WAN connection into the DNS server 1 and DNS server 2 fields. |
10.2.5. GRE Connection
This connection method is suitable if your ISP provides a static WAN IP and Tunnel IP via GRE.
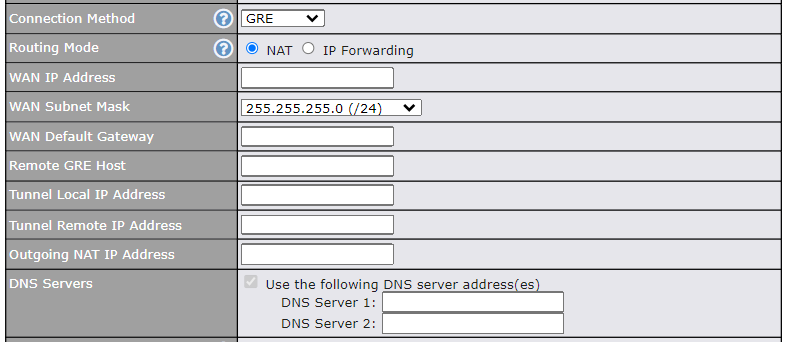
GRE Settings | |
Routing Mode | NAT allows substituting the real address in a packet with a mapped address that is routable on the destination network. By clicking the help icon in this field, you can display the IP Forwarding option, if your network requires it. |
WAN IP Address / Subnet Mask / Default Gateway | These settings allow you to specify the information required in order to communicate on the Internet via a fixed Internet IP address. The information is typically determined by and can be obtained from the ISP. |
Remote GRE Host | This field allows you to enter the IP address of the remote GRE. |
Tunnel Local IP Address | This field allows you to enter the IP address of the local tunnel for the GRE tunnel connection. |
Tunnel Remote IP Address | This field allows you to enter the IP address of the remote tunnel for the GRE tunnel connection. |
Outgoing NAT IP Address | This field is to enter the NAT IP address for outgoing via GRE tunnel. |
DNS Servers | Each ISP may provide a set of DNS servers for DNS lookups. This setting specifies the DNS (Domain Name System) servers to be used when a DNS lookup is routed through this connection. Selecting Obtain DNS server address automatically results in the DNS servers assigned by the PPPoE server to be used for outbound DNS lookups over the WAN connection. (The DNS servers are obtained along with the WAN IP address assigned from the PPPoE server.) When Use the following DNS server address(es) is selected, you can enter custom DNS server addresses for this WAN connection into the DNS server 1 and DNS server 2 fields. |
10.3. Cellular WAN
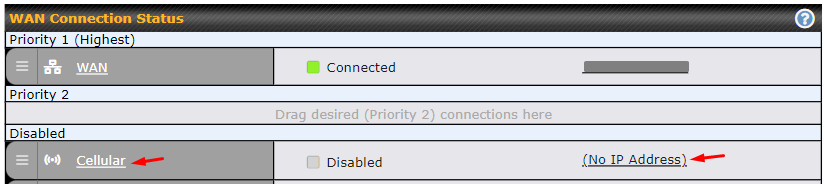
To access/configure the Cellular WAN settings, click Network > Cellular Name. You may click the “No IP Address” link to view the Cellular WAN details/status.
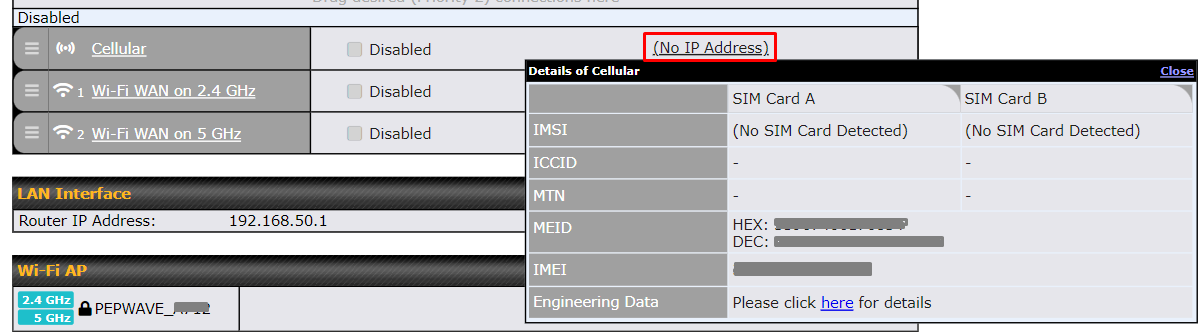
WAN Connection Status | |
IMSI | This is the International Mobile Subscriber Identity which uniquely identifies the SIM card. This is applicable to 3G modems only. |
ICCID | This is a unique number assigned to a SIM card used in a cellular device. |
MTN | This field is to display the mobile telephone number of the SIM card. |
MEID | Some Peplink routers support both HSPA and EV-DO. For Sprint or Verizon Wireless EV-DO users, a unique MEID identifier code (in hexadecimal format) is used by the carrier to associate the EV-DO device with the user. This information is presented in hex and decimal format. |
IMEI | This is the unique ID for identifying the modem in GSM/HSPA mode. |
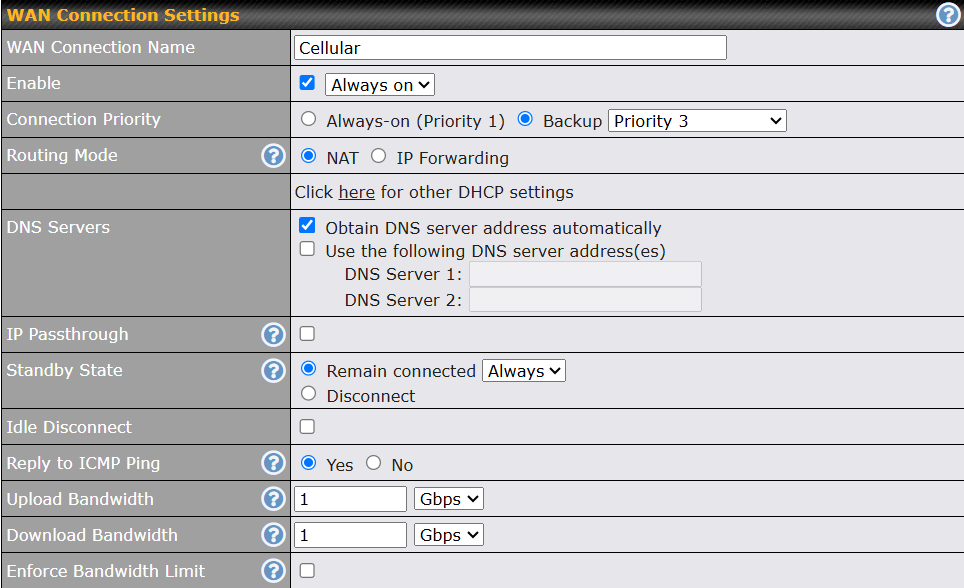
WAN Connection Settings | |
WAN Connection Name | Indicate a name you wish to give this Cellular WAN connection. |
Enable | Click the checkbox to toggle the on and off state of this connection. |
Connection Priority | This option allows you to configure the WAN connection whether for normal daily usage or as a backup connection only. If Always-on is chosen, the WAN connection will be kept on continuously, regardless of the priority of other WAN connections. If Backup is chosen, the WAN connection will depend on other WAN connections. It will not be used when one or more higher priority dependent WAN connections are connected. |
Independent from Backup WANs | If this is checked, the connection will be working independent from other Backup WAN connections. Those in Backup Priority will ignore the status of this WAN connection, and will be used when none of the other higher priority connections are available. |
Routing Mode | This option allows you to select the routing method to be used in routing IP frames via the WAN connection. The mode can be either NAT (Network Address Translation) or IP Forwarding. In the case if you need to choose IP Forwarding for your scenario. Click the |
Management IP Address | Management IP Address is available for configuration when you click here for other DHCP settings. This option allows you to configure the management IP address for the DHCP WAN connection. |
DNS Servers | Each ISP may provide a set of DNS servers for DNS lookups. This setting specifies the DNS (Domain Name System) servers to be used when a DNS lookup is routed through this connection. Selecting Obtain DNS server address automatically results in the DNS servers assigned by the WAN DHCP server being used for outbound DNS lookups over the connection. (The DNS servers are obtained along with the WAN IP address assigned by the DHCP server.) When Use the following DNS server address(es) is selected, you may enter custom DNS server addresses for this WAN connection into the DNS server 1 and DNS server 2 fields. |
IP Passthrough | When this IP Passthrough option is active, after the cellular WAN connection is up, the router's DHCP server will offer the connection's IP address to one LAN client. All incoming or outgoing traffic will be routed without NAT. Regardless of the WAN connection's state, the router always binds to the LAN IP address (Default: 192.168.50.1). So when the cellular WAN is connected, the LAN client could access the router's web admin by manually configuring its IP address to the same subnet as the router's LAN IP address (e.g. 192.168.50.10). Note: when this option is first enabled, the LAN client may not be able to refresh its IP address to the cellular WAN IP address in a timely fashion. The LAN client may have to manually renew its IP address from DHCP server. After this option is enabled, the DHCP lease time will be 2 minutes. I.e. the LAN client could refresh its IP address and access the network at most one minute after the cellular WAN connection goes up. |
Standby State | This option allows you to choose whether to remain connected or disconnected when this WAN connection is no longer in the highest priority and has entered the standby state. When Remain connected is chosen, bringing up this WAN connection to active makes it immediately available for use. |
Idle Disconnect | If this is checked, the connection will disconnect when idle after the configured Time value. |
Reply to ICMP PING | If the checkbox is unticked, this option is disabled and the system will not reply to any ICMP ping echo requests to the WAN IP addresses of this WAN connection. Default: ticked (Yes) |
Upload Bandwidth | Bandwidth control-related settings can be accessed by clicking the This field refers to the maximum upload speed. This value is referenced when the default weight is chosen for outbound traffic and traffic prioritization. A correct value can result in effective traffic prioritization and efficient use of upstream bandwidth. |
Download Bandwidth | This field refers to the maximum download speed. The default weight control for outbound traffic will be adjusted according to this value. |
Enforced Bandwidth Limit | When enabled, actual WAN traffic is limited based on the upload and download values configured above. Note: These bandwidth values are always enforced when one or more Application Queues are in use, regardless of whether this option is enabled. |
 button to enable IP Forwarding.
 icon in the top-right corner.
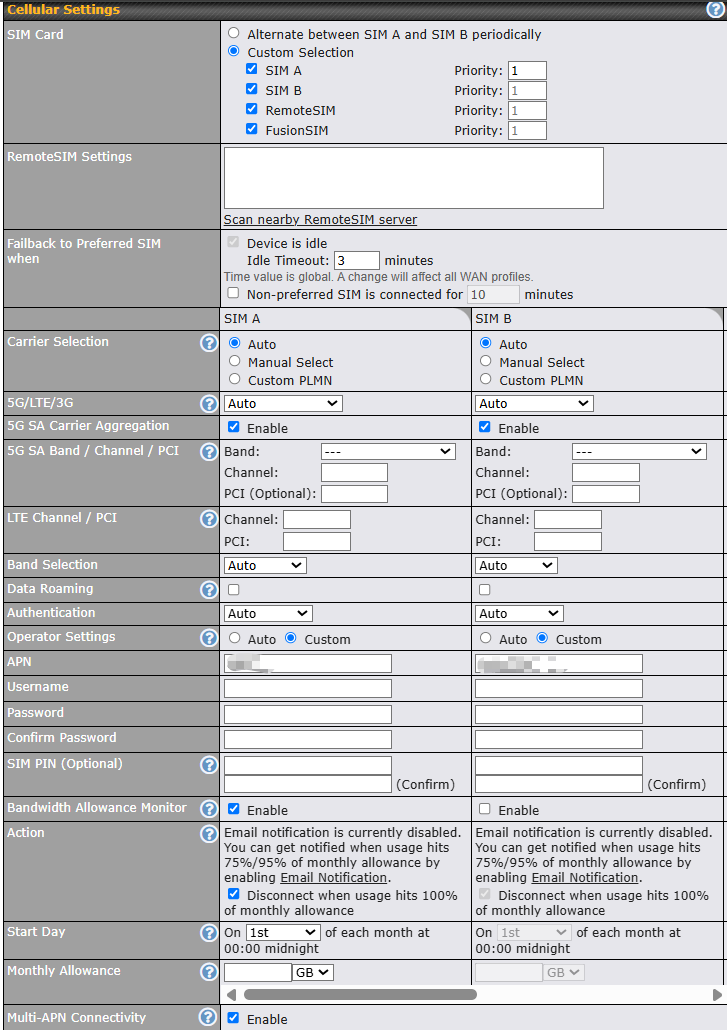
Cellular Settings | |
SIM Card | If “Alternate between SIM A and SIM B periodically” is selected, the SIM card will be switching according to the schedule time in the SIM Cards Alternate. If “Custom Selection” is selected, you can designate the priority of the SIM cards (SIM A/ SIM B/ Remote SIM/ SpeedFusion Connect) and connect to. For routers that support the SIM Injector, you may select the “Remote SIM” to provision a SIM from a SIM Injector. Further details on the SIM Injector are available here: https://www.peplink.com/products/sim-injector/. |
Remote SIM Settings | If “Use Remote SIM Only” is selected in the SIM card section, the Remote SIM Settings will be shown.
You may need to enable the remote SIM Host settings in the Remote SIM management, see the Appendix for more details on FusionSIM. After that, click on “Scan nearby remote SIM server” to show the serial number(s) of the connected SIM Injector(s). If you want to select a specific SIM, in the Cellular Settings, type “:” and then the number of the SIM slot, e.g. 1111-2222-3333:7. |
Fallback to Prefered SIM when | This option allows you to switch to another SIM card when the Cellular WAN reached fallback timeout. |
SIM Cards Alternate | If “Alternate between SIM A and SIM B periodically” is selected in the SIM Card section, the SIM Cards Alternate will be shown:
You may set the schedule time for switching between SIM A only and SIM B only. |
5G/LTE/3G | This drop-down menu allows you to restrict cellular to a particular band. Click the For 5G SA Carrier Aggregation supported models, refer to Firmware 8.6.0 – Release Notes, #36464. |
Optimal Network Discovery | Cellular WANs by default will only handover from 3G to LTE network when there is no active data traffic, enabling this option will make it run the handover procedures after fallback to 3G for a defined effective period, even though this may interrupt the connectivity for a short while. |
Band Selection | When set to Auto, band selection allows for automatically connecting to available, supported bands (frequencies) . |
Data Roaming | This checkbox enables data roaming on this particular SIM card. When data roaming is enabled this option allows you to select in which countries the SIM has a data connection. The option is configured by using MMC (country) codes. Please check your service provider’s data roaming policy before proceeding. |
Authentication | Choose from PAP Only or CHAP Only to use those authentication methods exclusively. Select Auto to automatically choose an authentication method. |
Operator Settings | This setting allows you to configure the APN settings for your connection. If Auto is selected, the mobile operator should be detected automatically. The connected device will be configured, and the connection will be established automatically. If there is any difficulty establishing the connection, you may select Custom to enter your carrier’s APN, Login, Password, and Dial Number settings manually. The correct values can be obtained from your carrier. The default and recommended setting is Auto. Clicking the |
APN / Login / Password / SIM PIN | When Auto is selected, the information in these fields will be filled automatically. Select Custom to customize these parameters. The parameter values are determined by and can be obtained from the ISP. |
Bandwidth Allowance Monitor | Check the box Enable to enable bandwidth usage monitoring on this WAN connection for each billing cycle. When this option is not enabled, bandwidth usage of each month is still being tracked but no action will be taken. |
Action | If email notification is enabled, you will be notified by email when usage hits 75% and 95% of the monthly allowance. If Disconnect when usage hits 100% of monthly allowance is checked, this WAN connection will be disconnected automatically when the usage hits the monthly allowance. It will not resume connection unless this option has been turned off or the usage has been reset when a new billing cycle starts. |
Start Day | This option allows you to define which day of the month each billing cycle begins. |
Monthly Allowance | This field is for defining the maximum bandwidth usage allowed for the WAN connection each month. |
Multi-APN Connectivity | Allows this connection to establish multiple simultaneous data sessions using different APNs. Each APN can be routed separately. For supported models, refer to Firmware 8.6.0 – Release Notes, #25292. |




Signal Threshold Settings

If signal threshold is defined, this connection will be treated as down when a weaker than threshold signal is determined.
The following values are used by the threshold scale:

To define the threshold manually using specific signal strength values, please click on the question mark and the following field will be visible.

Note: Signal strength value customization is only available on supported models. (Refer to Release Note - 8.6.0 RC4 #30572.)
10.4. Wi-Fi WAN

To access/configure the Cellular WAN settings, click Network > Wi-Fi WAN Connetion Name.
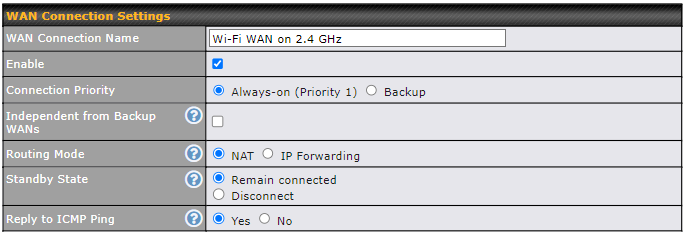
WAN Connection Settings | |
WAN Connection Name | Enter a name to represent this Wi-Fi WAN connection. |
Enable | Click the checkbox to toggle the on and off state of this connection. |
Connection Priority | This option allows you to configure the WAN connection whether for normal daily usage or as a backup connection only. If Always-on is chosen, the WAN connection will be kept on continuously, regardless of the priority of other WAN connections. If Backup is chosen, the WAN connection will depend on other WAN connections. It will not be used when one or more higher priority dependent WAN connections are connected. |
Independent from Backup WANs | If this is checked, the connection will be working independent from other Backup WAN connections. Those in Backup Priority will ignore the status of this WAN connection, and will be used when none of the other higher priority connections are available. |
Routing Mode | This option allows you to select the routing method to be used in routing IP frames via the WAN connection. The mode can be either NAT (Network Address Translation) or IP Forwarding. In the case if you need to choose IP Forwarding for your scenario. Click the |
Standby State | This setting specifies the state of the WAN connection while in standby. The available options are Remain Connected and Disconnect. |
Reply to ICMP PING | If this setting is disabled, the WAN connection will not respond to ICMP ping requests. By default, this setting is enabled. |
 button to enable IP Forwarding.
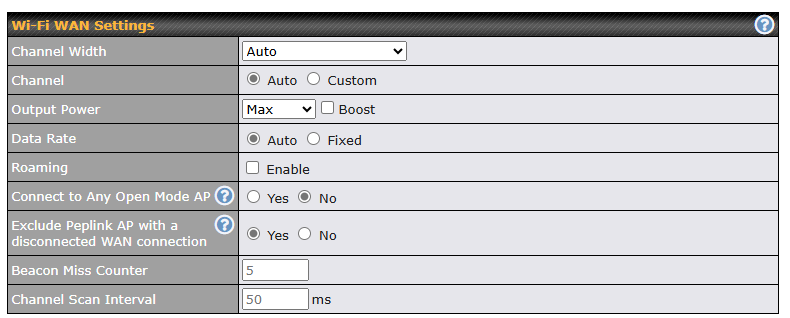
Wi-Fi WAN Settings | |
Channel Width | Select the channel width for this Wi-Fi WAN. 20MHz will have greater support for older devices using 2.4GHz, while 40MHz is appropriate for networks with newer devices that connect using 5GHz. |
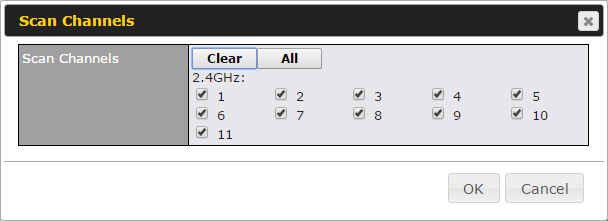
Channel | Determine whether the channel will be automatically selected. If you select custom, the following table will appear:
|
Output Power | If you are setting up a network with many Wi-Fi devices in close proximity, then you can configure the output power here. Click the “boost” button for additional power. However, with that option ticked, output power may exceed local regulatory limits. |
Data Rate | Selecting Auto will enable the router to automatically determine the best data rate, while manually selecting a rate will force devices to connect using the fixed rate. |
Roaming | Checking this box will enable Wi-Fi roaming. Click the |
Connect to Any Open Mode AP | This option is to specify whether the Wi-Fi WAN will connect to any open mode access points it finds. |
Exclude Peplink AP with a disconnected WAN connection | If Yes is selected, it will perform WAN Connection Status checking on Peplink access points detected. Those access points with disconnected WAN connection will be ignored. |
Beacon Miss Counter | This sets the threshold for the number of missed beacons. Click the |
Channel Scan Interval | Configure Channel Scan Interval in ms. Click the |
 icon for additional options.
 icon to enable this option.
 icon to enable this option.
10.4.1. Creating Wi-Fi Connection Profiles
You can manually create a profile to connect to a Wi-Fi connection. This is useful for creating a profile for connecting to hidden-SSID access points. Click Network > Wi-Fi WAN > Create Profile… to get started.
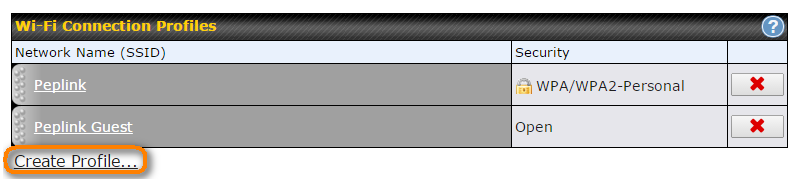
This will open a window similar to the one shown below.
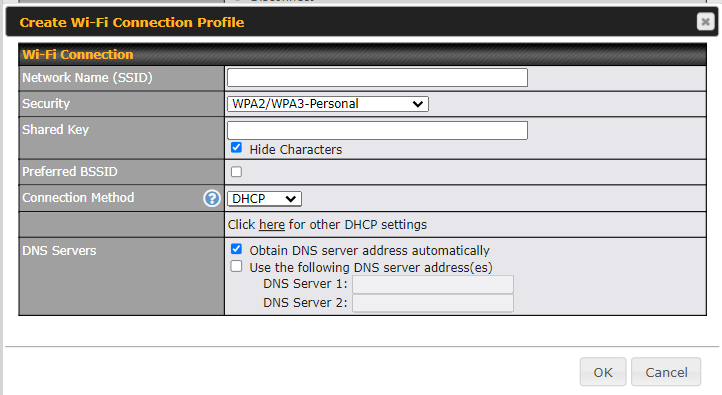
Wi-Fi Connection Profile Settings | |
Network Name (SSID) | Enter a name to represent this Wi-Fi connection. |
Security | This option allows you to select which security policy is used for this wireless network. Available options:
|
Shared Key | Enter the password for the wireless network. |
Preffered BSSID | Configure the BSSID. The BSSID is the MAC address of the wireless access point (WAP). |
Connected Method | Choose DHCP or Static IP for the Wi-Fi WAN connection method. |
DNS Servers | Configure the DNS servers that this WAN connection should use. |
10.5. OpenVPN WAN
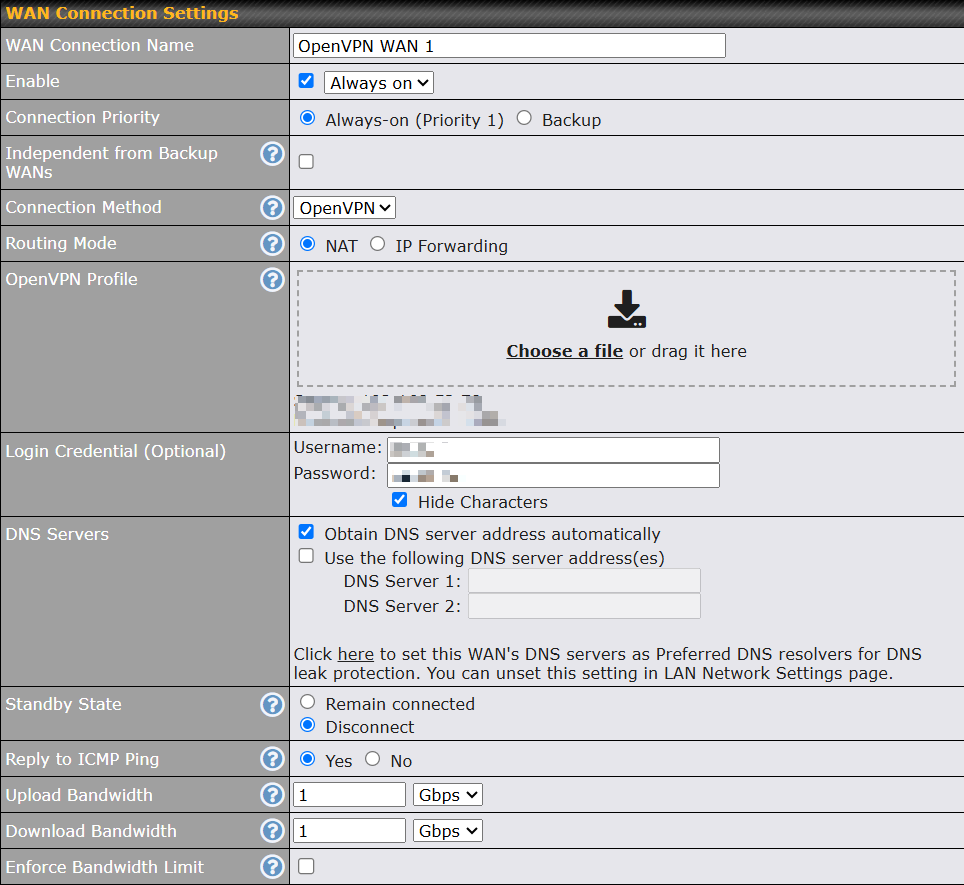
OpenVPN WAN is a standalone “WAN” which will appear in both your router and your InControl2 dashboards. You will be able to configure the priority of the physical WANs to connect to the OpenVPN server (similar to IPsec’s “WAN Connection Priority”). You can also customize OpenVPN’s outbound policy, firewall, etc.
* OpenVPN WAN license is required. Click on the below link for more details.
https://forum.peplink.com/t/introducing-the-openvpn-wan-license-partner-discussion/30291
WAN Connection Settings | |
WAN Connection Name | Enter a name to represent this WAN connection. |
Enable | This setting enables the WAN connection. If schedules have been defined, you will be able to select a schedule to apply to the connection. |
Connection Method | OpenVPN. |
Routing Mode | This field shows that NAT (network address translation) will be applied to the traffic routed over this WAN connection. IP Forwarding is available when you click the link in the help |
OpenVPN Profile | Upload the OpenVPN profile (.ovpn) from the OpenVPN server. |
Login Credential (Optional) | This field is optional to key in the respective username and password to connect to OpenVPN server if needed. |
DNS Servers | Each ISP may provide a set of DNS servers for DNS lookups. This setting specifies the DNS (Domain Name System) servers to be used when a DNS lookup is routed through this connection. Selecting Obtain DNS server address automatically results in the DNS servers assigned by the WAN DHCP server being used for outbound DNS lookups over the connection. (The DNS servers are obtained along with the WAN IP address assigned by the DHCP server.) When the following DNS server address(es) is selected, you may enter custom DNS server addresses for this WAN connection into the DNS server 1 and DNS server 2 fields. |
Connection Priority | This option allows you to configure the WAN connection whether for normal daily usage or as a backup connection only. If Always-on is chosen, the WAN connection will be kept on continuously, regardless of the priority of other WAN connections. If Backup is chosen, the WAN connection will depend on other WAN connections. It will not be used when one or more higher priority dependent WAN connections are connected. |
Standby State | This option allows you to choose whether to remain connected when this WAN connection is no longer in the highest priority and has entered the standby state. When Remain connected is chosen, upon bringing up this WAN connection to active, it will be immediately available for use. If this WAN connection is charged by connection time, you may want to set this option to Disconnect so that connection will be made only when needed. SpeedFusion VPN may use connected standby WAN for failover if link failure is detected on the higher priority WAN, you can set this option to Disconnect to avoid data passing through. |
Reply to ICMP PING | If the checkbox is unticked, this option is disabled and the system will not reply to any ICMP ping echo requests to the WAN IP addresses of this WAN connection. Default: ticked (Yes) |
Upload Bandwidth | This field refers to the maximum upload speed. This value is referenced when default weight is chosen for outbound traffic and traffic prioritization. A correct value can result in effective traffic prioritization and efficient use of upstream bandwidth. |
Download Bandwidth | This field refers to the maximum download speed. Default weight control for outbound traffic will be adjusted according to this value. |
Enforced Bandwidth Limit | When enabled, actual WAN traffic is limited based on the upload and download values configured above. Note: These bandwidth values are always enforced when one or more Application Queues are in use, regardless of whether this option is enabled. |

Physical Interface Settings (OpenVPN)
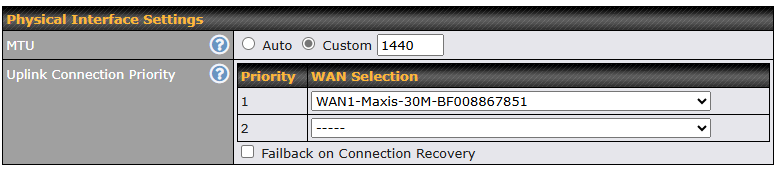
MTU | This field is for specifying the Maximum Transmission Unit value of the WAN connection. An excessive MTU value can cause file downloads to stall shortly after connected. You may consult your ISP for the connection’s MTU value. Default value is 1440. |
Uplink Connection Priority | Specify the order of WAN connections to be used to establish this OpenVPN connection. The healthy WAN with highest priority will be used. When Failback on Connection Recovery is enabled, once a higher priority WAN is recovered, OpenVPN connection will be disconnected and use that WAN to establish the connection again. |
10.6. Physical Interface Settings (Common)
The remaining WAN-related settings are common to the WAN connection:
Physical Interface Settings | |
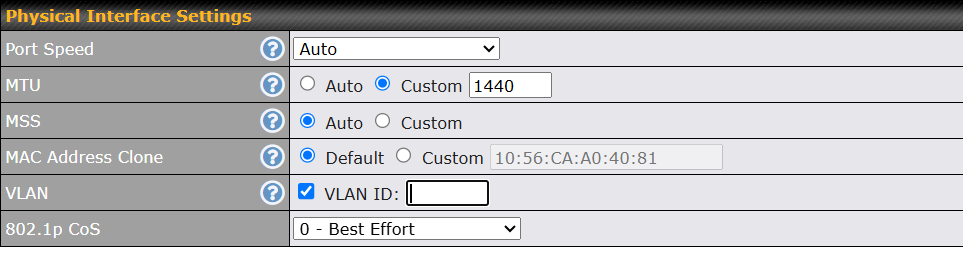
Speed | This is the port speed of the WAN connection. It should be set to the same speed as the connected device in case of any port negotiation problems. When a static speed is set, you may choose whether to advertise its speed to the peer device or not. Advertise Speed is selected by default. You can choose not to advertise the port speed if the port has difficulty in negotiating with the peer device. Default: Auto |
MTU | This field is for specifying the Maximum Transmission Unit value of the WAN connection. An excessive MTU value can cause file downloads to stall shortly after connected. You may consult your ISP for the connection's MTU value. Default value is 1440. |
MSS | This field is for specifying the Maximum Segment Size of the WAN connection. When Auto is selected, MSS will depend on the MTU value. When Custom is selected, you may enter a value for MSS. This value will be announced to remote TCP servers for maximum data that it can receive during the establishment of TCP connections. Some Internet servers are unable to listen to MTU setting if ICMP is filtered by firewall between the connections. Normally, MSS equals MTU minus 40. You are recommended to reduce the MSS only if changing of the MTU value cannot effectively inform some remote servers to size down data size. Default: Auto |
MAC Address Clone | Some service providers (e.g. cable network) identify the client's MAC address and require client to always use the same MAC address to connect to the network. If it is the case, you may change the WAN interface's MAC address to the client PC's one by entering the PC's MAC address to this field. If you are not sure, click the Default button to restore to the default value. |
VLAN | Check the box to assign a VLAN to the interface. |
802.1p CoS | Allows users to assign a priority (0-7) to the traffic. 0 - Best Effort 1 - Background 2 - Excellent Effort 3 - Critical Applications 4 - Video 5 - Voice 6 - Internetwork Control 7 - Network Control |
10.7. WAN Health Check
To ensure traffic is routed to healthy WAN connections only, the Peplink router can periodically check the health of each WAN connection. The health check settings for each WAN connection can be independently configured via Network > WAN Connection Name.
Health Check Settings | |
Method | This setting specifies the health check method for the WAN connection. This value can be configured as Disabled, PING, DNS Lookup, or HTTP. The default method is DNS Lookup. For mobile Internet connections, the value of Method can be configured as Disabled or SmartCheck. |
Health Check Disabled | |
When Disabled is chosen in the Method field, the WAN connection will always be considered as up. The connection will NOT be treated as down in the event of IP routing errors. | |
Health Check Method: PING | |
ICMP ping packets will be issued to test the connectivity with a configurable target IP address or hostname. A WAN connection is considered as up if ping responses are received from either one or both of the ping hosts. | |
PING Hosts | This setting specifies IP addresses or hostnames with which connectivity is to be tested via ICMP ping. If Use first two DNS servers as Ping Hosts is checked, the target ping host will be the first DNS server for the corresponding WAN connection. Reliable ping hosts with a high uptime should be considered. By default, the first two DNS servers of the WAN connection are used as the ping hosts. |
Health Check Method: DNS Lookup | |
DNS lookups will be issued to test connectivity with target DNS servers. The connection will be treated as up if DNS responses are received from one or both of the servers, regardless of whether the result was positive or negative. | |
Health Check DNS Servers | This field allows you to specify two DNS hosts’ IP addresses with which connectivity is to be tested via DNS lookup. If Use first two DNS servers as Health Check DNS Servers is checked, the first two DNS servers will be the DNS lookup targets for checking a connection's health. If the box is not checked, Host 1 must be filled, while a value for Host 2 is optional. If Include public DNS servers is selected and no response is received from all specified DNS servers, DNS lookups will also be issued to some public DNS servers. A WAN connection will be treated as down only if there is also no response received from the public DNS servers. Connections will be considered as up if DNS responses are received from any one of the health check DNS servers, regardless of a positive or negative result. By default, the first two DNS servers of the WAN connection are used as the health check DNS servers. |
Health Check Method: HTTP | |
HTTP connections will be issued to test connectivity with configurable URLs and strings to match.
| |
URL1 | WAN Settings>WAN Edit>Health Check Settings>URL1 HTTP request will be sent according to the specified URL. Health check result is determined based on the HTTP response status code. Status codes 2xx, 301 and 302 are classified as success. If Matching String is provided, health check will be determined as success only when the HTTP response content contains the specified string. |
URL 2 | WAN Settings>WAN Edit>Health Check Settings>URL2 If URL2 is also provided, a health check will pass if either one of the tests passes. |





Other Health Check Settings | |
Timeout | This setting specifies the timeout in seconds for ping/DNS lookup requests. The default timeout is 5 seconds. |
Health Check Interval | This setting specifies the time interval in seconds between ping or DNS lookup requests. The default health check interval is 5 seconds. |
Health Check Retries | This setting specifies the number of consecutive ping/DNS lookup timeouts after which the Peplink router will treat the corresponding WAN connection as down. Default health retries is set to 3. Using the default Health Retries setting of 3, the corresponding WAN connection will be treated as down after three consecutive timeouts. |
Recovery Retries | This setting specifies the number of consecutive successful ping/DNS lookup responses that must be received before the Peplink router treats a previously down WAN connection as up again. By default, Recover Retries is set to 3. Using the default setting, a WAN connection that is treated as down will be considered as up again upon receiving three consecutive successful ping/DNS lookup responses. |
Automatic Public DNS Server Check on DNS Test Failure |
When the health check method is set to DNS Lookup and health checks fail, the Peplink router will automatically perform DNS lookups on public DNS servers. If the tests are successful, the WAN may not be down, but rather the target DNS server malfunctioned. You will see the following warning message on the main page:
|

10.8. Bandwidth Allowance Monitoring
Bandwidth Allowance Monitor | |
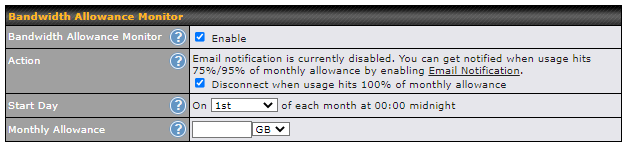
Action | If Email Notification is enabled, you will be notified by email when usage hits 75% and 95% of the monthly allowance. If Disconnect when usage hits 100% of monthly allowance is checked, this WAN connection will be disconnected automatically when the usage hits the monthly allowance. It will not resume connection unless this option has been turned off or the usage has been reset when a new billing cycle starts. |
Start Day | This option allows you to define which day of the month each billing cycle begins. |
Monthly Allowance | This field is for defining the maximum bandwidth usage allowed for the WAN connection each month. |
Disclaimer |
Due to different network protocol overheads and conversions, the amount of data reported by this Peplink device is not representative of actual billable data usage as metered by your network provider. Peplink disclaims any obligation or responsibility for any events arising from the use of the numbers shown here. |
10.9. Additional Public IP Address
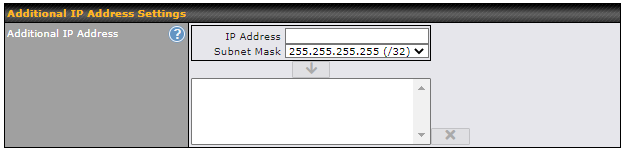
Additional Public IP Settings | |
IP Address List | IP Address List represents the list of fixed Internet IP addresses assigned by the ISP in the event that more than one Internet IP address is assigned to this WAN connection. Enter the fixed Internet IP addresses and the corresponding subnet mask, and then click the Down Arrow button to populate IP address entries to the IP Address List. |
10.10. Dynamic DNS Settings
Peplink routers are capable of registering the domain name relationships to dynamic DNS service providers. Through registration with dynamic DNS service provider(s), the default public Internet IP address of each WAN connection can be associated with a host name. With dynamic DNS service enabled for a WAN connection, you can connect to your WAN's IP address from the external, even if its IP address is dynamic. You must register for an account from the listed dynamic DNS service providers before enabling this option.
If the WAN connection's IP address is a reserved private IP address (i.e., behind a NAT router), the public IP of each WAN will be automatically reported to the DNS service provider.
Either upon a change in IP addresses or every 23 days without link reconnection, the Peplink router will connect to the dynamic DNS service provider to perform an IP address update within the provider’s records.
The settings for dynamic DNS service provider(s) and the association of hostname(s) are configured via Network > WAN > Details > Dynamic DNS Service Provider/Dynamic DNS Settings.
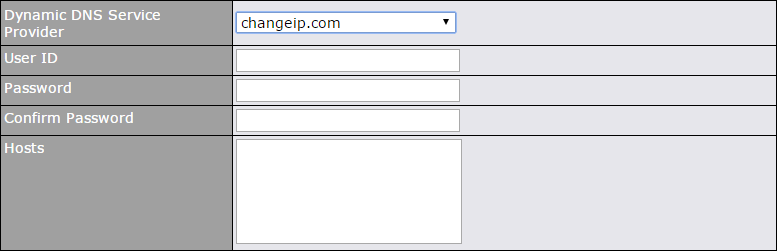
Dynamic DNS Settings | |
Dynamic DNS | This setting specifies the dynamic DNS service provider to be used for the WAN based on supported dynamic DNS service providers:
Support custom Dynamic DNS servers by entering its URL. Works with any service compatible with DynDNS API. Select Disabled to disable this feature. |
User ID/ Username / Email | This setting specifies the registered user name for the dynamic DNS service. |
Password | This setting specifies the password for the dynamic DNS service. |
Hosts | This field allows you to specify a list of host names or domains to be associated with the public Internet IP address of the WAN connection. If you need to enter more than one host, use a carriage return to separate them. |
Important Note |
In order to use dynamic DNS services, appropriate host name registration(s) and a valid account with a supported dynamic DNS service provider are required. A dynamic DNS update is performed whenever a WAN’s IP address changes (e.g., the IP is changed after a DHCP IP refresh, reconnection, etc.). Due to dynamic DNS service providers’ policy, a dynamic DNS host will automatically expire if the host record has not been updated for a long time. Therefore the Peplink router performs an update every 23 days, even if a WAN’s IP address has not changed. |