
24. AP
24.1. AP Controller
The AP controller acts as a centralized controller of Peplink Access Points.
With this feature, users can customize and manage up to 1500 Access Points from a single Peplink router interface.
To configure, navigate to the AP tab. and the following screen appears.

AP Controller | |
AP Management | The AP controller for managing Peplink APs can be enabled by checking this box. When this option is enabled, the AP controller will wait for management connections originating from APs over the LAN on TCP and UDP port 11753. It will also wait for captive portal connections on TCP port 443. An extended DHCP option, CAPWAP Access Controller addresses (field 138), will be added to the DHCP server. A local DNS record, AP Controller, will be added to the local DNS proxy. |
Sync Method |
|
Permitted AP | Access points to manage can be specified here. If Any is selected, the AP controller will manage any AP that reports to it. If Approved List is selected, only APs with serial numbers listed in the provided text box will be managed. |
24.2. Wireless SSID

Current SSID information appears in the SSID section. To edit an existing SSID, click its name in the list. To add a new SSID, click Add. Note that the following settings vary by model.
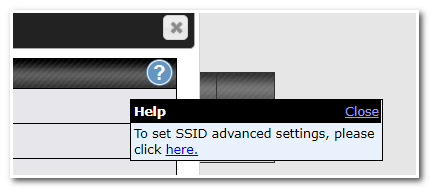
The below settings shows a new SSID window with Advanced Settings enabled (these are available by selecting the question mark in the top right corner).
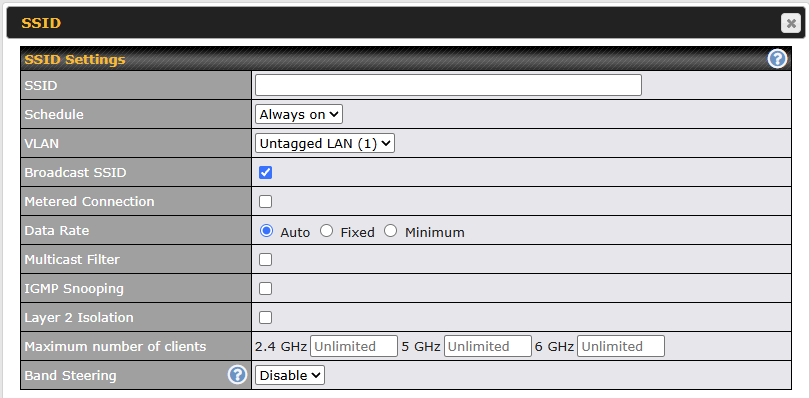
The Maximum number of clients > 6 GHz option is only available for models that support tri-band external APs and integrated APs. (Refer to Release Note - 8.6.0 RC4 #25032)
SSID Settings | |
SSID | This setting specifies the SSID of the virtual AP to be scanned by Wi-Fi clients. |
Schedule | Click the drop-down menu to apply a time schedule to this interface. |
VLAN | This setting specifies the VLAN ID to be tagged on all outgoing packets generated from this wireless network (i.e., packets that travel from the Wi-Fi segment through the Peplink AP One unit to the Ethernet segment via the LAN port). The default value of this setting is 0, which means VLAN tagging is disabled (instead of tagged with zero). |
Broadcast SSID | This setting specifies whether or not Wi-Fi clients can scan the SSID of this wireless network. Broadcast SSID is enabled by default. |
Metered Connection | Enable/disable a metered connection for the SSID. Connected client devices will treat the connection as metered. |
Data Rate | Select Auto to allow the Peplink router to set the data rate automatically, or select Fixed or Minimum and choose a rate from the displayed drop-down menu. |
Multicast Filter | This setting enables the filtering of multicast network traffic to the wireless SSID. |
IGMP Snooping | To allow the Peplink router to listen to internet group management protocol (IGMP) network traffic, select this option. |
Layer 2 Isolation | Layer 2 refers to the second layer in the ISO Open System Interconnect model. When this option is enabled, clients on the same VLAN, SSID, or subnet are isolated to that VLAN, SSID, or subnet, which can enhance security. Traffic is passed to the upper communication layer(s). By default, the setting is disabled. |
Maximum Number of Clients | Indicate the maximum number of clients that should be able to connect to each frequency. |
Band Steering A | To reduce 2.4 GHz band overcrowding, an AP with band steering steers 5 GHz-capable clients to the 5 GHz frequency. Choose between: Force - Clients capable of 5 GHz operation are only offered the 5 GHz frequency. Prefer - Clients capable of 5 GHz operation are encouraged to associate with the 5 GHz frequency. If clients insist on attempting to connect via the 2.4 GHz frequency, the 2.4 GHz frequency will be offered. Disable - Default |
A - Advanced feature. Click the  button on the top right-hand corner to activate.

Security Settings | |
Security Policy | This setting configures the wireless authentication and encryption methods. Available options are:
To allow any Wi-Fi client to access your AP without authentication, select Open (No Encryption). Details of each available authentication method follow. |

Enhanced Open (OWE) | |
Transition Mode | With the option enabled, legacy clients will be able to connect in Open mode. With the option disabled, legacy clients will not be able to connect. OWE-supported clients will always connect in OWE mode. |
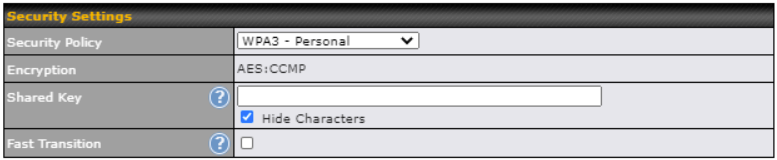
WPA3 – Personal | |
Shared Key | Enter a passphrase of between 8 and 63 alphanumeric characters to create a passphrase used for data encryption and authentication. Click Hide / Show Characters to toggle visibility. |
Fast Transition | Fast Transition [802.11r] When this option is ticked, the transition process for a mobile client is improved as it moves between access points. |

WPA3 – Enterprise | |
802.1X Version | Choose v1 or v2 of the 802.1x EAPOL. When v1 is selected, both v1 and v2 clients can associate with the access point. When v2 is selected, only v2 clients can associate with the access point. Most modern wireless clients support v2. For stations that do not support v2, select v1. The default is v2. |
Fast Transition | Fast Transition [802.11r] When this option is ticked, the transition process of a mobile client is improved as it moves between access points. |
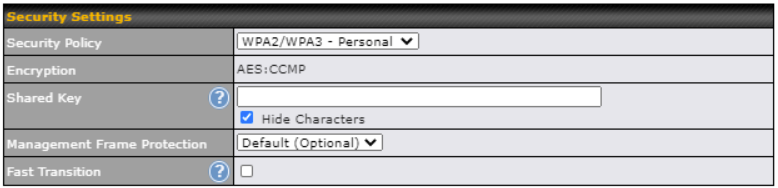
WPA2/WPA3 – Personal | |
Shared Key | Enter a passphrase of between 8 and 63 alphanumeric characters to create a passphrase used for data encryption and authentication. Click Hide / Show Characters to toggle visibility. |
Management Frame Protection | This feature protects stations against forged management frames spoofed from other devices. Frames that are protected include Disassociation, Deauthentication, and QoS Action. |
Fast Transition | Fast Transition [802.11r] When this option is ticked, the transition process of a mobile client is improved as it moves between access points. |
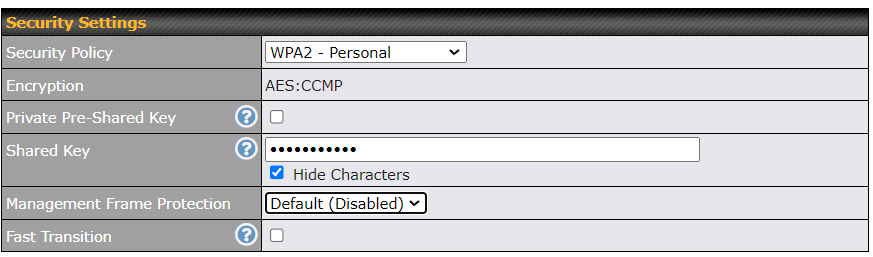
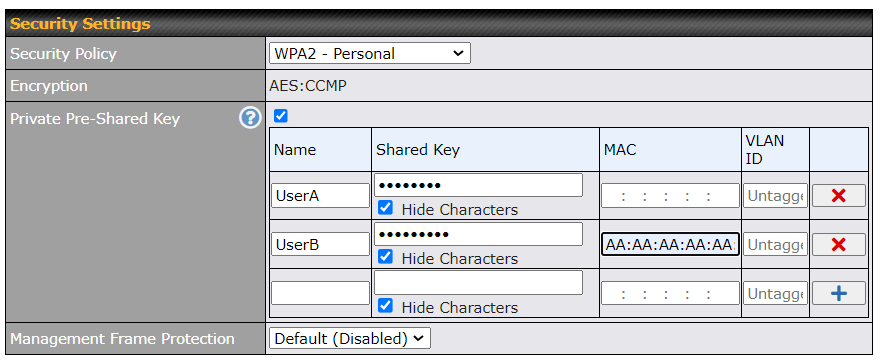
WPA2 – Personal | |||||||||
Private Shared Key | Enable the Private Pre-Shared Key (PPSK) option to set unique pre-shared keys for individual users or groups on the same SSID. Please provide the following information for each user or group:
*Each “Shared Key + MAC” combination must be unique in a different profile. | ||||||||
Shared Key | Enter a passphrase of between 8 and 63 alphanumeric characters to create a passphrase used for data encryption and authentication. Click Hide / Show Characters to toggle visibility. | ||||||||
Management Frame Protection | This feature protects stations against forged management frames spoofed from other devices. Frames that are protected include Disassociation, Deauthentication, and QoS Action. | ||||||||
Fast Transition | Fast Transition [802.11r] When this option is ticked, the transition process of a mobile client is improved as it moves between access points. | ||||||||
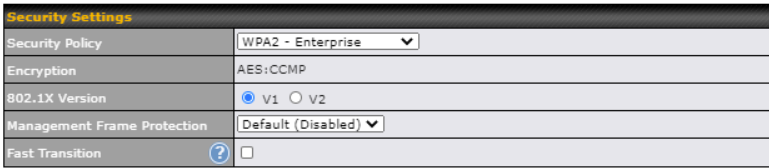
WPA2 – Enterprise | |
802.1X Version | Choose v1 or v2 of the 802.1x EAPOL. When v1 is selected, both v1 and v2 clients can associate with the access point. When v2 is selected, only v2 clients can associate with the access point. Most modern wireless clients support v2. For stations that do not support v2, select v1. The default is v2. |
Management Frame Protection | This feature protects stations against forged management frames spoofed from other devices. Frames that are protected include Disassociation, Deauthentication, and QoS Action. |
Fast Transition | Fast Transition [802.11r] When this option is ticked, the transition process of a mobile client is improved as it moves between access points. |
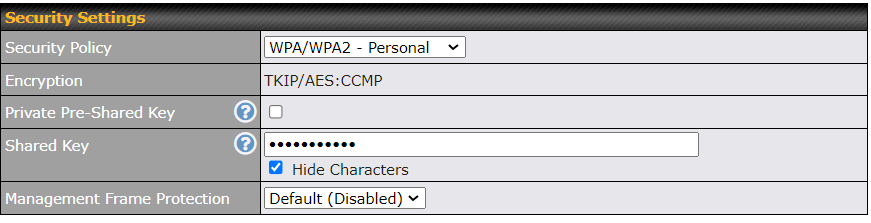
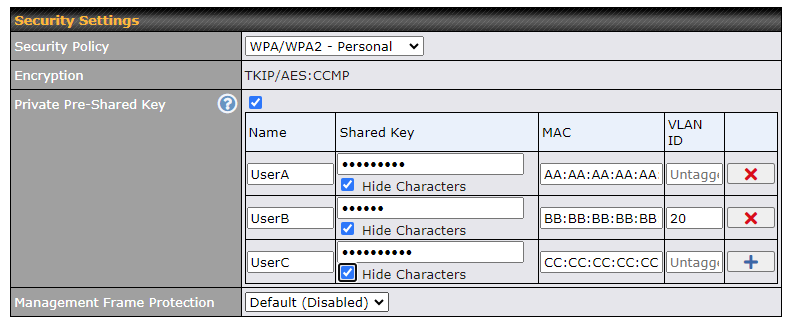
WPA/WPA2 – Personal | |||||||||
Private Shared Key | Enable the Private Pre-Shared Key (PPSK) option to set unique pre-shared keys for individual users or groups on the same SSID. Please provide the following information for each user or group:
*Each “Shared Key + MAC” combination must be unique in a different profile. | ||||||||
Shared Key | Enter a passphrase of between 8 and 63 alphanumeric characters to create a passphrase used for data encryption and authentication. Click Hide / Show Characters to toggle visibility. | ||||||||
Management Frame Protection | This feature protects stations against forged management frames spoofed from other devices. Frames that are protected include Disassociation, Deauthentication and QoS Action. | ||||||||

WPA/WPA2 – Enterprise | |
802.1X Version | Choose v1 or v2 of the 802.1x EAPOL. When v1 is selected, both v1 and v2 clients can associate with the access point. When v2 is selected, only v2 clients can associate with the access point. Most modern wireless clients support v2. For stations that do not support v2, select v1. The default is v2. |
Management Frame Protection | This feature protects stations against forged management frames spoofed from other devices. Frames that are protected include Disassociation, Deauthentication and QoS Action. |

Access Control | |
Restricted Mode | The settings allow the administrator to control access using MAC address filtering. Available options are None, Deny all except listed, Accept all except listed and Radius MAC Authentication. |
MAC Address List | Connections coming from the MAC addresses in this list will be either denied or accepted based on the option selected in the previous field. If more than one MAC address needs to be entered, you can use a carriage return to separate them. |
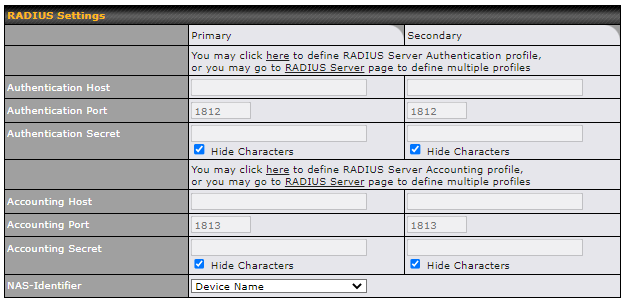
RADIUS Settings | |
Authentication Host | This field is for specifying the IP address of the primary RADIUS server for Authentication and, if applicable, the secondary RADIUS server. |
Authentication Port | In the field, enter the UDP authentication port(s) used by your RADIUS server(s) or click the Default is 1812. |
Authentication Secret | This setting is for entering the RADIUS shared secret for the primary server and, if applicable, the secondary RADIUS server. |
Accounting Host | This field is for specifying the IP address of the primary RADIUS server for Accounting and, if applicable, the secondary RADIUS server. |
Accounting Port | In the field, enter the UDP accounting port(s) used by your RADIUS server(s) or click the Default is 1813. |
Accounting Secret | This setting is for entering the RADIUS shared secret for the primary server and, if applicable, the secondary RADIUS server. |
NAS-Identifier | Choose between Device Name, LAN MAC address, Device Serial Number and Custom Value. |
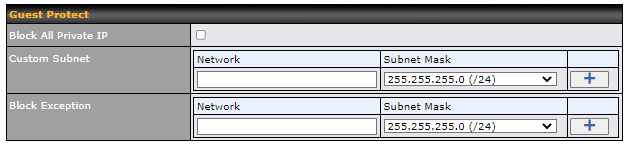
Guest Protect | |
Block All Private IP | Check this box to deny all connection attempts by private IP addresses. |
Custom Subnet | To create a custom subnet for guest access, enter the IP address and choose a subnet mask from the drop-down menu. |
Block Exception | To block access from a particular subnet, enter the IP address and choose a subnet mask from the drop-down menu. |

Firewall Settings | |
Firewall Mode | The settings allow administrators to control access to the SSID based on Firewall Rules. Available options are Disable, Lockdown - Block all except... and Flexible -Allow all except… |
Firewall Exceptions | Create Firewall Rules based on Port, IP Network, MAC address or Domain Name. |
24.3. Wireless Mesh

Wireless Mesh Support is available on devices running 802.11ac (Wi-Fi 5) and above. Along with the AP Controller, mesh network extensions can be established, which can expand network coverage. Note that the Wireless Mesh settings need to match the Mesh ID and Shared Key of the other devices on the same selected frequency band.
To create a new Wireless Mesh profile, go to AP > Wireless Mesh, and click Add.
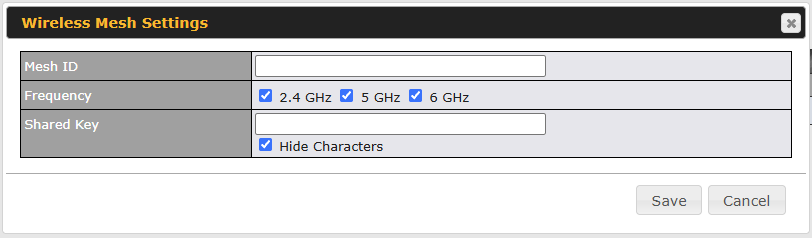
Wireless Mesh Settings | |
Mesh ID | Enter a name to represent the Mesh profile. |
Frequency | Select the 2.4 GHz, 5 GHz, and/or 6 GHz frequency to be used. Note: The 6 GHz checkbox is only available on supported models. (Refer to Release Note - 8.6.0 RC4 #25032) |
Shared Key | Enter the shared key in the text field. Please note that it needs to match the shared keys of the other APs in the Wireless Mesh settings. Click Hide / Show Characters to toggle visibility. |
24.4. Settings
To configure the AP settings, navigate to AP > Settings:
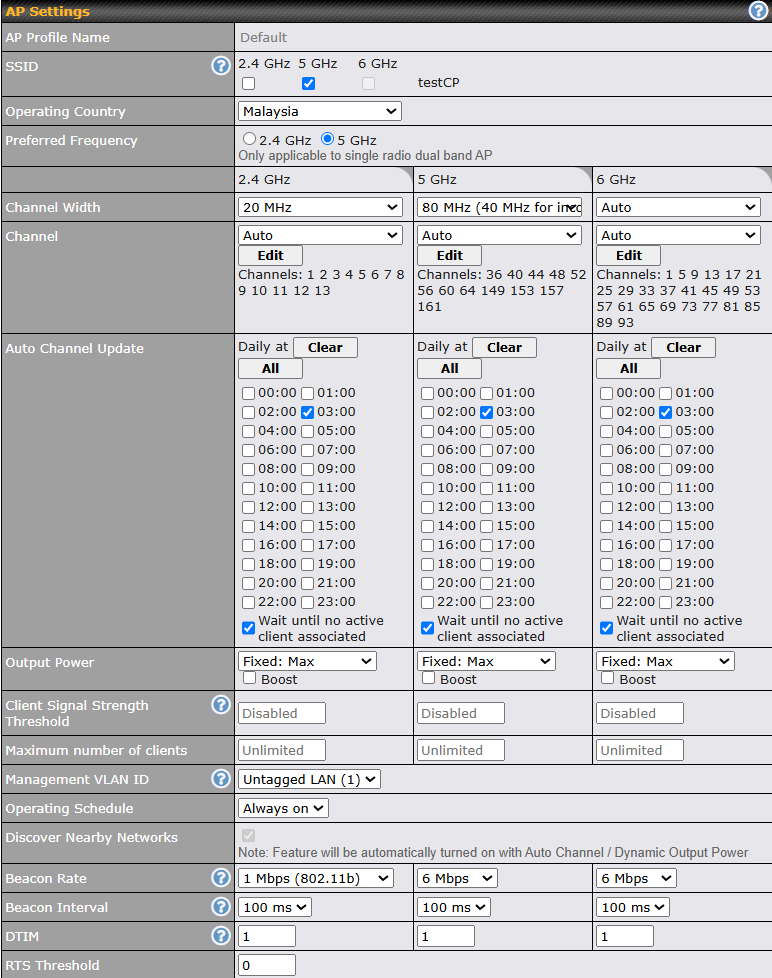
AP Settings | |
SSID | These buttons specify which wireless networks will use this AP profile. You can also select the frequencies at which each network will transmit. Please note that the Peplink MAX does not detect whether the AP is capable of transmitting at both frequencies. Instructions to transmit at unsupported frequencies will be ignored by the AP. |
Operating Country | This drop-down menu specifies the national / regional regulations which the AP should follow.
Note: Users are required to choose an option suitable to local laws and regulations. Per FCC regulation, the country selection is not available on all models marketed in the US. All US models are fixed to US channels only. |
Preferred Frequency | These buttons determine the frequency at which access points will attempt to broadcast. This feature will only work for APs that can transmit at both 5.4GHz and 5GHz frequencies. |
Channel Width | There are three options: 20 MHz, 20/40 MHz, and 40 MHz. With this feature enabled, the Wi-Fi system can use two channels at once. Using two channels improves the performance of the Wi-Fi connection. |
Channel | This drop-down menu selects the 802.11 channel to be utilized. Available options are from 1 to 11 and from 1 to 13 for the North America region and Europe region, respectively. (Channel 14 is only available when the country is selected as Japan with protocol 802.11b.) If Auto is set, the system will perform channel scanning based on the scheduled time set and choose the most suitable channel automatically. |
Auto Channel Update | Indicate the time of day at which to update automatic channel selection. |
Output Power | This drop-down menu determines the power at which the AP under this profile will broadcast. When fixed settings are selected, the AP will broadcast at the specified power level, regardless of context. When Dynamic settings are selected, the AP will adjust its power level based on its surrounding APs in order to maximize performance. The Dynamic: Auto setting will set the AP to do this automatically. Otherwise, the Dynamic: Manual setting will set the AP to dynamically adjust only if instructed to do so. If you have set Dynamic:Manual, you can go to AP>Toolbox>Auto Power Adj. to give your AP further instructions. If you click the Boost checkbox, the AP under this profile will transmit using additional power. Please note that using this option with several APs in close proximity will lead to increased interference. |
Client Signal Strength Threshold | This field determines the maximum signal strength each individual client will receive. The measurement unit is megawatts. |
Max number of Clients | This field determines the maximum clients that can be connected to APs under this profile. |
Management VLAN ID | This field specifies the VLAN ID to tag to management traffic, such as AP to AP controller communication traffic. The value is 0 by default, meaning that no VLAN tagging will be applied. Note: change this value with caution as alterations may result in loss of connection to the AP controller. |
Operating Schedule | Choose from the schedules that you have defined in System > Schedule. Select the schedule for the integrated AP to follow from the drop-down menu. |
Discover Nearby NetworksA | This option is to turn on and off to scan the nearby the AP. Note: Feature will be automatically turned on with Auto Channel / Dynamic Output Power. |
Beacon RateA | This option allows you to set the transmit bit rate for sending a beacon. If the transmit bit rate is not set to 1, 2, 5.5, or 11 Mbps (802.11b data rates), 802.11b-only clients will not discover the AP. |
Beacon IntervalA | This drop-down menu provides the option to set the time between each beacon send. Available options are 100ms, 250ms, and 500ms. |
DTIMA | This field provides the option to set the frequency for the beacon to include delivery traffic indication message (DTIM). The interval unit is measured in milliseconds. |
RTS ThresholdA | This field provides the option to set the minimum packet size for the unit to send an RTS using the RTS/CTS handshake. Setting 0 disables this feature. |
A - Advanced feature. Click the  button on the top right-hand corner to activate.
Important Note |
Per FCC regulation, the country selection is not available on all models marketed in the US. All US models are fixed to US channels only. |
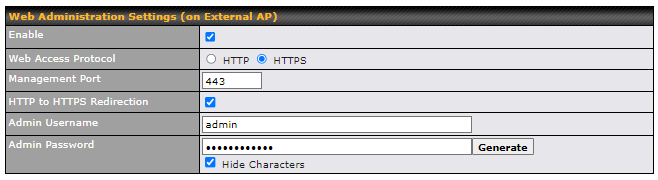
Web Administration Settings (on External AP) | |
Enable | Check the box to allow the Peplink router to manage the web admin access information of the AP. |
Web Access Protocol | These buttons specify the web access protocol used for accessing the web admin of the AP. The two available options are HTTP and HTTPS. |
Management Port | This field specifies the management port used for accessing the device. |
HTTP to HTTPS Redirection | This option will be available if you have chosen HTTPS as the Web Access Protocol. With this enabled, any HTTP access to the web admin will redirect to HTTPS automatically. |
Admin User Name | This field specifies the administrator username of the web admin. It is set as admin by default. |
Admin Password | This field allows you to specify a new administrator password. You may also click the Generate button and let the system generate a random password automatically. |

This allows users to configure AP Time Settings (both Timezone and NTP) in AP Controller.
AP Time Settings | |
Time Zone | This field is to select the time zone for the AP controller. |
Time Server | This field is to select the time server for the AP controller. |

This setting is to allow users to manage external AP's controller unreachable action. When Manage Unreachable Action is checked, there will be 2 options which are "None" and "Radio Off".

This is an option to enable client load balancing for AP Controller. When the option is enabled, it is trying to balance the station count on APs within the same profile.
Some Peplink models display a screen similar to the one shown below, navigating to AP > Settings:
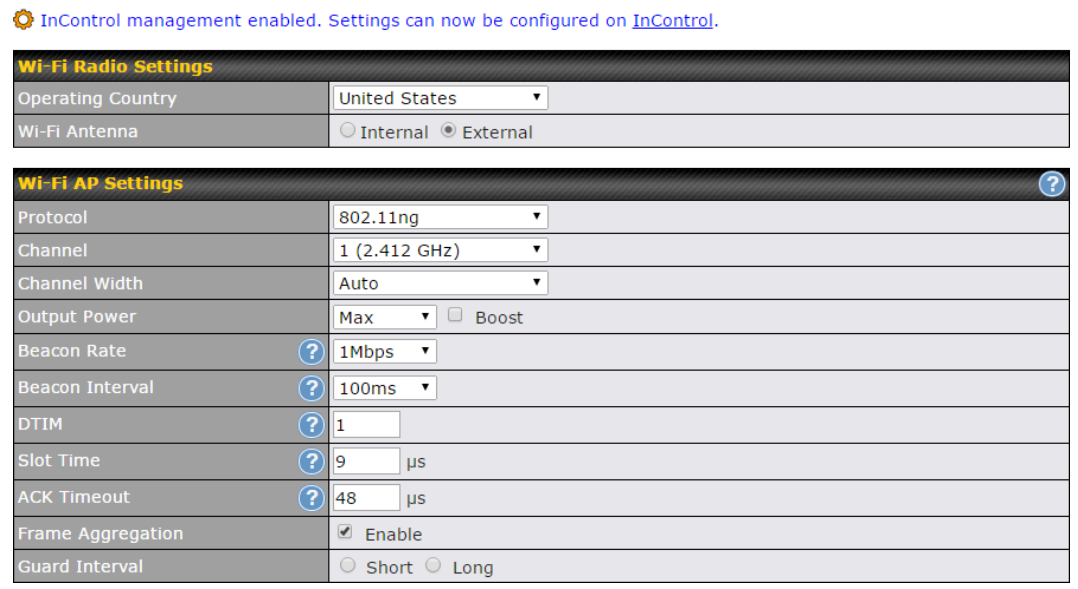
Wi-Fi Radio Settings | |
Operating Country | This option sets the country whose regulations the Peplink router follows. |
Wi-Fi Antenna | Wi-Fi Antenna Choose from the router's internal or optional external antennas, if so equipped. |
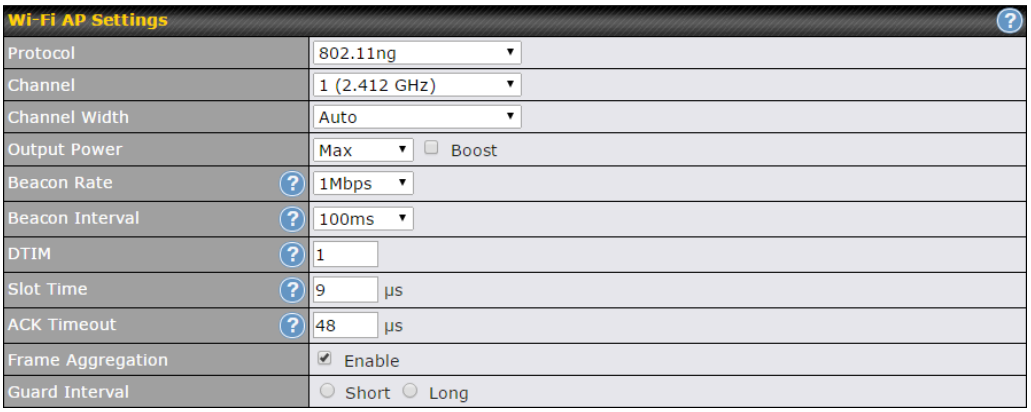
Wi-Fi AP Settings | |
Protocol | This option allows you to specify whether 802.11b and/or 802.11g client association requests will be accepted. Available options are 802.11ng and 802.11na. By default, 802.11ng is selected. |
Channel | This option allows you to select which 802.11 RF channel will be used. Channel 1 (2.412 GHz) is selected by default. |
Channel Width | Auto (20/40 MHz) and 20 MHz are available. The default setting is Auto (20/40 MHz), which allows both widths to be used simultaneously. |
Output Power | This option is for specifying the transmission output power for the Wi-Fi AP. There are 4 relative power levels available – Max, High, Mid, and Low. The actual output power will be bound by the regulatory limits of the selected country. |
Beacon RateA | This option is for setting the transmit bit rate for sending a beacon. By default, 1Mbps is selected. |
Beacon IntervalA | This option is for setting the time interval between each beacon. By default, 100ms is selected. |
DITMA | This field allows you to set the frequency for the beacon to include a delivery traffic indication message. The interval is measured in milliseconds. The default value is set to 1 ms. |
Slot TimeA | This field is for specifying the wait time before the Router transmits a packet. By default, this field is set to 9 µs. |
ACK TimeA | This field is for setting the wait time to receive an acknowledgement packet before performing a retransmission. By default, this field is set to 48 µs. |
Frame AggreagtionA | This option allows you to enable frame aggregation to increase transmission throughput. |
Guard IntervalA | This setting allows choosing a short or long guard period interval for your transmissions. |