
7. Wi-Fi AP
Wi-Fi AP holds the SSID and radio configuration that InControl 2 applies to the Wi-Fi capable devices it manages. The feature appears at three levels. Organization-wide SSIDs are delivered first, then group-wide SSIDs, then device level SSIDs. Radio parameters such as channel and output power are set at group level and at device level.
AP Controller. A router's web admin has a separate function, AP Controller, in which the router manages the Wi-Fi of the access points attached to it. On a device with AP Controller switched on, Wi-Fi configuration is handled there rather than by InControl 2. InControl 2 shows an AP Cont badge on the device's Device Details page (see 14.1.2 Status Badges on the Heading Line).
To check a whole group, read the Wi-Fi Config column on Group > Dashboard (10.1.3 The Devices Grid). Devices configured at group level read Group level. Any other value means the device takes its Wi-Fi configuration from elsewhere.
7.1. Organization-wide SSID Settings
Use this screen to define SSIDs once for every group in the organization, instead of repeating them in each group.
Where to find it
Organization > Wi-Fi AP > Organization-wide SSID Settings
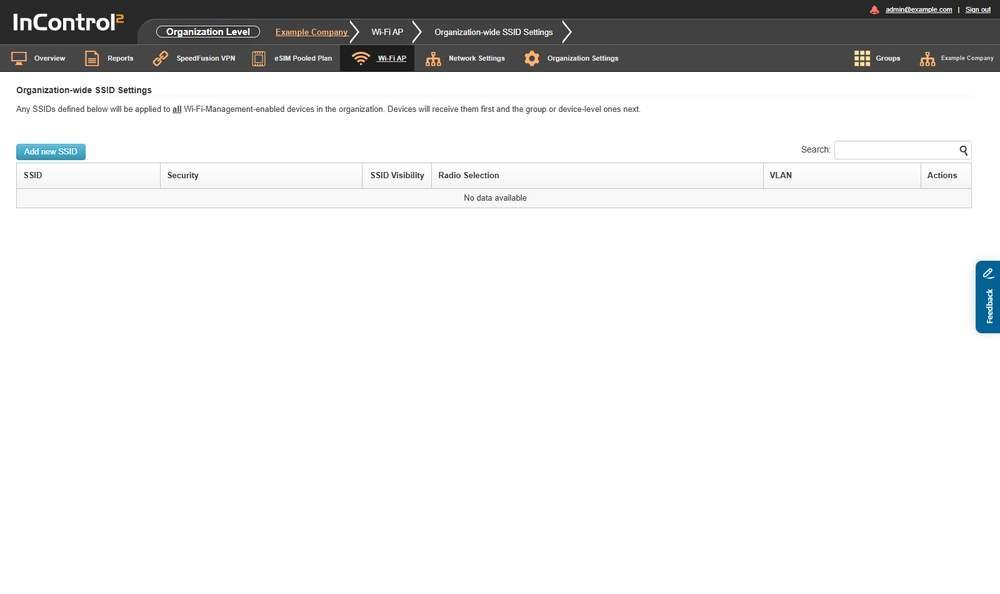
The organization level SSID list. The line above the table states the order in which devices receive SSIDs.
The page states the scope: SSIDs defined here are applied to all Wi-Fi-Management-enabled devices in the organization. Devices receive these first, then the group or device-level SSIDs.
7.1.1. What This Screen Shows
Column | What it shows |
SSID | The network name |
Security | The security policy set on the SSID |
SSID Visibility | Whether the SSID is shown or hidden |
Radio Selection | Which radio bands carry the SSID |
VLAN | The VLAN associated with the SSID |
Actions | Per row actions for that SSID |
An empty list shows No data available.
The organization-level list has six columns. The group-level list has nine, adding SSID Availability, Captive Portal and Schedule. See Group-wide SSID Settings below (7.2 Group-wide SSID Settings).
7.1.2. Controls on This Screen
Control | What it does |
Add new SSID | Opens the SSID Settings editor |
Search: | Filters the SSID list |
Caution: An SSID saved here is applied to every Wi-Fi management enabled device in the organization, across every group. Check the security policy and key before saving, and roll out a new SSID to one group first.
7.2. Group-wide SSID Settings
Use this screen to define SSIDs for one group and to choose which devices in the group carry them. One SSID definition can give each device its own network name: Guest-#### becomes Guest- plus the last 4 characters of each device's serial number.
Where to find it
Group > Wi-Fi AP > Group-wide SSID Settings
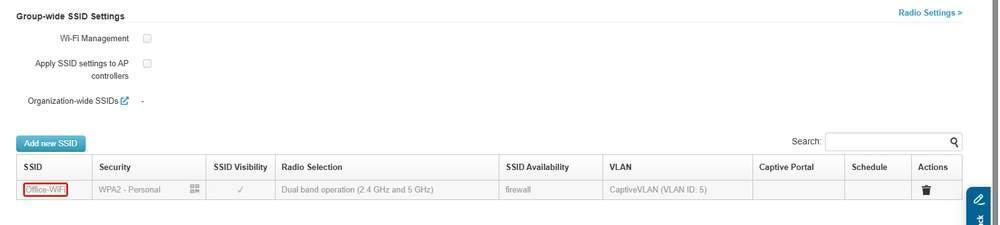
The group level SSID list. The SSID name, here Office-WiFi, outlined in red, is a link that opens the SSID Settings editor. The Wi-Fi Management checkbox is above the table, and Radio Settings > links to the radio page.
7.2.1. What This Screen Shows
Column | What it shows |
SSID | The network name. It is a link: click it to open the SSID in the SSID Settings editor |
Security | The security policy set on the SSID, for example WPA2 - Personal, with a QR code icon beside it |
SSID Visibility | Whether the SSID is shown or hidden |
Radio Selection | Which radio bands carry the SSID (2.4 GHz, 5 GHz and 6 GHz), for example Dual band operation (2.4 GHz and 5 GHz) |
SSID Availability | Which devices carry the SSID, for example All Devices, or the tag the SSID is limited to |
VLAN | The VLAN associated with the SSID |
Captive Portal | The captive portal assigned to the SSID, if any |
Schedule | When the SSID is active, for example Always on |
Actions | Per row actions for that SSID |
The Actions column holds the delete icon. To change an SSID, click its name. See 7.2.4 How to Change an SSID or Its Wi-Fi Password.
7.2.2. Controls on This Screen
Control | What it does |
Wi-Fi Management | Switches Wi-Fi management on or off for the group |
Apply SSID settings to AP controllers | Applies the SSID settings defined here to AP controllers. A separate checkbox from Wi-Fi Management |
Organization-wide SSIDs | Link to Organization-wide SSID Settings |
Add new SSID | Opens the SSID Settings editor |
Search: | Filters the SSID list |
Radio Settings > | Link to Group-wide Radio Settings. See 7.3 Group-wide Radio Settings |
7.2.3. How to Roll Out an SSID to the Group
- 1.On Group > Wi-Fi AP > Group-wide SSID Settings, confirm that Wi-Fi Management is ticked. Before ticking it for the first time, read 8.1.1 Before You Tick a Manage Checkbox.
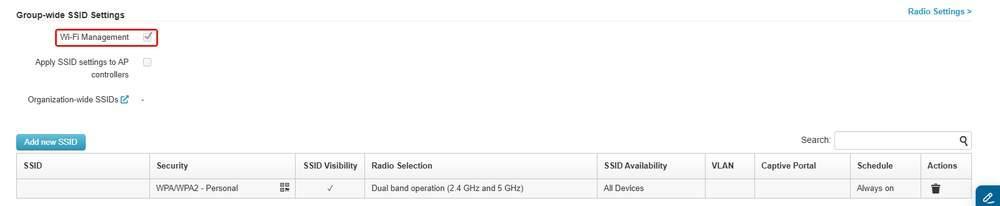
Step 1. The Wi-Fi Management checkbox, outlined in red, ticked above the SSID list. Add new SSID is at the left above the table.
- 2.Click Add new SSID and set Device Selection, which opens on Please Select.... To roll out to a pilot set first, select This SSID is enabled on some devices....
- 3.Set Security Policy and Firewall Mode, which open on Open - No Encryption and Disabled.
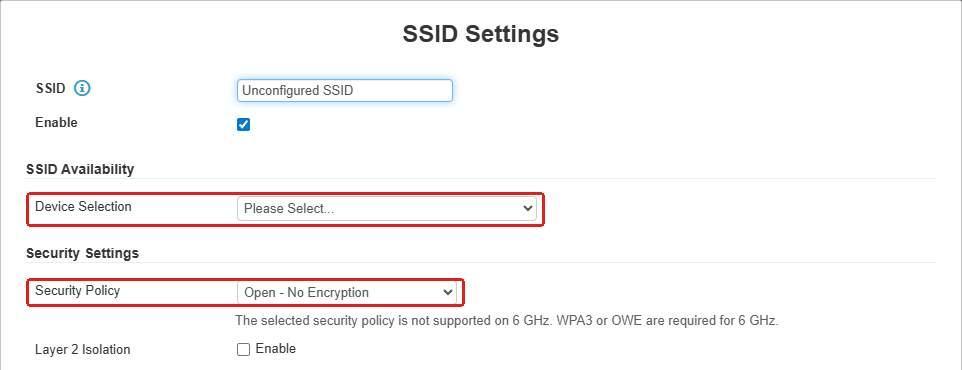
Steps 2 and 3. Device Selection on Please Select... and Security Policy on Open - No Encryption, both outlined in red, as a new SSID opens. Firewall Mode is further down the same dialog.
- 4.Click Save Changes.
Caution: With This SSID is enabled on all devices, the saved SSID reaches every Wi-Fi managed device in the group. Roll out to some devices first, then widen the selection.
- 5.Verify on Group > Dashboard (10.1.3 The Devices Grid): the Wi-Fi Config column reads Group level for devices following the group, and Last Config Applied updates. A device showing a configuration state icon, for example InControl stopped to apply configurations to device., has not applied the change.

Step 5. The Wi-Fi Config column, outlined in red. One device reads Group level and follows the group's SSIDs; another reads a dash.
- 6.Once clients join, Group > Reports > Wi-Fi Reports lists the SSID under SSID Usage with its clients and usage. See 11.3.2 SSID Usage.
7.2.4. How to Change an SSID or Its Wi-Fi Password
Use this procedure to rename an existing SSID or to change the key its clients use to join.
- 1.Open Group > Wi-Fi AP > Group-wide SSID Settings.
- 2.Click the SSID name in the SSID column. The SSID Settings editor opens.
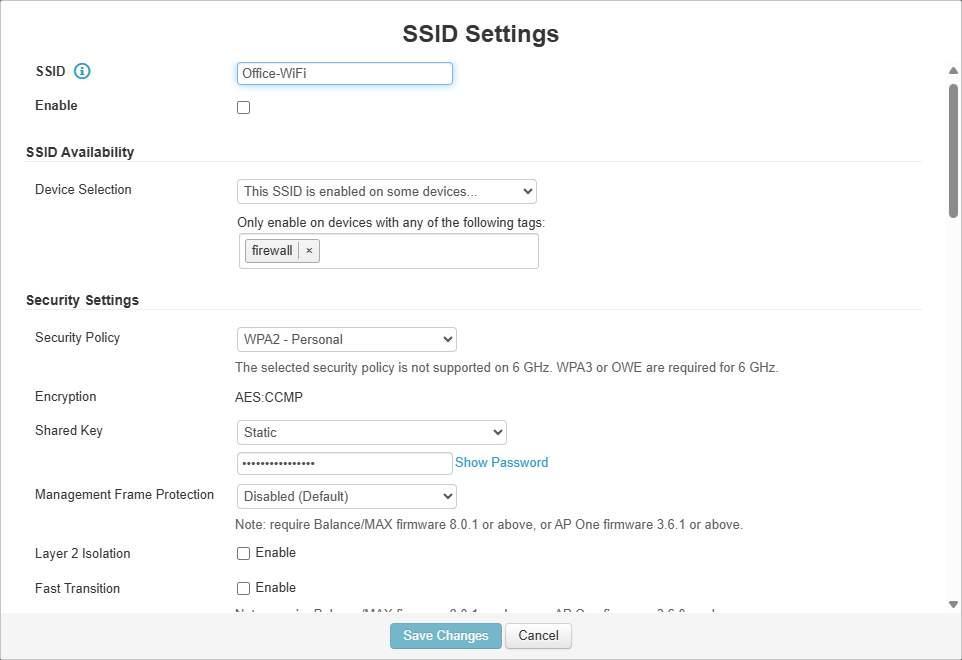
Step 2. An existing SSID opened from its name. The SSID field at the top holds the name, and Security Policy, Encryption and Shared Key are in Security Settings. Save Changes remains greyed out until a value changes.
- 3.To rename the SSID, change the SSID field at the top.
- 4.In Security Settings, check Security Policy. The key is set in the Shared Key row.
- 5.In Shared Key, the dropdown offers Static, Private Pre-Shared Key, Last 8 octets of LAN MAC address and Random. With Static, type the new password in the box below it. Show Password displays what is typed.
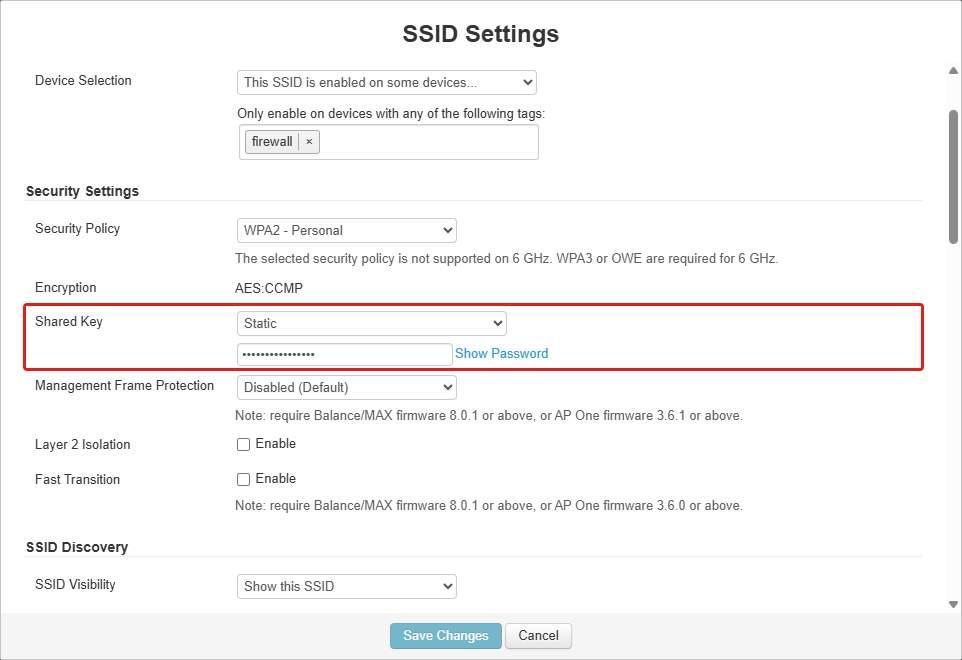
Step 5. The Shared Key row, outlined in red, under Security Policy WPA2 - Personal: the key type dropdown on Static, the password box and Show Password.
- 6.Click Save Changes. It remains greyed out until a value changes.
Caution: Save Changes applies the new name or key to every Wi-Fi managed device the SSID's Device Selection covers. Have the new key ready for users before saving.
Notes:
- Shared Key carries the same label for WPA3 - Personal, WPA2/WPA3 - Personal, WPA2 - Personal and WPA/WPA2 - Personal.
- WPA3 - Personal adds Configure as WPA2 for Unsupported Peplink Devices, ticked by default, and states that it requires Balance/MAX firmware 8.1.0 or above, and AP One firmware 3.6.2 and 3.7.1 or above.
- WPA2 - Enterprise has no Shared Key. Its rows are Primary Server, Secondary Server, Authentication Port, Accounting Port and NAS-Identifier. Open - No Encryption has no key.
- The editor and the SSID list both offer a Wi-Fi QR code for the SSID. It encodes the network name and key, so protect it as you would the key.
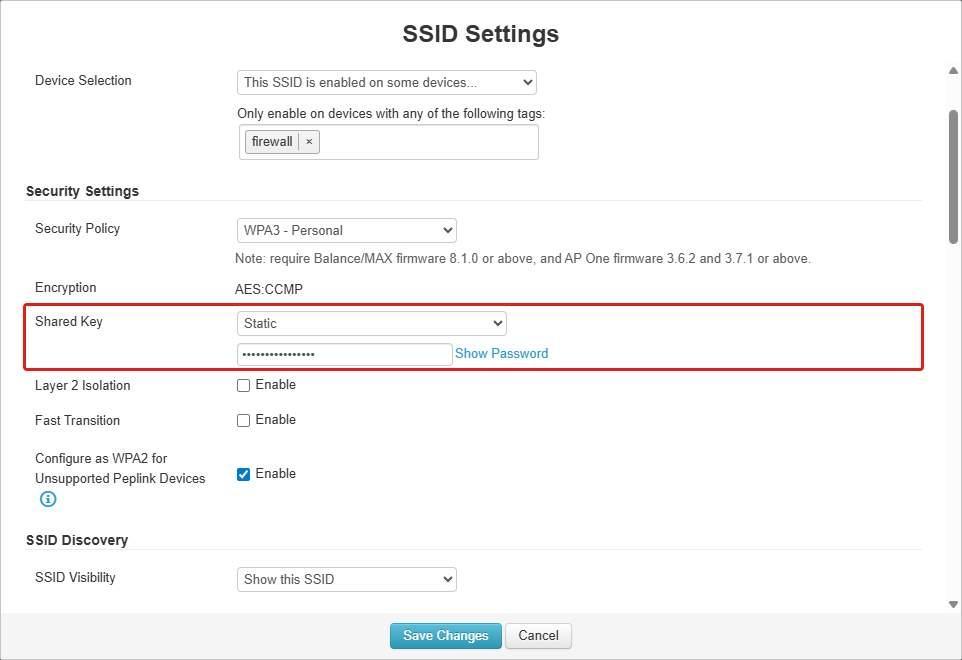
Security Policy set to WPA3 - Personal. The Shared Key row, outlined in red, is unchanged, and Configure as WPA2 for Unsupported Peplink Devices appears below it, ticked.
7.2.5. The SSID Settings Editor
To create an SSID, enter the name, set Device Selection, then set Security Policy and Firewall Mode, which open on Open - No Encryption and Disabled. Every other dropdown already holds a value.
Add new SSID opens a dialog titled SSID Settings. It closes with Save Changes or Cancel.
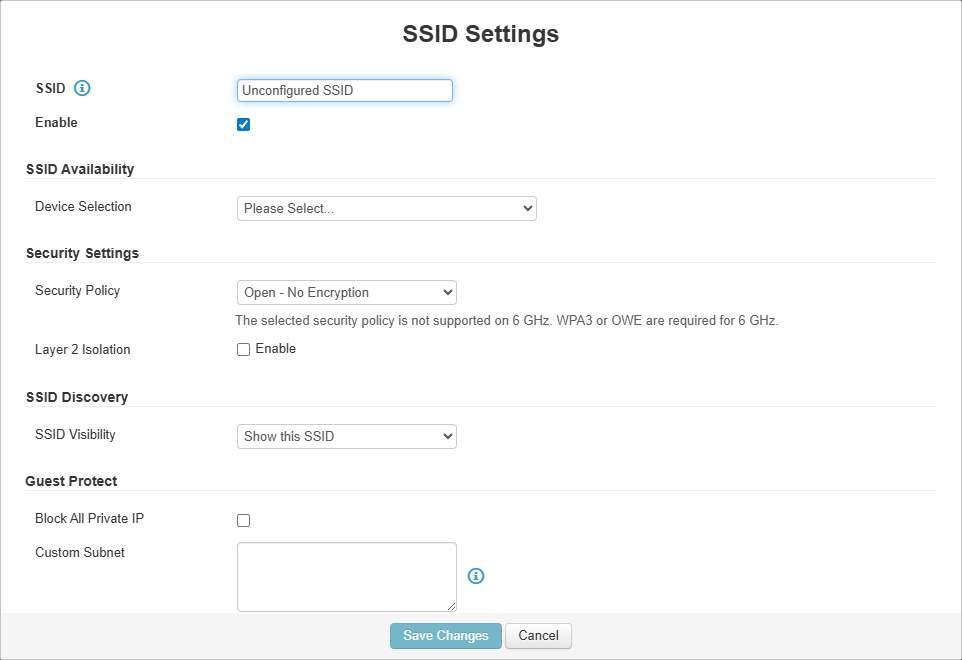
The group level SSID Settings dialog. Device Selection is directly under the SSID name, in the SSID Availability section.
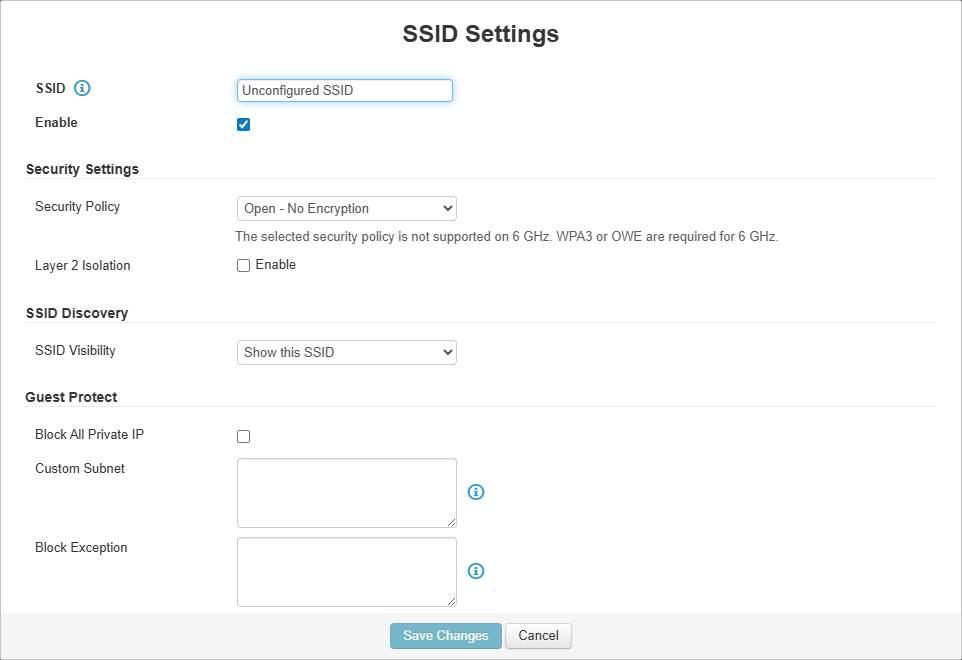
The organization level version of the same dialog. It has no SSID Availability section; the other sections are the same.
To open an existing SSID in this editor and change its name or key, click the SSID name in the list. See 7.2.4 How to Change an SSID or Its Wi-Fi Password.
The dialog is divided into named sections, in this order: SSID Availability (group level only), Security Settings, SSID Discovery, Guest Protect, Bandwidth Management (AP One only) (organization level only), VLAN Settings, MAC Filter, Multicast Settings, Radio Selection, Firewall Settings, and at group level also Schedule and Captive Portal Settings. The organization-level dialog ends at Firewall Settings.
Fields
The two levels do not offer the same set of fields. The table below shows where each field appears. Where a dropdown opens on a particular option, the Options column names it. These opening values are those of the group-level dialog.
Field | Type | Options | Org | Group |
SSID | text | Accepts the token ####, which is replaced with the last 4 characters of each device's serial number | yes | yes |
Device Selection | dropdown | Please Select..., This SSID is enabled on all devices, This SSID is enabled on some devices..., This SSID is available on all devices except... The dialog opens on Please Select..., so no scope is set until one is chosen | no | yes |
Security Policy | dropdown | Open - No Encryption, Enhanced Open (OWE), WPA3 - Personal, WPA3 - Enterprise, WPA2/WPA3 - Personal, WPA2 - Personal, WPA2 - Enterprise, WPA/WPA2 - Personal, WPA/WPA2 - Enterprise. Nine options; the dialog opens on Open - No Encryption. A message below the list states that WPA3 or OWE is required for 6 GHz | yes | yes |
SSID Visibility | dropdown | Show this SSID, Hide this SSID. Default is Show this SSID | yes | yes |
Custom Subnet | text area | In Guest Protect, beside Block All Private IP. IP subnets in CIDR format, one per line, separated by a carriage return | yes | yes |
Block Exception | text area | In Guest Protect, beside Custom Subnet and Block All Private IP | yes | yes |
Upstream Limit | number | Measured in kbps. 0 means Unlimited | yes | no |
Downstream Limit | number | Measured in kbps. 0 means Unlimited | yes | no |
Per Client Upstream Limit | number | Measured in kbps. 0 means Unlimited | yes | no |
Per Client Downstream Limit | number | Measured in kbps. 0 means Unlimited | yes | no |
Network Priority (QoS) | dropdown | Gold, Silver, Bronze | yes | no |
Restriction Mode | dropdown | None, Deny all except listed, Allow all except listed, RADIUS MAC Authentication. Four restriction modes; the default is None | yes | yes |
Multicast Filter | dropdown | Enable, Disable. Default is Disable | yes | yes |
Multicast Rate | dropdown | Eight rates: MCS24/MCS16/MCS8/MCS0/6M, MCS25/MCS17/MCS9/MCS1/9M, MCS26/MCS18/MCS10/MCS2/12M, MCS27/MCS19/MCS11/MCS3/18M, MCS28/MCS20/MCS12/MCS4/24M, MCS29/MCS21/MCS13/MCS5/36M, MCS30/MCS22/MCS14/MCS6/48M, MCS31/MCS23/MCS15/MCS7/54M. Default is the first, MCS24/MCS16/MCS8/MCS0/6M | yes | yes |
Band Steering | dropdown | Disable, Prefer, Force. Default is Prefer | yes | yes |
Maximum Number of Clients, 2.4 GHz: | dropdown | 68 options: Unlimited, then 1 through 64 in steps of 1, then 100, 200 and 300, measured in clients. Default is Unlimited | yes | yes |
Maximum Number of Clients, 5 GHz: | dropdown | The same 68 options, with the same default | yes | yes |
Firewall Mode | dropdown | Disabled, Flexible - Allow all except..., Lockdown - Block all except... Default is Disabled | yes | yes |
Device Selection lets one SSID definition target a pilot set first (This SSID is enabled on some devices...), then the whole group (This SSID is enabled on all devices), or exclude a site with different requirements (This SSID is available on all devices except...).
Notes on the table:
- A new SSID is created with default values for all settings. Before saving, check Security Policy (default: Open - No Encryption) and Firewall Mode (default: Disabled), because these defaults allow unrestricted access.
- The group-level dialog adds Device Selection. Both levels have the five Bandwidth Management fields, which the dialog labels Bandwidth Management (AP One only). The dialog has further controls beyond that list, including Configure as WPA2 for Unsupported Peplink Devices and the RADIUS source setting, both described under Guidance inside the editor below.
- Maximum Number of Clients is a pair of controls under one heading, one row labelled 2.4 GHz: and one labelled 5 GHz:. Set both if the SSID runs on both bands. The section notes that it requires Balance and MAX firmware 7 or above, or AP One firmware 3.5.4 or above, and that the default is Unlimited.
- The highest client count offered here is 300. The per radio Max. Clients setting on the Radio Settings screens offers up to 64. The two settings are separate.
Guidance inside the editor
Five fields carry an information icon. Their guidance is summarised below.
SSID. The name accepts the token ####, which is replaced with the last 4 characters of each device's serial number, so that one definition gives each device in the scope a distinct SSID.
Configure as WPA2 for Unsupported Peplink Devices. This setting determines whether the SSID is applied to devices that do not support WPA3.
- The default is Enabled, at both levels. The SSID is therefore still applied to devices without WPA3 support, configured as WPA2, until the setting is disabled.
- When it is disabled, this SSID is not applied to WPA3 unsupported devices. The tooltip on the setting states this and the default.
Leave it enabled where devices with and without WPA3 support are mixed. Disable it only when the SSID is intended for WPA3 capable devices alone; WPA3 unsupported devices then stop carrying it.
The RADIUS source address. RADIUS requests leave the device from the IP address of a VLAN, and this setting selects the VLAN. The control at each level is as follows.
Level | Control | Behaviour stated |
Group | Source Network Address, offering Untagged LAN or a VLAN ID | RADIUS requests are originated from the IP address of the selected VLAN |
Organization | VLAN ID RADIUS Requests Originate | RADIUS requests originate from the IP address of the VLAN of the specified VLAN ID. A VLAN ID of zero is the untagged LAN. If the VLAN is not configured on a device, the requests originate from the untagged LAN |
For an organization-wide SSID:
- Enter 0 to send RADIUS requests from the untagged LAN.
- A device that does not have the specified VLAN configured still sends its RADIUS requests, from the untagged LAN instead. Take this into account on any RADIUS server that accepts requests only from known source addresses.
Custom Subnet. The field accepts IP subnets in CIDR format separated by a carriage return, so enter one subnet per line. Examples given: 192.168.30.0/24, 10.8.0.0/16 and 203.0.113.96/32.
Band Steering. Band steering reduces 2.4 GHz band overcrowding. An AP with band steering moves clients capable of 5 GHz operation onto 5 GHz.
Option | Effect |
Force | Clients capable of 5 GHz operation are only offered 5 GHz |
Prefer | Clients capable of 5 GHz operation are encouraged to associate with 5 GHz. If a client insists on attempting 2.4 GHz, 2.4 GHz is offered. This is the default |
Disable | Turns band steering off |
Checkbox and dropdown settings
Setting | Section | Control |
Enable | Top of the dialog, next to SSID | Checkbox |
Layer 2 Isolation | Security Settings | Checkbox |
Block All Private IP | Guest Protect | Checkbox |
Block SpeedFusion VPN | Guest Protect | Checkbox |
VLAN Tagging | VLAN Settings | Checkbox |
IGMP Snooping | Multicast Settings | Checkbox |
Radio Selection | Radio Selection | A checkbox for each band: 2.4 GHz, 5 GHz and 6 GHz on devices that support it |
Schedule | Schedule, group level only | Dropdown, showing Always on |
Captive Portal | Captive Portal Settings, group level only | Applies to AP One only, as the section states. To make a captive portal effective on Balance and MAX, assign it to this SSID's VLAN on the VLAN Networks page instead. See 8.8 VLAN Networks |
SSID Discovery holds SSID Visibility.
7.3. Group-wide Radio Settings
Use this screen to set the operating country for the group, tune channels, power and client limits across every managed radio in the group, set up Wireless Mesh and review Assisted Roaming.
Where to find it
Group > Wi-Fi AP > Group-wide Radio Settings
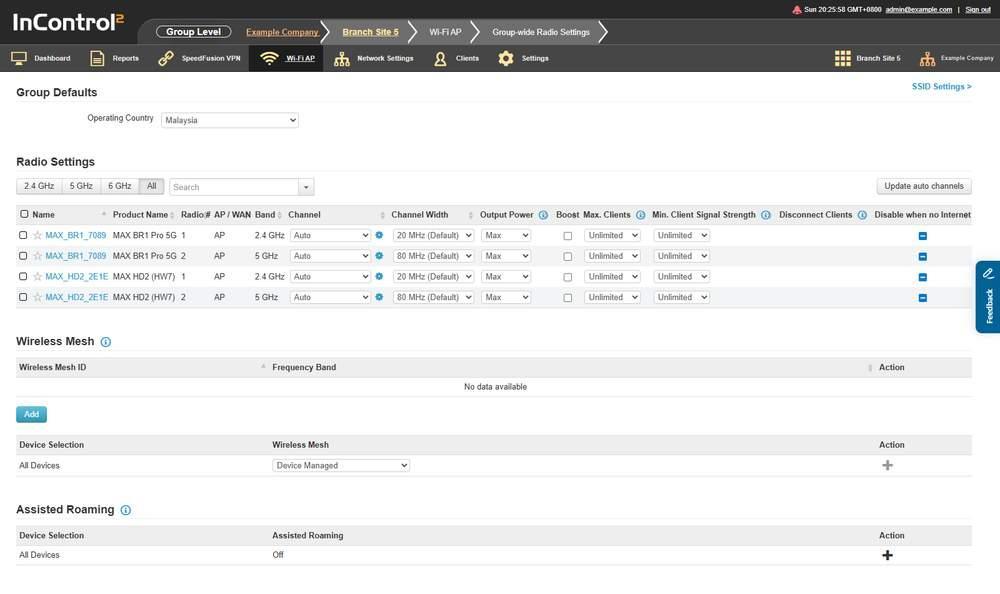
The four sections of the page. Group Defaults sets the operating country, and the Radio Settings grid lists one row per radio per device.
The page has four sections: Group Defaults, Radio Settings, Wireless Mesh and Assisted Roaming.
7.3.1. Group Defaults

The Group Defaults section. Operating Country shows the country the group is currently set to, Malaysia in this example.
Control | What it does |
Operating Country | Selects the regulatory country for the group |
Operating Country offers 74 countries: Australia, Austria, Bahrain, Belgium, Bolivia, Brazil, Bulgaria, Canada, Chile, China, Colombia, Cyprus, Czech Republic, Denmark, Egypt, El Salvador, Estonia, Finland, France, Germany, Greece, Guatemala, Hong Kong, Hungary, Iceland, India, Indonesia, Ireland, Israel, Italy, Japan, Jordan, Kenya, Kuwait, Latvia, Lebanon, Liechtenstein, Lithuania, Luxembourg, Malaysia, Malta, Mexico, Netherlands, New Zealand, Norway, Panama, Peru, Philippines, Poland, Portugal, Puerto Rico, Qatar, Romania, Russia, Saudi Arabia, Singapore, Slovak Republic, Slovenia, South Africa, South Korea, Spain, Sri Lanka, Sweden, Switzerland, Taiwan, Thailand, Trinidad and Tobago, Tunisia, Turkey, United Arab Emirates, United Kingdom, United States, Uruguay, Vietnam.
The dropdown shows the country the group is currently set to.
Changing the selection displays a message on the page: Operating country setting changed. Please ensure the selection conforms to the local regulation.
- The setting is regulatory and applies to the whole group.
- Before saving, confirm that the choice conforms to the local regulation where the group's devices operate.
Caution: A change to Operating Country applies to every radio in the group once Save Changes is clicked. Confirm the country first, then check any fixed channels in the Radio Settings grid.
7.3.2. Radio Settings
The grid has one row per radio per device, each with its own channel, width, power and client settings. The Max. Clients field here offers up to 64 and is separate from the SSID's client limit.

The Radio Settings grid. The band filter buttons and Search are above it on the left, Update auto channels is on the right, and each radio row has its own dropdowns and checkboxes.
Column | What it shows |
Name | Device name, linking to that device |
Product Name | Device model |
Radio # | Radio number on that device |
AP / WAN | Role the radio is in, for example AP |
Band | Band the radio operates on, for example 2.4 GHz or 5 GHz |
Channel | Channel selection for the radio |
Channel Width | Channel width for the radio |
Output Power | Output power level |
Boost | A checkbox on each radio row |
Max. Clients | Client limit for the radio. No further connection is accepted once the number of connected clients reaches this amount |
Min. Client Signal Strength | Clients with signal strength lower than this value are not allowed to connect. Default is Unlimited |
Disconnect Clients | Checkbox. When Min. Client Signal Strength is set and this option is selected, clients whose detected signal is 6 dB below the Min. Client Signal Strength are disconnected from the network |
Disable when no Internet | A checkbox on each radio row |
Four columns carry an information icon. Hovering over it shows the guidance above, plus two firmware requirements:
- Output Power. The Custom option requires AP firmware 3.6.1 or above, or Balance and MAX firmware 8.0.0 or above. If a power value larger than a radio can support is entered, the radio's maximum power is applied instead.
- Max. Clients. Requires Balance and MAX firmware 7 or above, or AP firmware 3.5.4 or above. Default is Unlimited.
The client controls address two common problems:
- Clients that stay connected to a distant AP. Set Min. Client Signal Strength with Disconnect Clients. Clients below the threshold cannot join, and clients that fall 6 dB below it are disconnected so that they can reconnect to a nearer AP.
- An AP that overloads at a busy site. Limit that radio with Max. Clients.
Controls above the grid:
Control | What it does |
2.4 GHz | Filters the grid to 2.4 GHz radios |
5 GHz | Filters the grid to 5 GHz radios |
6 GHz | Filters the grid to 6 GHz radios |
All | Removes the band filter |
Search | Filters the grid |
Update auto channels | Acts on the automatic channel selection of the radios in the grid |
In a large group, narrow the grid with the band buttons and Search before editing.
Options per band
The in row dropdowns differ by band. Each opens on the radio's current value, and each has a default.
Setting | 2.4 GHz options | 5 GHz options | Default |
Channel | Auto, 1 (2.412 GHz), 2 (2.417 GHz), 3 (2.422 GHz), 4 (2.427 GHz), 5 (2.432 GHz), 6 (2.437 GHz), 7 (2.442 GHz), 8 (2.447 GHz), 9 (2.452 GHz), 10 (2.457 GHz), 11 (2.462 GHz), 12 (2.467 GHz), 13 (2.472 GHz). 14 options | Auto, 36 (5.18 GHz), 40 (5.2 GHz), 44 (5.22 GHz), 48 (5.24 GHz), 52 (5.26 GHz), 56 (5.28 GHz), 60 (5.3 GHz), 64 (5.32 GHz), 149 (5.745 GHz), 153 (5.765 GHz), 157 (5.785 GHz), 161 (5.805 GHz). 13 options | Auto on both bands |
Channel Width | 20 MHz (Default), 40 MHz, 20/40 MHz | 20 MHz, 40 MHz, 20/40 MHz, 80 MHz (Default) | The option the interface marks (Default): 20 MHz on 2.4 GHz and 80 MHz on 5 GHz |
Channels 52, 56, 60 and 64 carry a trailing asterisk in the 5 GHz Channel dropdown. The asterisk marks a DFS channel.
Settings that are the same on both bands:
Setting | Options | Default |
Output Power | Max, High, Medium, Low, Custom | Max |
Max. Clients | 65 options: Unlimited, then 1 through 64 in steps of 1 | Unlimited |
Min. Client Signal Strength | 95 options: Unlimited, then -94 dBm through -1 dBm in steps of 1 dBm | Unlimited |
As a result of these defaults:
- A radio left at its defaults runs at Max output power with no client limit and no signal strength threshold. Lower power, a client limit and a signal threshold must each be set explicitly.
- Channel defaults to Auto on both bands, so a radio selects its own channel until a fixed channel is set. Update auto channels above the grid acts on the automatic channel selection.
7.3.3. Wireless Mesh
The section has two grids.

The Wireless Mesh section. The definitions grid is empty with Add below it, and the assignment grid below holds the All Devices row set to Device Managed.
Grid | Columns |
Wireless Mesh definitions | Wireless Mesh ID, Frequency Band, Action |
Wireless Mesh assignment | Device Selection, Wireless Mesh, Action |
Control | What it does |
Add | Opens the wireless mesh dialog. It is on the definitions grid |
Wireless Mesh | The dropdown in the assignment grid, offering Device Managed and Disabled. Default is Device Managed |
An empty definitions grid shows No data available. The assignment grid holds one row, All Devices, with its Wireless Mesh dropdown on Device Managed.
Device Managed is the default, so until the setting is changed InControl 2 leaves wireless mesh to the devices rather than managing it from the group.
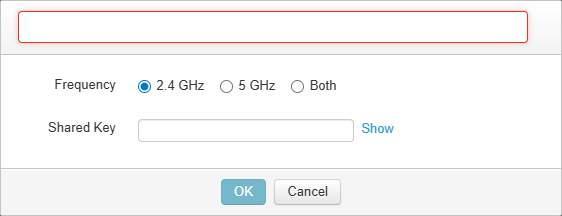
The wireless mesh dialog. The Wireless Mesh ID field is at the top. Frequency offers 2.4 GHz, 5 GHz or Both, and Shared Key has a Show control beside it. The Wireless Mesh ID field remains outlined in red until an ID is entered.
The dialog closes with OK or Cancel.
Field | Type | Options |
Wireless Mesh ID | text | |
Frequency | radio buttons | 2.4 GHz, 5 GHz, Both |
Shared Key | password, with a Show control |
The Wireless Mesh ID field is at the top of the dialog and matches the first column of the definitions grid.
7.3.4. Assisted Roaming
The section holds one grid.

The Assisted Roaming section. The single row reads All Devices and Off, with a + icon in the Action column and an information icon beside the heading.
Column | What it shows |
Device Selection | Which devices the entry applies to |
Assisted Roaming | The setting applied to those devices |
Action | Per row actions for that entry |
The grid holds one row, with Device Selection All Devices. The + icon in its Action column adds an entry, and the Assisted Roaming column shows the current setting.
The Assisted Roaming heading carries an information icon. Its tooltip states that the feature guides clients on AP One devices in bridge mode, reduces the maximum number of SSIDs by one, and does not apply to Balance or MAX access points.
7.3.5. Controls at the Foot of the Page
Control | What it does |
Save Changes | Commits the changes. Disabled until a change is made |
Cancel | Discards the changes |
SSID Settings > | Link to Group-wide SSID Settings |
7.4. SSID and Radio Settings
Use this screen to review which SSID sources a single device follows, to stop the device following the group's SSIDs, and to tune its own radios. The device level page has no Group Defaults, Wireless Mesh or Assisted Roaming section; Operating Country is set at group level only. See 7.3.1 Group Defaults.
Where to find it
Device > Wi-Fi AP > SSID and Radio Settings
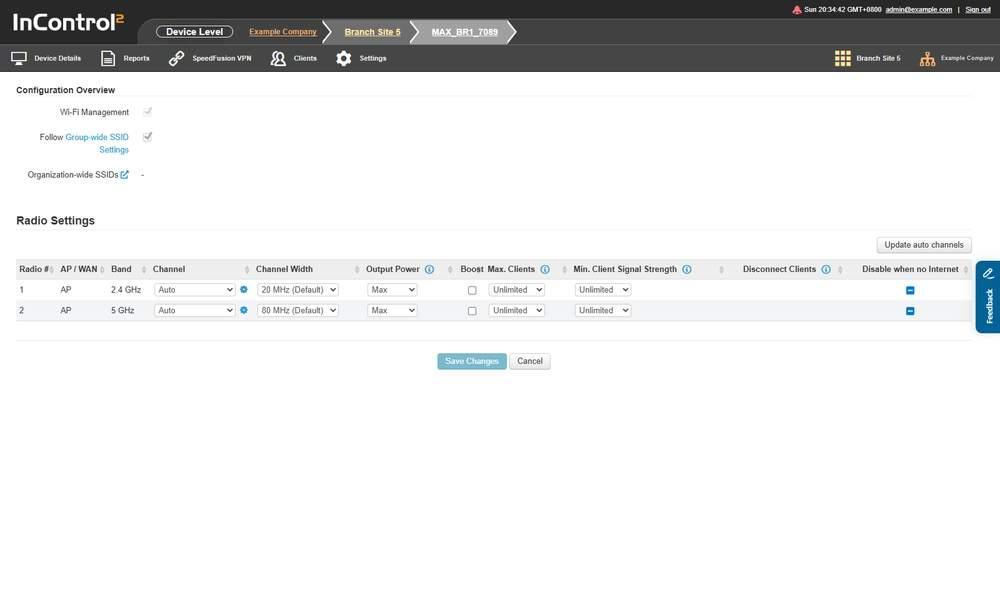
The device level page. Configuration Overview shows which SSID sources the device follows, and the Radio Settings grid omits the Name and Product Name columns because it covers one device only.
The page has two sections, Configuration Overview and Radio Settings.
7.4.1. Configuration Overview
The section holds two checkboxes and two links.
Item | What it shows |
Wi-Fi Management | Whether Wi-Fi management is on. Not editable here |
Follow Group-wide SSID Settings | Whether this device takes the group's SSIDs. Editable here |
Group-wide SSID Settings | A link to the group-level SSID list |
Organization-wide SSIDs | A link to Organization-wide SSID Settings |
Wi-Fi Management is read only at device level. Switch Wi-Fi management on or off for the group on Group-wide SSID Settings. At device level, the only change available is whether the device follows the group's SSIDs.
When Follow Group-wide SSID Settings is cleared, the device no longer takes the group's SSIDs, and later changes on Group-wide SSID Settings do not reach it. With Wi-Fi Management clear, the page shows Device Managed below it.
7.4.2. SSIDs for This Device
Use this list to give one device its own SSIDs, for example at a site that needs a different network name from the rest of the group.
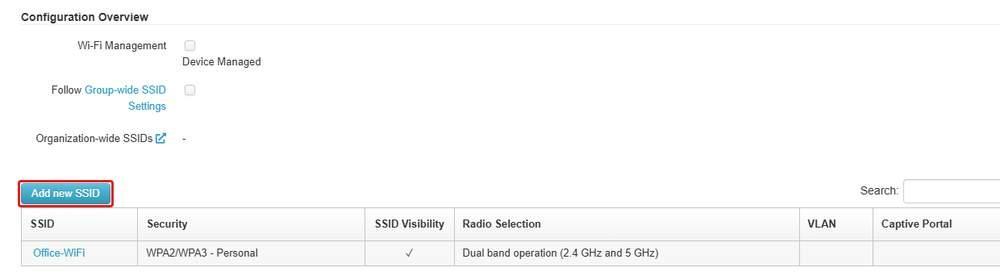
A device that does not follow the group wide SSIDs. Its own SSID list is under Configuration Overview, with Add new SSID, outlined in red, above it.
Below Configuration Overview the page lists the SSIDs set on this device, with Add new SSID and a Search box above the list.
Column | What it shows |
SSID | The network name. Click it to open the SSID for editing |
Security | The security policy, for example WPA2/WPA3 - Personal, with a QR code icon beside it |
SSID Visibility | A tick when the SSID is broadcast |
Radio Selection | The bands the SSID uses (2.4 GHz, 5 GHz and 6 GHz), for example Dual band operation (2.4 GHz and 5 GHz) |
VLAN | The VLAN the SSID is placed on, if any |
Captive Portal | The captive portal attached, if any |
Actions | A delete icon for the SSID |
To change an SSID or its Wi-Fi password, follow the group level steps (7.2.4 How to Change an SSID or Its Wi-Fi Password), starting from this list.
7.4.3. Radio Settings
The grid has one row per radio on the device, for example radio 1 on 2.4 GHz and radio 2 on 5 GHz, both in the AP role.

The device level grid. Each row starts at Radio # because there is no Name or Product Name column, and Update auto channels is above it on the right.
Column | What it shows |
Radio # | Radio number on the device |
AP / WAN | Role the radio is in, for example AP |
Band | Band the radio operates on |
Channel | Channel selection for the radio |
Channel Width | Channel width for the radio |
Output Power | Output power level |
Boost | A checkbox on each radio row |
Max. Clients | Client limit for the radio. No further connection is accepted once the number of connected clients reaches this amount |
Min. Client Signal Strength | Clients with signal strength lower than this value are not allowed to connect. Default is Unlimited |
Disconnect Clients | Checkbox. When Min. Client Signal Strength is set and this option is selected, clients whose detected signal is 6 dB below the Min. Client Signal Strength are disconnected from the network |
Disable when no Internet | A checkbox on each radio row |
This grid has 11 columns, compared with 13 in the group-level grid.
The same four information icons appear here, with the same text as at group level, including the firmware requirements on Output Power Custom and on Max. Clients.
The option lists and defaults match the group-level page:
Setting | 2.4 GHz options | 5 GHz options | Default |
Channel | Auto, 1 (2.412 GHz) through 13 (2.472 GHz). 14 options | Auto, 36 (5.18 GHz), 40 (5.2 GHz), 44 (5.22 GHz), 48 (5.24 GHz), 52 (5.26 GHz), 56 (5.28 GHz), 60 (5.3 GHz), 64 (5.32 GHz), 149 (5.745 GHz), 153 (5.765 GHz), 157 (5.785 GHz), 161 (5.805 GHz). 13 options | Auto on both bands |
Channel Width | 20 MHz (Default), 40 MHz, 20/40 MHz | 20 MHz, 40 MHz, 20/40 MHz, 80 MHz (Default) | 20 MHz on 2.4 GHz, 80 MHz on 5 GHz |
Setting | Options | Default |
Output Power | Max, High, Medium, Low, Custom | Max |
Max. Clients | 65 options: Unlimited, then 1 through 64 in steps of 1 | Unlimited |
Min. Client Signal Strength | 95 options: Unlimited, then -94 dBm through -1 dBm in steps of 1 dBm | Unlimited |
A value set here applies to this device's radio only. To set the same value for every radio in the group at once, use the group-level page. See 7.3.2 Radio Settings.
Before fixing a channel, check Device > Reports > AirMonitor Reports, which charts utilization and the access points detected per channel. See 15.13 AirMonitor Reports.
7.4.4. Controls on This Screen
Control | What it does |
Update auto channels | Acts on the automatic channel selection of the radios in the grid |
Save Changes | Commits the changes. Disabled until a change is made |
Cancel | Discards the changes |