
2. Getting Started
This chapter covers access to InControl 2, the Peplink ID account, the organization list, and the three levels of the interface. Later chapters assume familiarity with the terms organization, group and device.
2.1. How InControl 2 Is Organized
InControl 2 has three levels. The top bar shows the current level, above the breadcrumb.
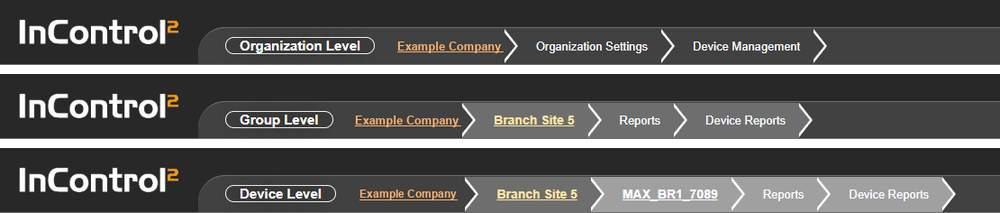
The top bar at each level. From the top: Organization Level, Group Level and Device Level, each followed by its breadcrumb.
Level | Top bar reads | What it holds |
Organization | Organization Level | Groups, organization-wide settings, and every device the organization owns |
Group | Group Level | Devices, and the settings that apply to all of them |
Device | Device Level | One device, its own details, reports and tools |
The breadcrumb beside the level name shows the navigation path, for example organization, then group, then device.
How menu paths are written in this manual. The first word of a path is the level: Organization, Group or Device. The second is the item on the menu bar, and the third is the entry in that item's dropdown. For example, Group > Settings > Notifications means: open the group, select Settings on the menu bar, then Notifications in its dropdown.
The dropdown opens when the pointer rests on the menu bar item.
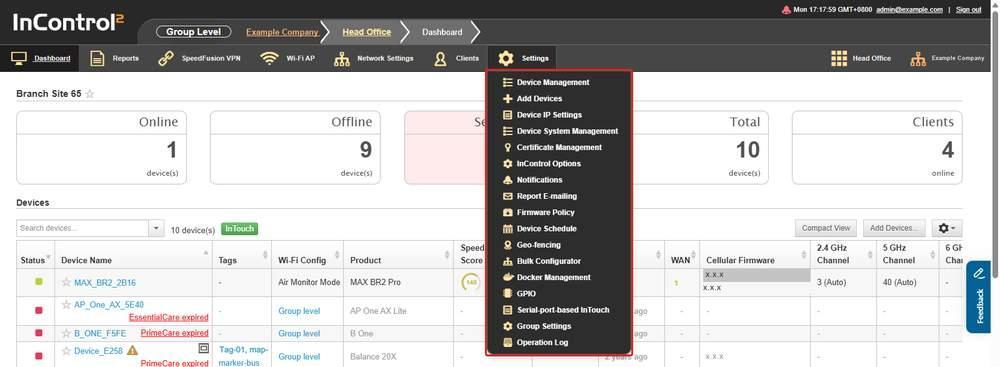
Group > Settings with its dropdown open, outlined in red. Device Management, Add Devices and Notifications are among its entries, and Operation Log is the last.
The same menu bar item lists different entries at each level. At device level, Settings holds the tools for one device.

Device > Settings with its dropdown open, outlined in red, on an online router: Remote Web Admin, InTouch, Web CLI, Firmware Management, Certificate Management and Device Tools.
Note the following:
- The same report exists at more than one level, and shows different data. Device Reports at group level covers every device in the group. Device Reports at device level covers one device, and offers fewer date ranges.
- A setting made at group level applies to every device in that group. Some settings appear again at device level, where they apply to that device only.
Where this manual covers each level
Level | Chapters |
Organization | Organization Dashboard, Organization Reports, Settings (Organization Level) |
Group | Group Dashboard, Reports, Network Settings, SpeedFusion VPN, Wi-Fi AP, Clients, Settings (Group Level) |
Device | Device Level Management, Device Level Tools, Device Reports |
2.2. Signing In
To access InControl 2, sign in with your Peplink ID or with a Google, Microsoft or Apple account.
InControl 2 is located at incontrol2.peplink.com. Sign in is handled by Peplink ID at a separate address, peplinkid.peplink.com, so the address bar changes when the sign-in page opens. Opening any InControl 2 address while signed out redirects to this page.
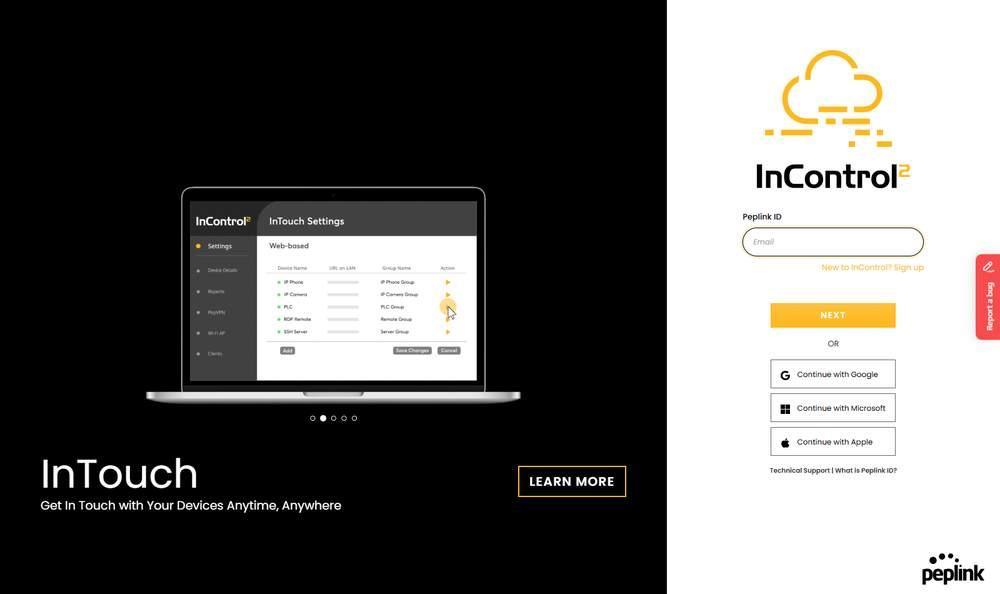
The sign in page. The account controls are in the right hand panel. The left hand panel is a product carousel and is not used to sign in.
2.2.1. Controls
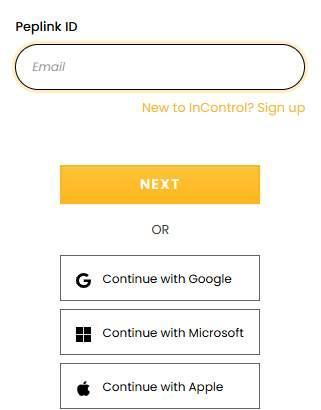
The Peplink ID box with the Sign up link beneath it, NEXT, and the three Continue with buttons below the OR separator.
Control | What it does |
Peplink ID | Takes the e-mail address of your Peplink ID. If the browser already holds a Peplink ID session, the page shows Sign in as a different user in place of the empty address field |
NEXT | Continues with the address entered |
New to InControl? Sign up | Opens the Peplink ID registration form. See 2.3 If You Do Not Have a Peplink ID Yet |
Continue with Google | Signs in with a Google account instead of a Peplink ID password. The three Continue with options are federated sign in through the selected identity provider, and are placed below an OR separator |
Continue with Microsoft | Signs in with a Microsoft account |
Continue with Apple | Signs in with an Apple account |
Technical Support | Opens the Peplink support ticket form at ticket.peplink.com |
What is Peplink ID? | Opens the Peplink forum article explaining what a Peplink ID is |
2.2.2. If You Cannot Sign In or Reach Your Organization
What you see | Cause and fix |
A page reading Access Denied and The page you requested does not exist or you do not have right to access., after signing in, after being added to an organization, or on one page only | Usually stale data in the browser. Sign out of InControl 2 and sign in again. If that does not clear it, clear the browser cache and the cookies for peplink.com, open a private window, or try another browser. If it persists, ask an administrator of the organization to check that your user is listed, is not suspended and has a role |
Your account has been temporarily disabled. Please contact your system administrator for more information or try again later. | This usually follows several failed sign-in attempts, which lock the account for a while. Wait at least one hour, then sign in again. Use Forgot Password if you are unsure of the password. If it persists after a few hours, open a ticket with Peplink Support and give the address you sign in with |
Signed in, but your organization or a device is not listed | You may be signed in with a different Peplink ID. For example, Continue with Apple with Apple's Hide My Email turned on creates a Peplink ID under a relay address rather than your own. Sign in the same way again to reach what that account holds |
Added to an organization, but it does not appear | The administrator must add the exact e-mail address of your Peplink ID. If that address has no Peplink ID yet, register one with it (2.3.1 Creating a Peplink ID). After an administrator changes your role, sign out and sign in again |
Only an administrator of the organization can add you to it or change your role. If the organization has no administrator left, open a ticket with Peplink Support.
2.3. If You Do Not Have a Peplink ID Yet
Follow this procedure to create an InControl 2 account.
2.3.1. Creating a Peplink ID
An InControl 2 account is a Peplink ID. The registration form is reached from New to InControl? Sign up on the sign-in page. A Peplink ID can also be created at peplinkid.peplink.com.
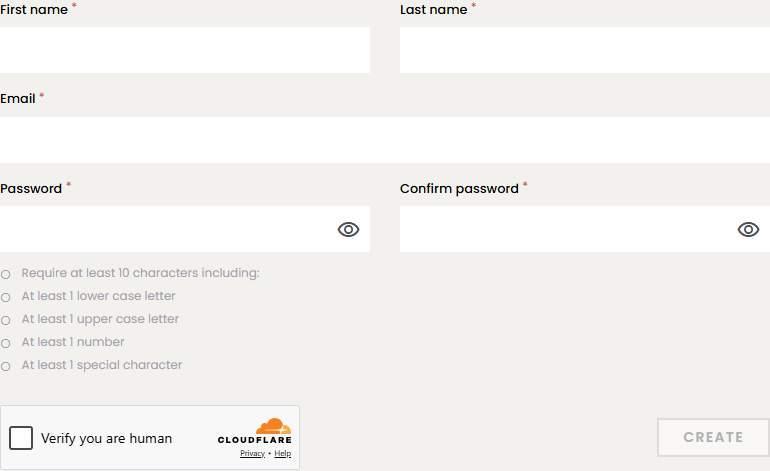
The Create Peplink ID form. Enter your first name, last name, e-mail address and password, then confirm the password. The password requirements are shown below the Password field and are checked as you type.
Fields
All five fields are marked required with an asterisk.
Field | Notes |
First name | |
Last name | |
Becomes your Peplink ID | |
Password | Must meet the rules below. A visibility control shows or hides the entry |
Confirm password | Must match. Also has a visibility control |
Password rules
The requirements are listed under the Password field:
- At least 10 characters
- At least 1 lower-case letter
- At least 1 upper-case letter
- At least 1 number
- At least 1 special character
Controls
Control | What it does |
Verify you are human | A Cloudflare verification check below the password rules. It must pass before the form can be submitted. If the check fails, the details entered are kept. Complete the check and click CREATE again |
CREATE | Submits the form and creates the Peplink ID. It is greyed out until the verification check passes |
Sign in | Returns to the sign-in page |
FAQ | Opens the Peplink ID FAQ |
The form footer contains Terms & Conditions, Privacy Policy and Contact Us.
2.3.2. Verifying Your E-mail Address
Clicking CREATE does not complete the registration. Peplink ID sends a verification e-mail, and the account cannot be used until the link in it is opened.
The page you land on
CREATE opens a Peplink ID page headed Check your inbox, which states:
If that email is registered with us, you will receive a link to complete your setup or sign in.
The page is the same whether or not the address already has a Peplink ID. The e-mail that follows differs:
- A new address receives Verify Email Address for Peplink ID, described below.
- An address that already has a Peplink ID receives Your Peplink ID account already exists, with a Go to login link and a Reset your password link. Use these links instead of registering again.
If no e-mail arrives:
- Check the spam or junk folder.
- Check the address entered.
- Try again from another browser or a private window.
- If it still does not arrive, open a ticket with Peplink Support from the Technical Support link on the sign-in page.
A password reset e-mail is not sent to an unverified account. Verify the address first.
Control | What it does |
BACK TO INCONTROL | Returns to InControl 2. While the account is unverified and signed out, this opens the sign-in page |
The page footer links to Terms & Conditions, Privacy Policy and Contact Us.
The e-mail
Item | Value |
From | Peplink ID <[email protected]> |
Subject | Verify Email Address for Peplink ID |
Link | Confirm email address |
Validity | The link expires in 5 days, as stated in the e-mail |
The body asks the recipient to click the link to verify the address and finish creating the Peplink ID, and to ignore the message if it was not requested.
2.4. My Organizations and Groups
This screen lists every organization you can access, and is where new organizations are created. Its search box finds a device, SIM or user across all of them. It opens after sign in when the account has access to more than one organization or group. An account with access to a single organization or group opens that organization's or group's overview directly, and an account with access to no organization is taken to Create Organization instead. See 2.6 Your First Organization below.
Where to find it
incontrol2.peplink.com/r/user/organizations, or My Organizations in the top bar of any user level screen.
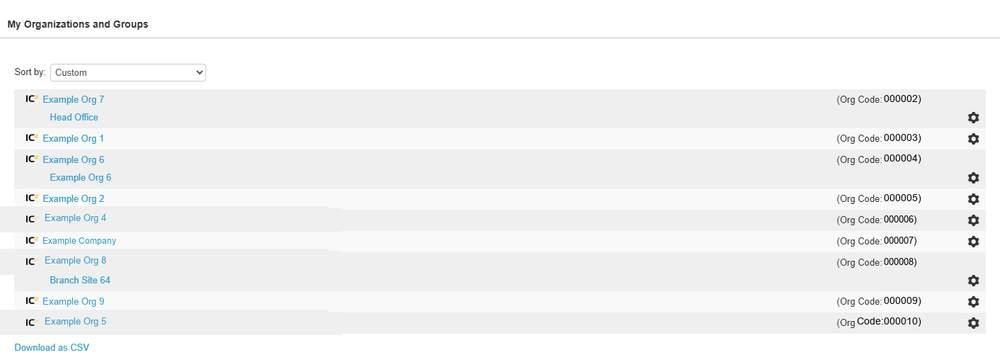
The organization list. Each row is one organization, with its Org Code on the right and a gear at the end of the row. A group granted without its whole organization is listed under that organization.
2.4.1. What This Screen Shows
Item | What it shows |
Organization name | Links to that organization. The icon to its left is the organization's own icon. The address shown in the browser address bar changes when an organization is opened. This is expected |
Nested group name | Appears under an organization when your access is to that group rather than to the whole organization. Links directly to the group |
(Org Code: ...) | The organization's code |
Gear | Opens a menu with one item, Remove, which removes the user from the organization |
2.4.2. Controls
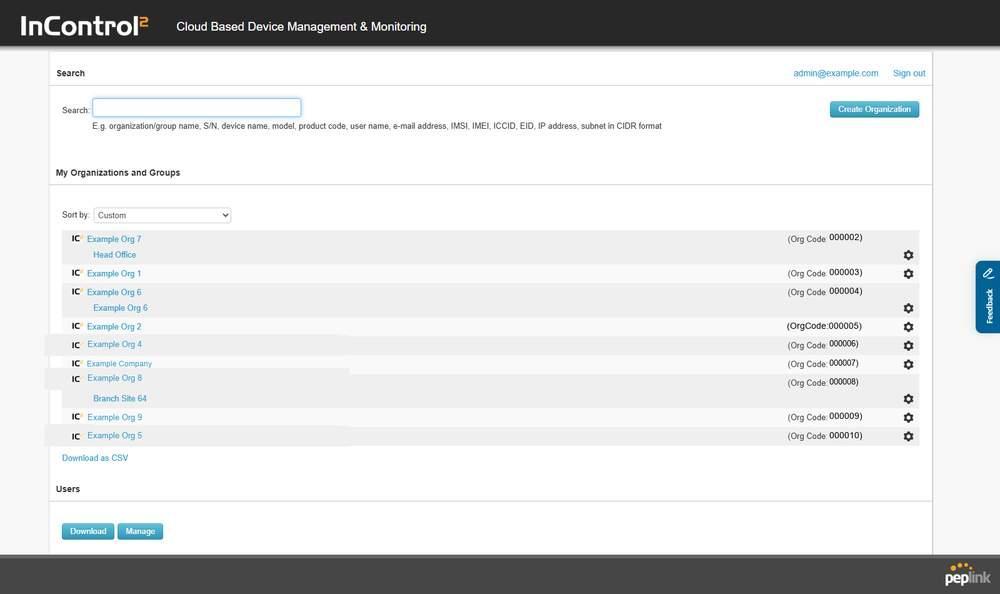
Search and its hint at the top, Create Organization on the right, Sort by above the list, Download as CSV below it, and the Users panel with Download and Manage at the foot.
Control | What it does |
Search: | Searches across organizations and their contents |
Create Organization | Opens the Create Organization form. See 2.5 Creating an Organization |
Sort by: | Reorders the list. Six options, listed below |
Download as CSV | Downloads the organization list as a CSV file |
Download (Users panel) | Downloads the user list as a CSV file, for example for periodic access reviews |
Manage (Users panel) | Opens User Management. Its tooltip reads User Management |
2.4.3. What the Search Covers
The hint under the search box lists the searchable items:
E.g. organization/group name, S/N, device name, model, product code, user name, e-mail address, IMSI, IMEI, ICCID, EID, IP address, subnet in CIDR format
A serial number, ICCID, IP address or subnet in CIDR form, for example 10.20.0.0/16, can be searched across every accessible organization at once.
2.4.4. Sort by Options
Custom is the default.
Option | Orders by |
Custom | A user-defined order |
Organization name | Name |
Organization creation date | When the organization was created |
Date of access availability | When your access to it began |
Number of active devices | Active device count |
Number of devices | Total device count |
2.5. Creating an Organization
An organization is the top-level container. Create one before adding any device.
Where to find it
My Organizations and Groups > Create Organization
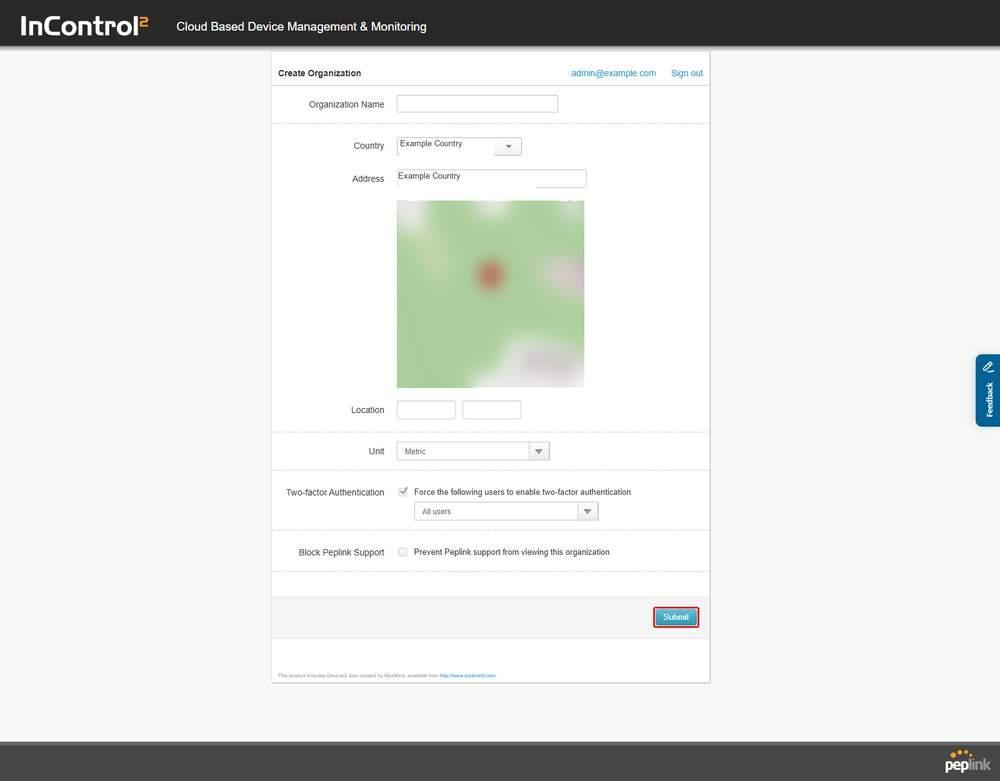
The Create Organization form, with Submit outlined in red at the foot. Organization Name is empty, Country, Address and Location are pre-filled from your location, Unit is set to Metric, and Two-factor Authentication is ticked for All users.
2.5.1. Fields
Field | Default | Notes |
Organization Name | Empty | |
Country | Pre-selected from your location | A full country list |
Address | Pre-filled from your location | Free text, with a map below it. The Location values are entered separately and, as the field tooltip states, may not correspond to the address |
Location | Pre-filled from your location | Two fields, latitude then longitude |
Unit | Metric | Metric, Imperial, Nautical metric, Nautical imperial |
Two-factor Authentication | Ticked | Force the following users to enable two-factor authentication, with a list of the users it applies to |
Block Peplink Support | Clear | Prevent Peplink support from viewing this organization. Leave it clear to allow Peplink to assist with a support case |
The pre-filled Country, Address and Location are derived from your network location. The page credits GeoLite2 data from MaxMind.
2.5.2. Who Two-factor Authentication Is Forced On
The list below the checkbox sets the scope. All users is the default.
Option | Applies to |
All users | Everyone with access to the organization |
All administrators | Organization administrators |
All super organization administrators | Super organization administrators only |
Caution: Two-factor authentication is on by default for all users, including the creator. See 2.6 Your First Organization before clicking Submit.
2.5.3. The Map
The OpenStreetMap map between Address and Location shows the position the address resolved to.
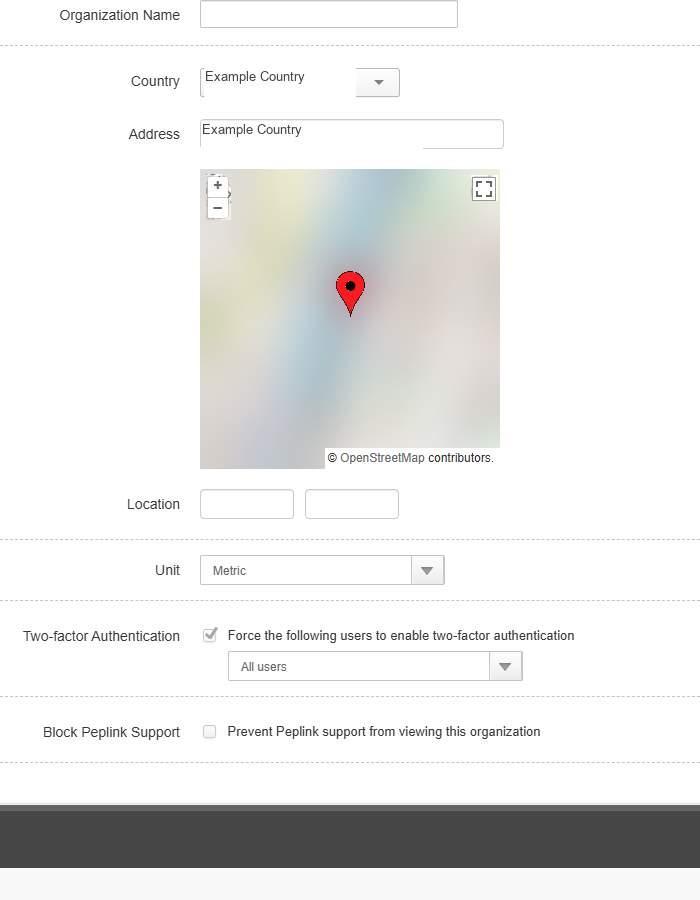
The map sits between Address and Location, with the zoom buttons at its top left and the full screen icon at its top right.
Control | What it does |
+ | Zoom in |
– | Zoom out |
Full-screen icon | Toggle full screen. Its tooltip reads Toggle full-screen |
2.5.4. Before Pressing Submit
Confirm the following before clicking Submit:
- Which users must use two-factor authentication.
- Whether Peplink support may view the organization (Block Peplink Support).
- The Unit, which sets speed and distance units for the whole organization.
2.6. Your First Organization
A new account has access to no organization, so InControl 2 does not show the organization list. The first sign in opens Create Organization, and remains there until an organization exists. The form is described in 2.5 Creating an Organization.
2.6.1. What Happens After Submit
Submit shows Creating organization... please wait, then opens the new organization.
With the form's defaults, the organization requires two-factor authentication, so instead of the Overview the organization shows this message:
This organization requires users to enable two factor authentication. Click here to enable.
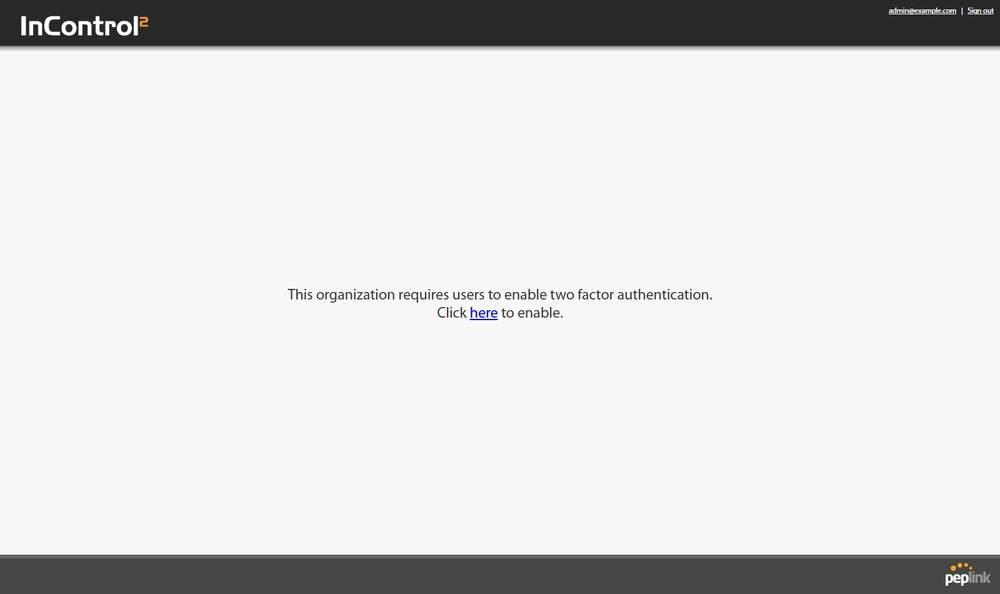
The page a new organization shows its creator when the Create Organization defaults are kept. The page has no navigation. The only working controls are the account link, Sign out, and here.
The restriction applies to the organization, not to the account. My Organizations and Groups, your profile and Create Organization remain available, and the organization appears in the list. Only opening the organization is blocked.
2.6.2. Why, and What to Do About It
The new organization requires two-factor authentication for all users, and two factor authentication is not yet enabled on your account.
To access the organization, enable two-factor authentication on your Peplink ID:
- 1.Click here on the page. The Peplink ID account console opens in a new tab, at peplinkid.peplink.com/profile.
- 2.In the SECURITY section, set up an authenticator application on your phone.
- 3.Return to InControl 2 and open the organization again.
The Two Factor Authentication row of your InControl 2 profile shows the current state, and its Change link opens the same Peplink ID page.
To avoid this step, do one of the following:
When | What to do |
Before creating the organization | Enable Two Factor Authentication on your own account first, on the profile screen |
On the creation form | Untick Two-factor Authentication, or narrow it from All users to a group that does not include you. It can be turned on afterwards from the Security section of Organization > Organization Settings (9.8.2 Security) |
2.7. Your First Group
A new organization requires a group before any other task.
This form is headed Name your group. It does not offer Settings Cloning, which is described under Create Group in Settings (Organization Level) (9.3 Create Group).
In an organization with no groups, InControl 2 opens Create Group until a group exists.
Where to find it
Organization > Organization Settings > Create Group, or open the organization.
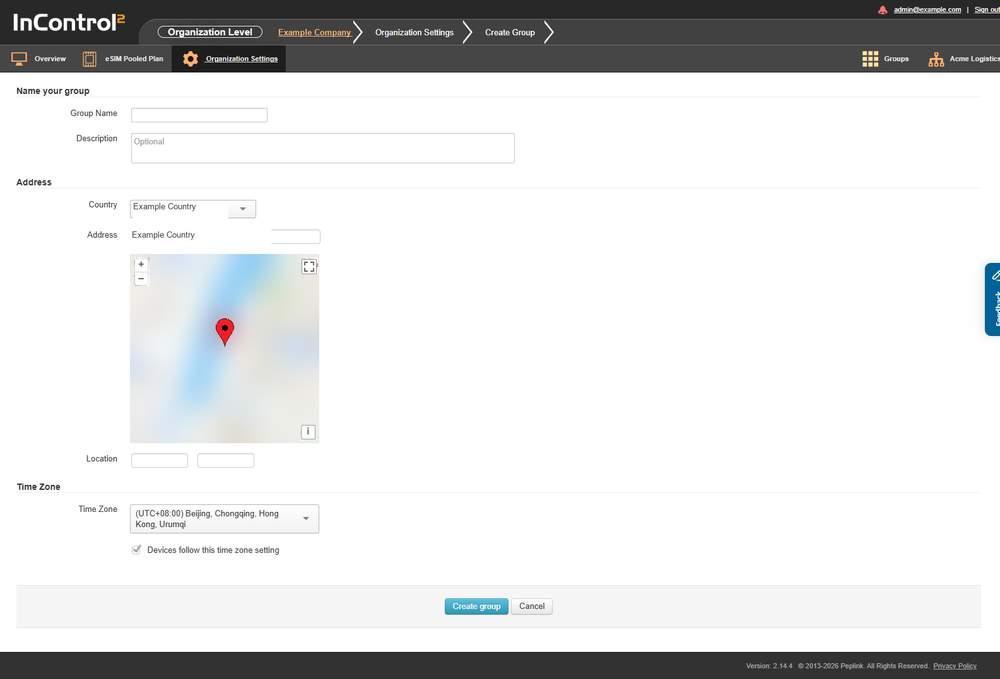
Create Group in a new organization, headed Name your group. The menu on the left holds only Overview, eSIM Pooled Plan and Organization Settings.
2.7.1. Fields
Field | Default | Notes |
Group Name | Empty | Required |
Description | Empty | Marked Optional |
Address | Pre-filled from your location | With a map and a Country list, as on Create Organization |
Time Zone | Pre-filled | Devices follow this time zone setting is ticked, so devices added to the group use the group's time zone instead of their own |

The Time Zone list is pre-filled, and Devices follow this time zone setting is ticked.
Control | What it does |
Create group | Creates the group and opens Add Devices at group level |
Cancel | Abandons the form |
2.8. Adding Your First Device
A new group has no devices, so InControl 2 opens Add Devices when the group is created. This group-level version adds devices to the current group. Organization level has its own Add Devices, which adds devices to a selected group (see 9.1 Add Devices (Organization Level)). If a device remains offline after it is added, check the prerequisites in Introduction, Before you start (1.3 Before You Start): warranty or subscription, supported firmware, and outbound TCP 5246 and UDP 5246 from the site.
Where to find it
Group > Settings > Add Devices
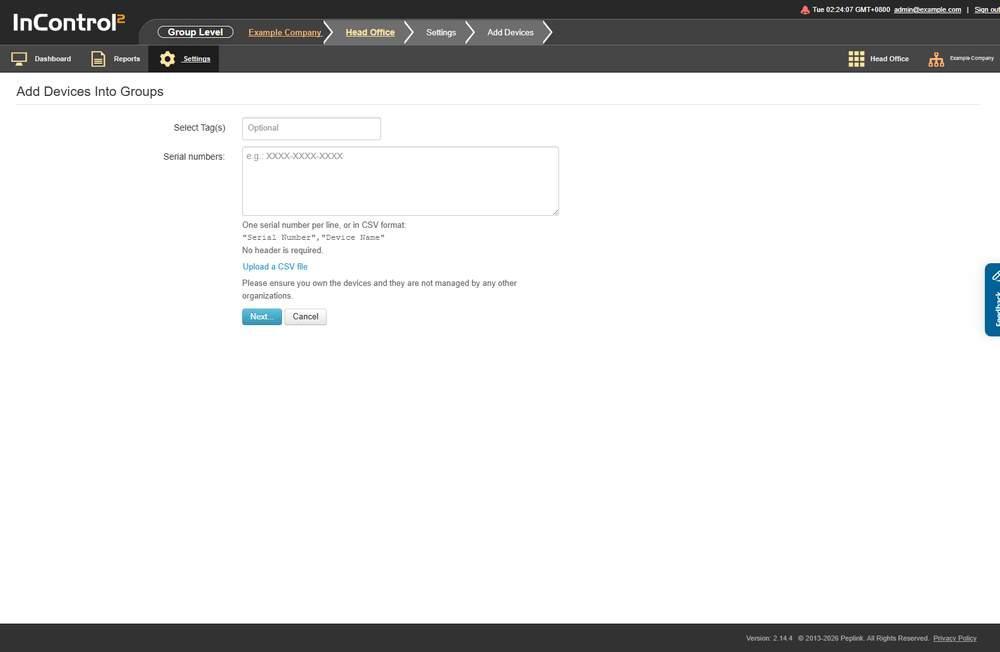
Add Devices, headed Add Devices Into Groups. Serial numbers are entered one per line or uploaded as CSV.
Item | What it does |
Select Tag(s) | Tags to apply to the devices being added |
Serial numbers: | One serial number per line, or CSV |
Upload a CSV file | Adds serial numbers from a file |
Next... | Continues |
Cancel | Abandons the form |
The CSV file format is described under Add Devices in Settings (Organization Level), 9.1 Add Devices (Organization Level).
Caution: The screen states: Please ensure you own the devices and they are not managed by any other organizations. A device belongs to one organization at a time. Adding a serial number that another organization already manages does not move the device.
2.8.1. If a Serial Number Cannot Be Added
Next... checks every serial number entered. Serial numbers that cannot be added are listed on a screen that replaces the form.
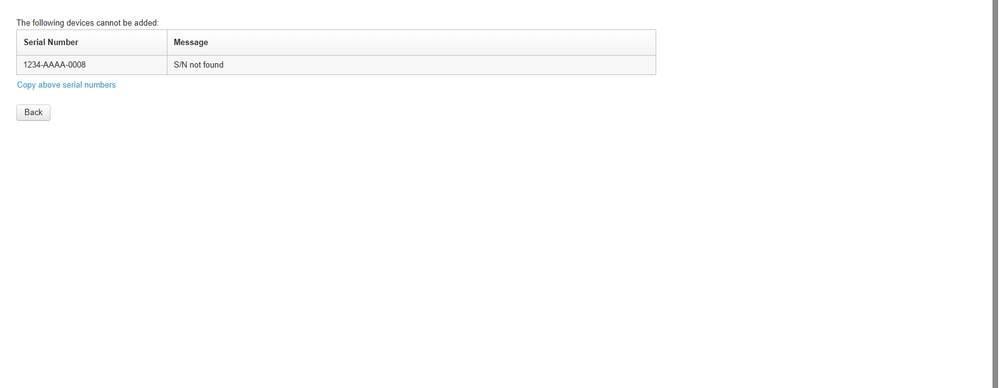
The result of Next... with an unknown serial number. The table shows the serial number and the message S/N not found, with Copy above serial numbers and Back below it.
Item | What it shows or does |
The following devices cannot be added: | Heads the list |
Serial Number | Each serial number that was refused |
Message | The reason, for example S/N not found |
Copy above serial numbers | Copies the listed serial numbers |
Back | Returns to the form |
The figure shows Organization > Organization Settings > Add Devices, which uses the same Next... check.
Message | What it means | What to do |
S/N not found | The serial number is not recognised | Check it against the label on the device, click Back and enter it again. If it matches the label, open a ticket with Peplink Support with the serial number |
Device already belongs to another organization (What should I do?) | Another InControl 2 organization holds the device. What should I do? is a link | |
Device already belongs to the organization "<name>" | The same case, with the holding organization named and linked | Open that organization, or ask its administrator, and remove the device there (2.8.3 Releasing a Device You No Longer Own) |
Failed to verify | The Peplink ID is temporarily restricted from adding devices after repeated attempts | Open a ticket with Peplink Support and give the Peplink ID you sign in with and the serial numbers. If a device is held by another organization, see 2.8.2 If the Device Belongs to Another Organization |
2.8.2. If the Device Belongs to Another Organization
A device belongs to one organization at a time. For privacy and security reasons, Peplink cannot remove a device from an organization. This applies to every device.
The device must be removed by the organization that holds it.
- 1.Ask the holder (seller, reseller, installer or former administrator) to remove the device from their organization. See 2.8.3 Releasing a Device You No Longer Own.
- 2.Once it is removed, add it again.
While another organization holds the device, it keeps working and its local Web Admin stays available. Once released, InControl 2 manages it only while it has warranty or an active care plan (1.3 Before You Start).
2.8.3. Releasing a Device You No Longer Own
Before selling, returning or handing over a device, release it so the next owner can add it:
- 1.Open the group that holds the device and go to Group > Settings > Device Management.
- 2.Download any reports you need to keep. Removing a device clears all data InControl 2 has collected from it.
- 3.Tick the device, open Actions and choose Remove.... See 13.1.6 The Actions Menu.
- 4.In the form, choose whether InControl 2 managed settings on the device should be removed or retained, then click OK. The default is retained.
- 5.Factory reset the device to clear your configuration from it.
The removal is recorded in the Operation Log as Removed: <serial number>, followed by whether InControl 2 managed settings were removed from the device.
Once removed, the new owner can add the device to their own organization.
2.8.4. Adding Many Devices
- Prepare a CSV with one line per device in the form "Serial Number","Device Name". No header row is needed. Devices are named as they are added.
- Select tags in Select Tag(s) before clicking Next.... Tags later scope notification profiles (Devices Notify for ...), firewall and VLAN profiles, and Cell ID location lookup to a subset of devices.
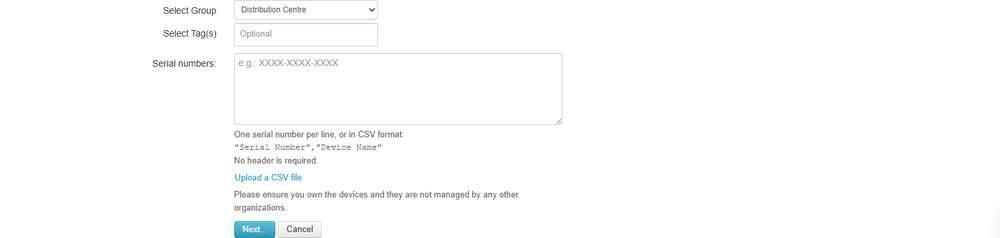
Select Group and Select Tag(s) sit above the Serial numbers box. The CSV format is stated under the box, above Upload a CSV file.
- Each pass adds devices to one group. To add devices to several groups, use Organization > Organization Settings > Add Devices once per group. See 9.1 Add Devices (Organization Level).
- To give a new group the same settings as an existing group, create it from Organization > Organization Settings > Create Group and tick the settings to clone. See Settings (Organization Level), 9.3.2 Settings Cloning.
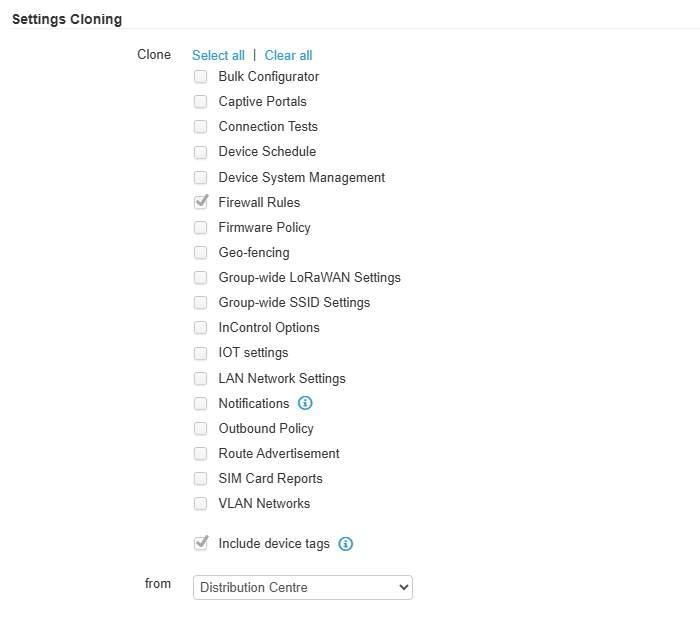
Tick the settings to copy in the Clone list, then check that the from dropdown below it names the template group.
2.9. What a New Organization Looks Like
In a new organization, most screens are empty and the menus show fewer options than the screenshots in this manual. Additional menu options appear as devices and settings are added. No features are hidden or restricted by licensing.
Stage | Organization menu holds |
No groups | Overview, eSIM Pooled Plan, Organization Settings |
A group, no devices | the above plus Add Devices, Device Management, Create Group, Group Management, Report E-mailing, Operation Log, Subscriptions and Licenses |
Devices online | the above plus Reports, SpeedFusion VPN, Wi-Fi AP, Network Settings, SIM Card Reports, Starlink Data Pools |
Group level behaves the same way. With no devices it offers Dashboard, Reports and Settings only.
2.9.1. What the Empty Screens Say
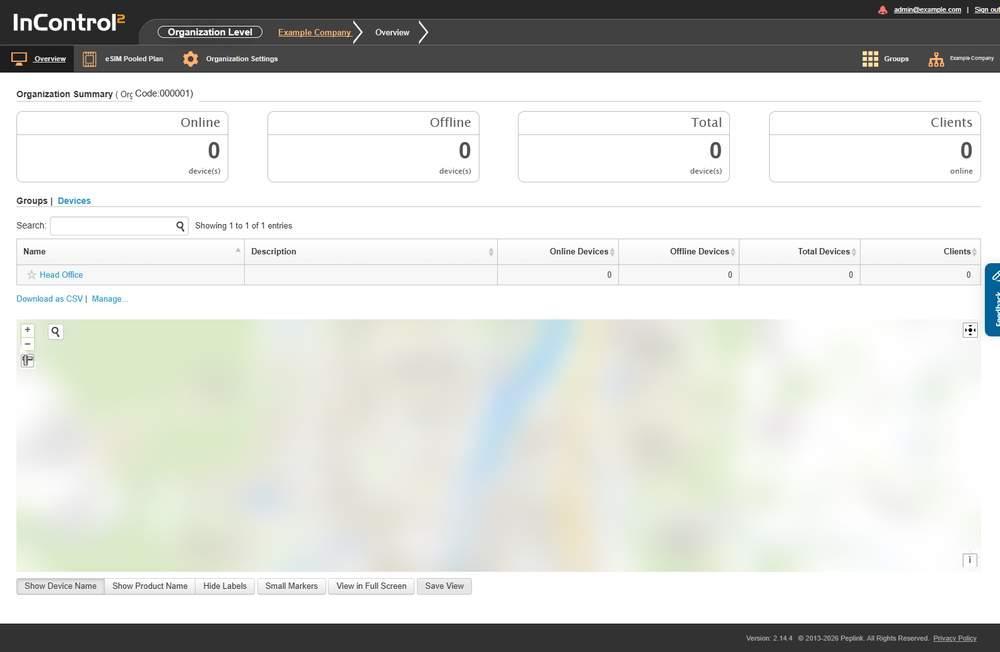
The Overview of a new organization. Online, Offline, Total and Clients all read 0, and the Groups grid lists the one group with zero devices.
Screen | What it shows before any device is added |
Organization Overview | Online 0, Offline 0, Total 0, Clients 0 online, and the Groups grid listing your group with zeros across it |
Group Management | The group and No. of Devices 0 |
Device Management, organization | This organization contains no devices. Click here to add devices. |
Group Dashboard | This group contains no devices. Click here to add devices. |
In each case here links to Add Devices.
2.10. Your Profile
This screen shows your Peplink ID settings, your recent sign-in history and the applications authorized for your account. It also sets which e-mails InControl 2 sends you.
Where to find it
Click your e-mail address in the top bar of any user level screen.
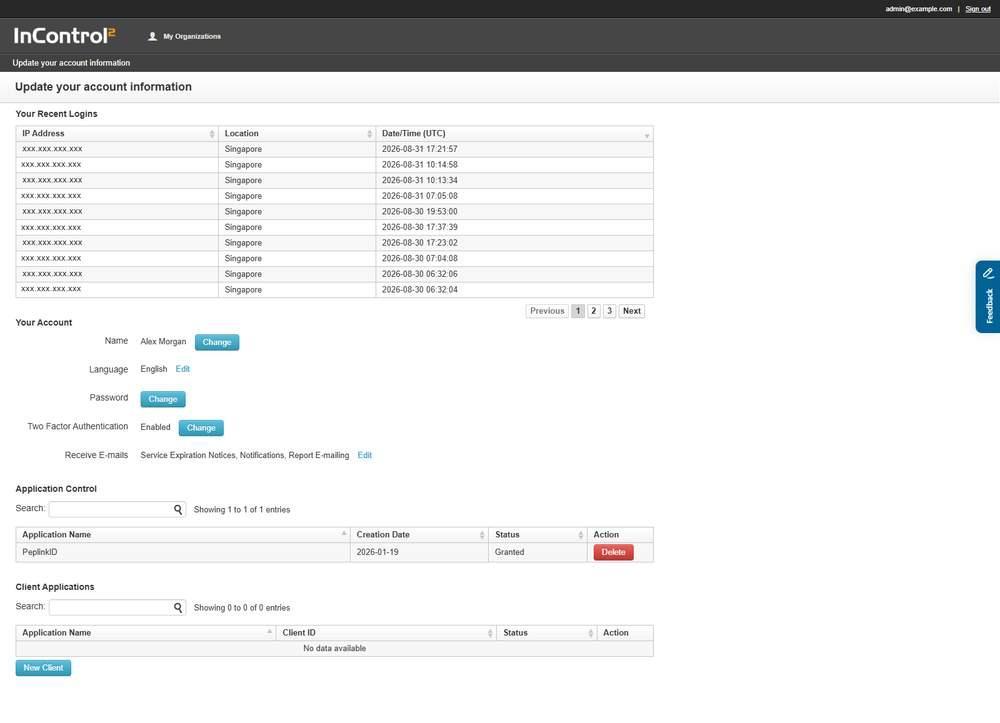
The profile screen. Your Recent Logins is at the top, the account settings in the middle, and the two application tables at the bottom.
2.10.1. What This Screen Shows
Section | What it shows |
Your Recent Logins | Where and when your account was signed in |
Your Account | The Peplink ID settings you can change |
Application Control | Applications you have granted access to your account |
Client Applications | API clients you created for the InControl 2 API |
2.10.2. Your Recent Logins
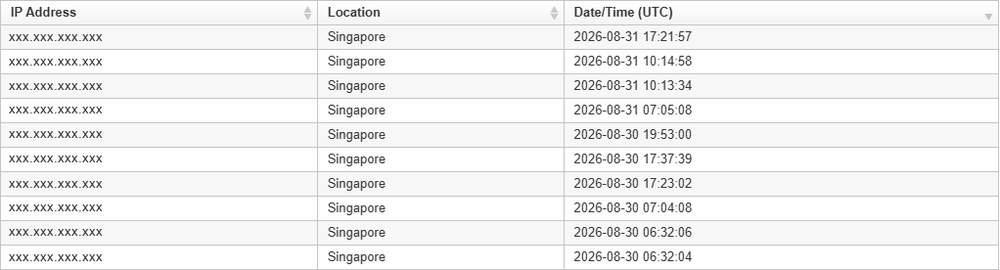
Each row gives the source IP address, the place it resolved to, and the date and time in UTC.
Column | What it shows |
IP Address | The address the sign in came from |
Location | The place that address resolved to |
Date/Time (UTC) | When it happened. UTC, not your local time |
The table is paged, and every column can be sorted. Most other InControl 2 timestamps use the group's time zone, and the organization level Operation Log has a selectable time zone. Do not compare them directly with these UTC times.
2.10.3. Your Account
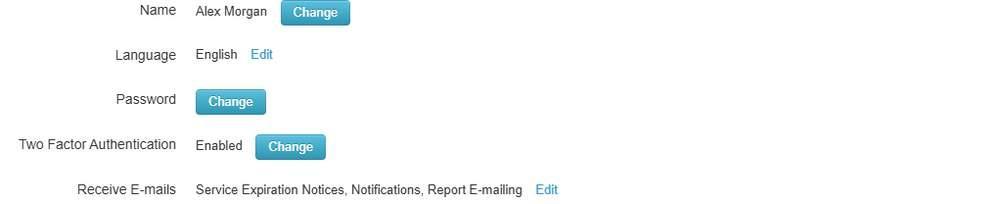
Each row has its own Change or Edit control. Two Factor Authentication shows its current state, here Enabled, and Receive E-mails lists the enabled categories.
Row | Control | What it does |
Name | Change | Changes the name on the account |
Language | Edit | Changes the interface language |
Password | Change | Changes the Peplink ID password |
Two Factor Authentication | Change | Turns two-factor authentication on or off for your own account. The row shows the current state |
Receive E-mails | Edit | Selects which e-mails InControl 2 sends you |
Receive E-mails lists the enabled categories. The three available categories are Service Expiration Notices, Notifications and Report E-mailing. If alert e-mails set up under Group > Settings > Notifications (13.7 Notifications) are not received, check this row.
2.10.4. Application Control
Applications that hold access to your account.

One granted application, PeplinkID, with Delete in the Action column.
Column | What it shows |
Application Name | The application |
Creation Date | When access was granted |
Status | Whether access is granted |
Action | Delete, which withdraws that application's access |
Sign in through Peplink ID is listed here as a granted application.
2.10.5. Client Applications
API clients registered for your account. The table is empty until a client is created.

The Client Applications table. Each API client you create is listed here, under the columns described below.
Column | What it shows |
Application Name | The client |
Client ID | The identifier the client authenticates with |
Status | Whether the client is active |
Action | Per client actions |
New Client creates a client.
2.11. User Management
User Management adds one user to several organizations at once, instead of adding the same person in each organization's Administration list. To manage users and their roles in one organization, use the Administration section of Organization > Organization Settings instead (see 9.8.1 Administration).
Where to find it
My Organizations and Groups > Manage, in the Users panel.

User Management. The organizations listed are the ones you administer, and the control below them adds a user to all of them together.
2.11.1. What This Screen Shows
- The organizations you can administer, listed by name. This list is shorter than My Organizations and Groups, which also includes organizations where you hold group level access.
- Add a user to all organizations above, which adds one user across all of them.
2.11.2. Controls
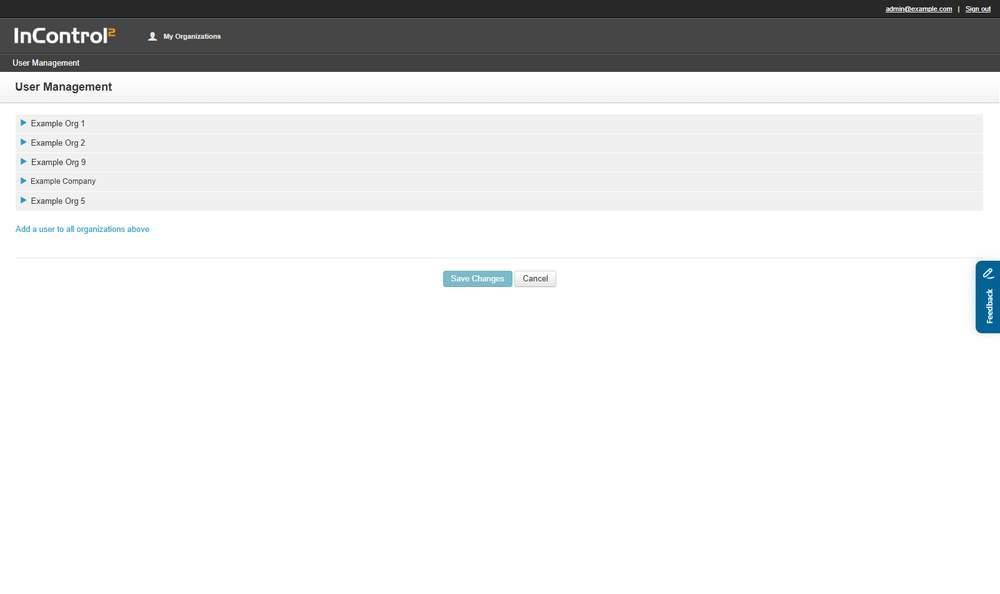
Add a user to all organizations above sits under the organization list, with Save Changes and Cancel below it.
Control | What it does |
Add a user to all organizations above | Adds a user to every listed organization |
Save Changes | Commits the change |
Cancel | Discards it |
Caution: One save adds the user to every organization listed. Check the list before clicking Save Changes.
2.12. Before Handing the Organization to an Operations Team
Complete this checklist once the first devices are online.
- Add users with the narrowest role required. See Administration in Settings (Organization Level) (9.8.1 Administration) and in Settings (Group Level) (13.17.2 Administration).
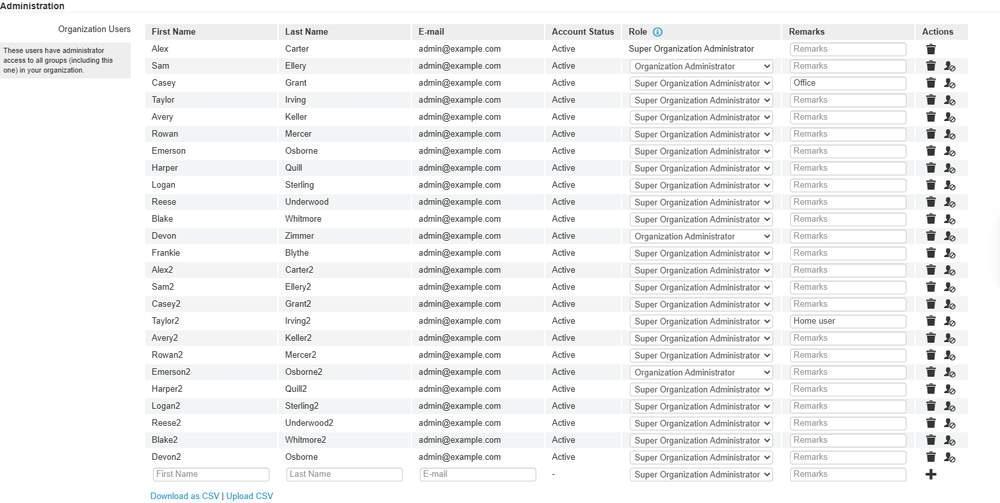
Each user row has its own Role dropdown. Select the narrowest role, and use the empty row at the foot to add a user.
- Turn on notifications for each group. See Settings (Group Level), 13.7 Notifications.
- Set up report e-mailing. See Settings (Group Level), 13.8 Report E-mailing (Group Level).
- Decide the firmware policy. See Settings (Organization Level), 9.6 Firmware Policy (Organization Level).
- Review the Security section of Organization > Organization Settings (9.8.2 Security): Idle Timeout, Two-factor Authentication, Authenticated with Password and API access.

Idle Timeout, Two-factor Authentication and Authenticated with Password, with the OAuth2 API setting below them.