
6. eSIM and SIM Management
This chapter covers every SIM task in InControl 2, at organization, group and device level. It starts with a short guide to each task, linked to the section that documents it in full, and then documents the organization level eSIM Pooled Plan screen. That screen reports the state of the organization's Peplink eSIM data pooled plan, lists the ICCIDs drawing on it, and keeps a history of every movement of data between the pool and individual eSIMs. InControl 2's help text describes the pooled plan as a "family data plan" that lets you share Peplink eSIM data among multiple devices. The allowance belongs to the pool, not to each eSIM separately.
6.1. SIM Tasks at a Glance
Each SIM task in InControl 2 in brief, with a link to the full section.
6.1.1. Cap SIM Data and Get Alerts
Use this when a set of SIMs shares a carrier plan and needs a quota, usage alerts, and an action once the quota is exceeded.
- 1.Open Group > Reports > SIM Card Reports for one group, or Organization > Reports > SIM Card Reports for every group.
- 2.Click New SIM Pool.
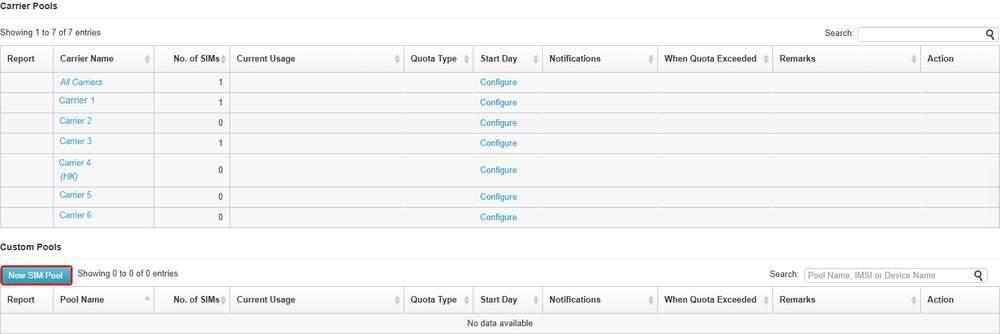
Step 2. New SIM Pool, outlined in red, at the head of the Custom Pools table, below Carrier Pools.
- 3.Enter Pool Name, select Define by (IMSI or ICCID), list the SIMs, and set Bandwidth Quota and Start Day.
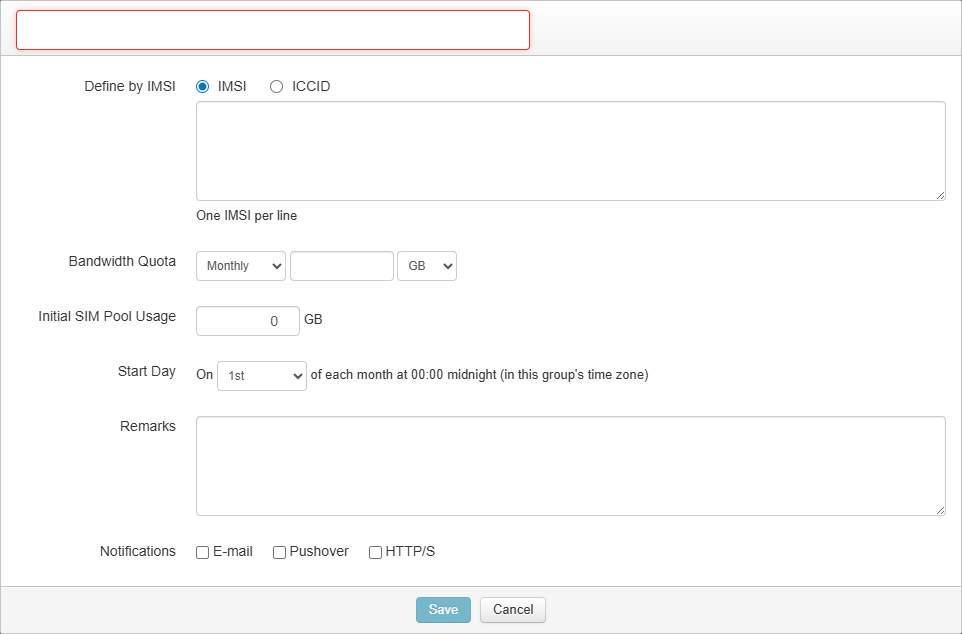
Step 3. The New SIM Pool dialog. Pool Name, outlined in red, is at the top, followed by Define by, the identifier list, Bandwidth Quota and Start Day, with Notifications at the foot.
- 4.Tick the Notifications to send (E-mail, Pushover, HTTP/S), select the action under When Bandwidth Quota Exceeded, and click Save.
- Carrier Pools are created automatically, one per carrier plus All Carriers. Configure on a carrier row opens the settings for that pool.
- A group-level pool resets at midnight in that group's time zone. An organization-level pool resets at midnight GMT+0.
Caution: Stop Routing User Traffic stops user traffic once the pool's quota is exceeded, and one pool can hold SIMs across many devices. Check the SIMs in the pool and the quota before saving, and select Bandwidth Throttling where loss of service is not acceptable. Bandwidth Throttling requires firmware 8.5.3 or newer on every device in the pool. On earlier firmware it falls back to Stop Routing User Traffic, so check the firmware first.
Full detail: 11.5.7 Creating a Custom SIM Pool, 4.1 SIM Card Reports (Organization Level)
6.1.2. Give Each Device Its Own SIM Pool in One Step
Use this when every device needs its own pool and quota, without creating each pool manually.
- 1.Open Group > Settings > Device Management and tick the devices.
- 2.From Actions, select Create per-device custom SIM pools....
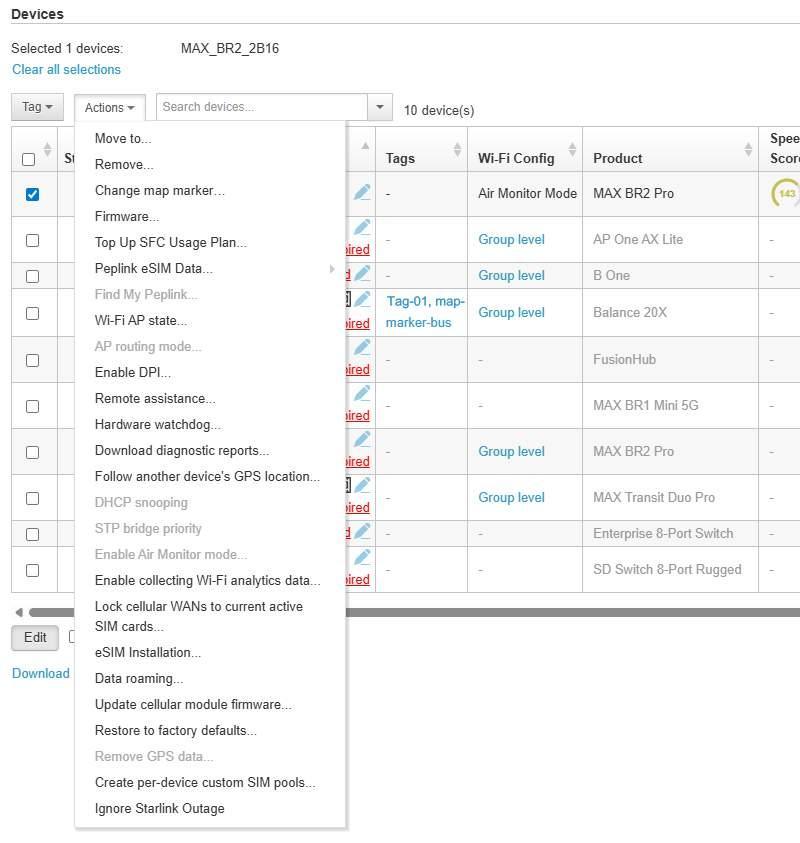
Step 2. The Actions menu opened with one device ticked. The Selected 1 devices line above the grid names the device, and entries that do not apply to it are greyed out. Create per-device custom SIM pools... is near the foot of the menu.
- 3.Enter a Pool Name Prefix, select Define by, set Bandwidth Quota and Start Day, and tick Stop Routing User Traffic or Bandwidth Throttling.
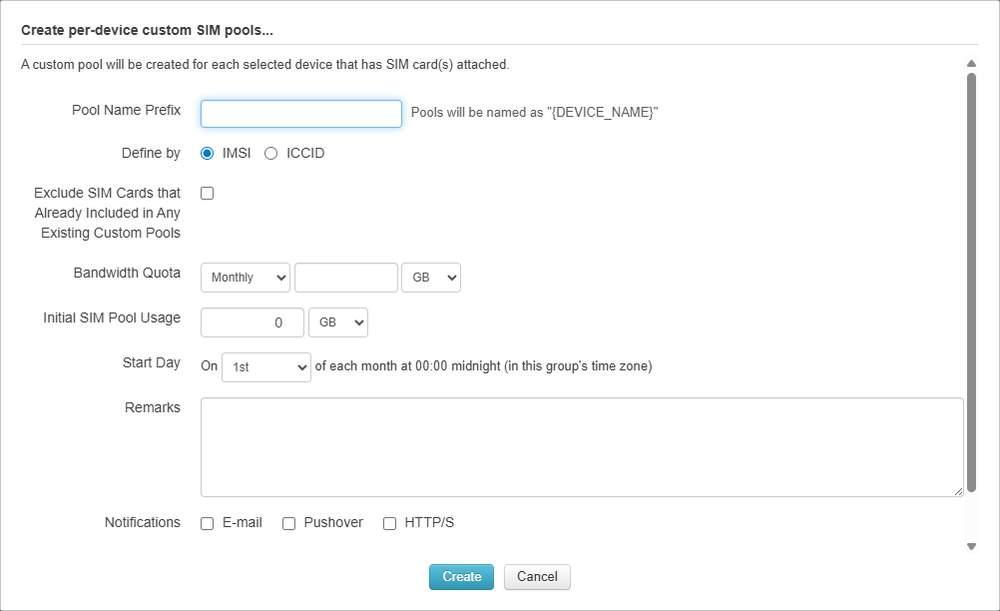
Step 3. The form opened from Actions. Pool Name Prefix, Define by, Bandwidth Quota and Start Day in order down the form, and Create at the foot.
- 4.Click Create.
- One custom pool is created for each selected device that has SIM cards attached, named from the prefix followed by the device name.
- Tick Exclude SIM Cards that Already Included in Any Existing Custom Pools to leave out SIMs already in a custom pool.
Caution: Bandwidth Throttling requires firmware 8.5.3 or newer, as the form notes. On earlier firmware it falls back to Stop Routing User Traffic, which stops user traffic once the quota is exceeded.
Full detail: 13.1.10 Create Per-device Custom SIM Pools
6.1.3. Check SIM Usage and Export SIM Details
Use this when reconciling a carrier invoice, finding which SIM in a pool used the data, or when a carrier requests the ICCID, IMSI, MTN, APN or band of a SIM.
- 1.Open Organization > Reports > SIM Card Reports, or Group > Reports > SIM Card Reports for one group. Current Usage in Carrier Pools and Custom Pools shows each pool's usage in the current quota period.
- 2.For daily usage per SIM, go to Per-SIM Daily Data Usage, select IMSI or ICCID, list the identifiers, set Date Range, and click Download as CSV. A wildcard such as 310260* covers every SIM whose IMSI starts with that prefix.

Step 2. SIM Identifier, the identifier box and the Date Range fields. Download as CSV is greyed out until identifiers are entered.
- 3.For SIM details, go to Devices and SIM Cards, find the device with Search:, and read its rows, or click Download as CSV under that table.
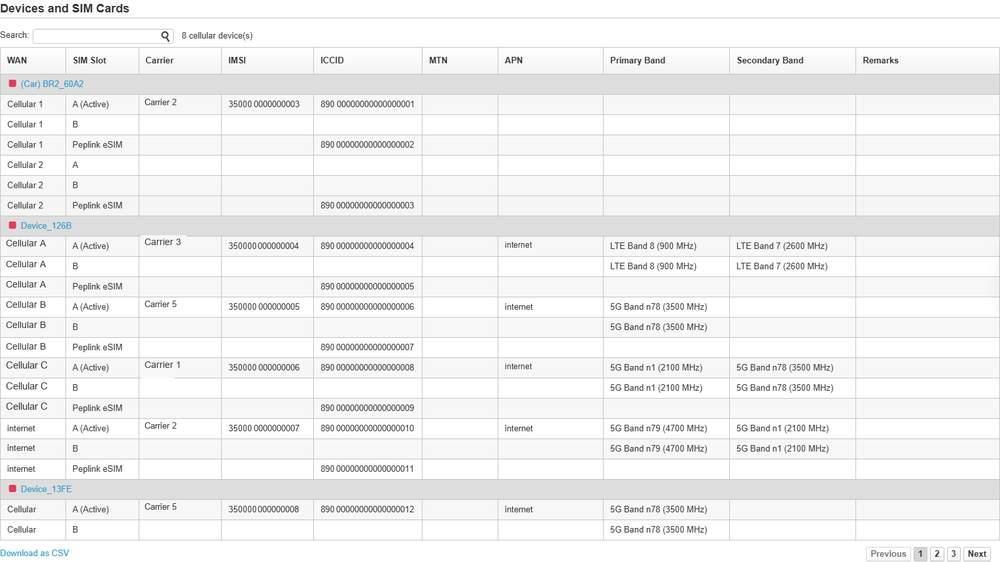
Step 3. One row per SIM slot under each device, with Carrier, IMSI, ICCID, MTN, APN and the primary and secondary bands. The slot in use is marked (Active).
- Per-SIM Daily Data Usage produces a CSV file, not an on-screen table.
Full detail: 4.1.4 Per-SIM Daily Data Usage, 4.1.5 Devices and SIM Cards
6.1.4. Turn Data Roaming On or Off for Many Devices
Use this when roaming must change on several devices at once.
- 1.Open Group > Settings > Device Management and tick the devices.
- 2.From Actions, select Data roaming....
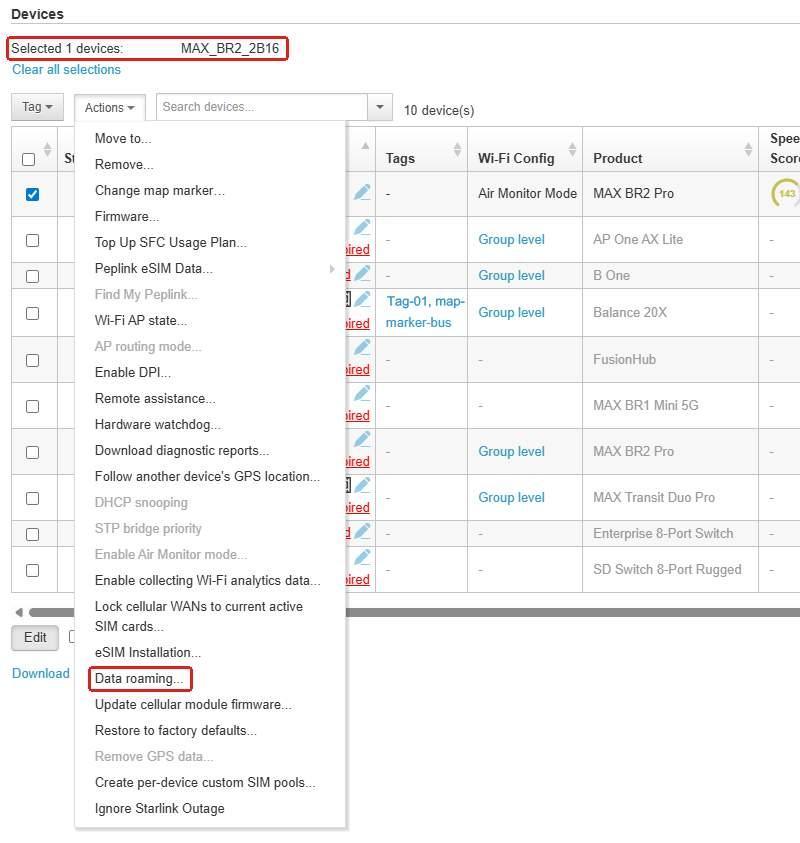
Step 2. Data roaming..., outlined in red, in the Actions menu. The Selected 1 devices line, also outlined, names every device the change applies to.
- 3.Select Enable or Disable, check the Selected N devices: line, and click Save.
- The setting applies to every cellular WAN on every selected device.
Full detail: 13.1.7 What Each Entry Opens
6.1.5. Lock Devices to the SIM Cards Active Now
Use this when devices must connect only on the SIM cards currently active, or a lock must be released.
- 1.Open Group > Settings > Device Management and tick the devices.
- 2.From Actions, select Lock cellular WANs to current active SIM cards....
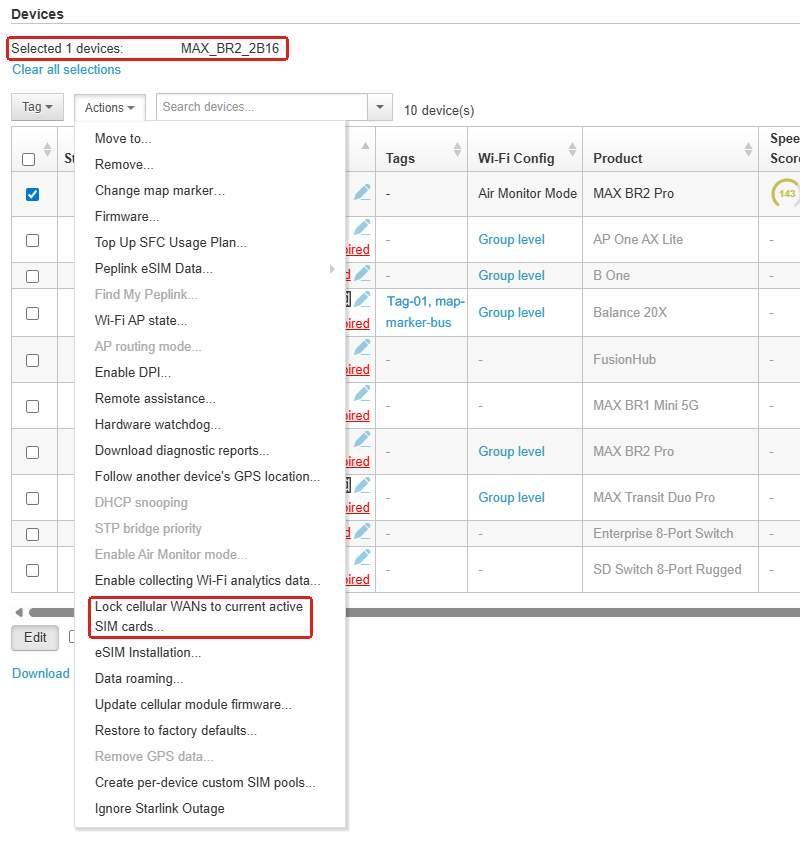
Step 2. Lock cellular WANs to current active SIM cards..., outlined in red, in the Actions menu. The Selected 1 devices line, also outlined, names every device the lock applies to.
- 3.Select Lock, so the device connects only on the SIM cards currently active, or Unlock, so it connects on any SIM card, and click Save.
- A locked device shows the status icon whose tooltip reads Cellular WAN connections are locked to specific SIM cards.
Full detail: 13.1.7 What Each Entry Opens, 13.1.2 Status Icons
6.1.6. Top Up Peplink eSIM Data or Add Devices to the Pooled Plan
Use this when selected devices need more Peplink eSIM data, or need to join the organization's pooled plan.
- 1.Open Group > Settings > Device Management and tick the devices.
- 2.From Actions, select Peplink eSIM Data.... It opens a submenu, not a form.
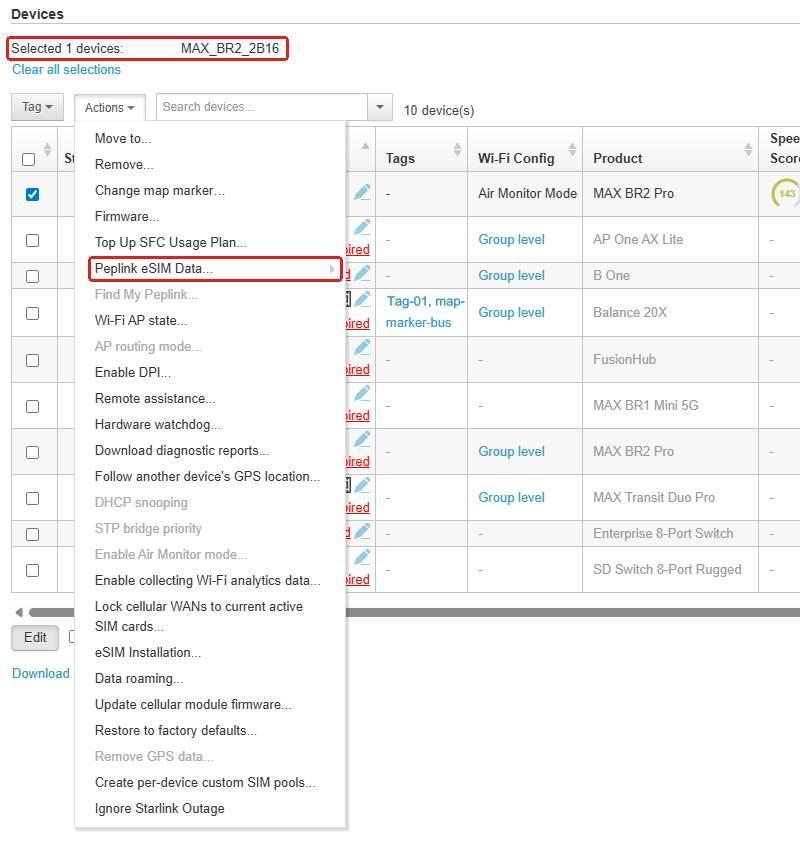
Step 2. Peplink eSIM Data..., outlined in red, has an arrow because it opens a submenu. The Selected 1 devices line, also outlined, names every device a top up applies to.
- 3.Select Top Up Peplink NA & EU eSIM Data Plan..., Top Up Peplink Global eSIM Data Plan... or Add device to Peplink eSIM Data Pooled Plan....
- To add data to the pooled plan itself, use Top Up... on Organization > eSIM Pooled Plan. Add ICCID... on the same screen attaches an eSIM By Peplink device or By ICCID (Third-party device).
Caution: The Top Up entries apply to every device on the Selected N devices: line. Check that line before confirming.
Full detail: 13.1.7 What Each Entry Opens, 6.3 eSIM Pooled Plan
6.1.7. Install an eSIM on One Device
Use this when an eSIM profile from an eSIM provider must be installed on one cellular WAN of one device, remotely. The device must be online, have EssentialCare or PrimeCare, and keep another WAN connected to the Internet, such as Ethernet, Wi-Fi WAN or USB. A physical SIM in the same cellular module cannot serve as that connection.
- 1.Open Device > Settings > Device Tools and select eSIM Installation in Command.
- 2.In WAN, select the cellular WAN. Each entry shows the slots in use, for example Cellular 1 (Used slot: 0/4). When every slot is used, remove one with eSIM Deletion first.
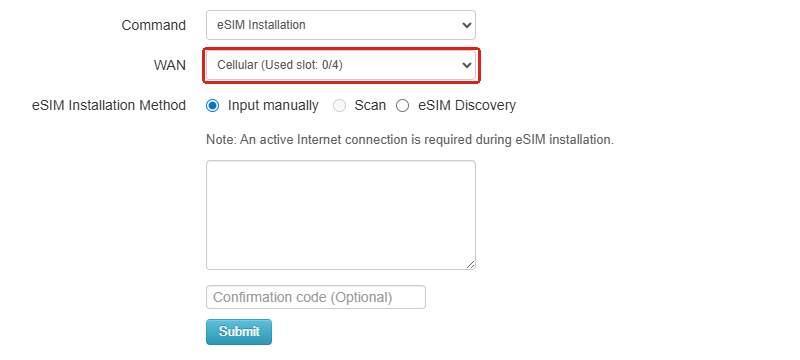
Step 2. WAN, outlined in red, names the cellular WAN and its used slots, here Cellular (Used slot: 0/4). The installation method options are below it.
- 3.Under eSIM Installation Method, select Input manually (paste the activation code, add the confirmation code if one was issued, click Submit), Scan (click Scan and hold the QR code up to the camera) or eSIM Discovery (click Acquire).
- 4.Wait for the result beside the button, for example eSIM profile installed successfully., then check that the Used slot count for that WAN has increased by one.
Full detail: 16.4.8 How to Install an eSIM
6.1.8. Install eSIMs on Many Devices
Use this when eSIM profiles must be installed on several devices in one action.
- 1.Open Group > Settings > Device Management and tick the devices.
- 2.From Actions, select eSIM Installation....
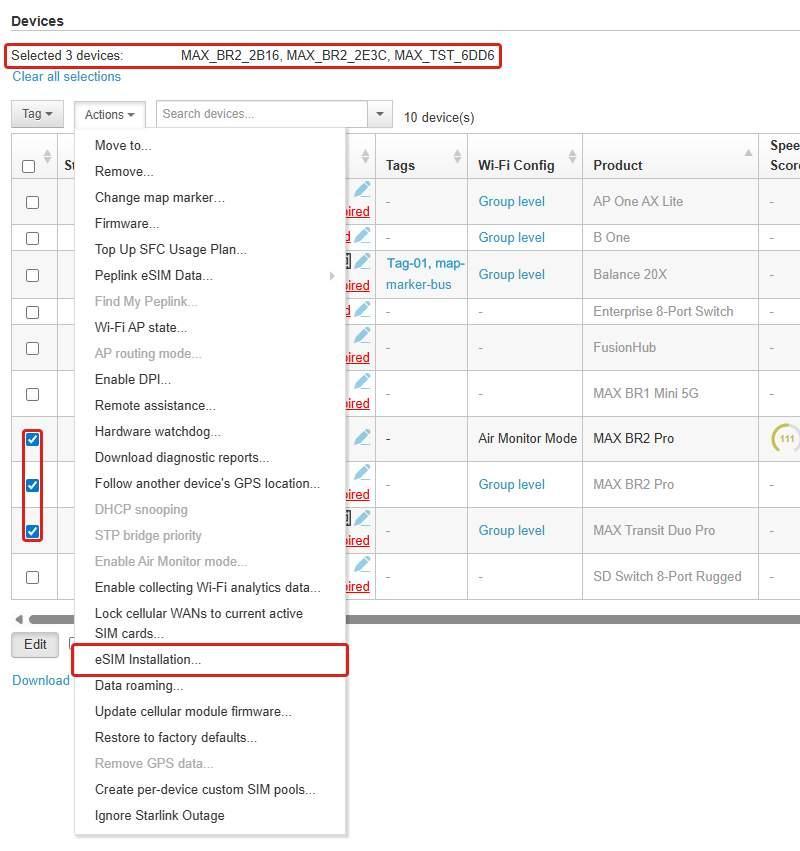
Steps 1 and 2. Three ticked device rows, the Selected 3 devices line at the top, and eSIM Installation... in the open Actions menu, all outlined in red. Selected 3 devices confirms how many are ticked.
- 3.Check Number of selected devices that are online and with an eSIM, then answer Are the eSIM profiles tied to specific devices or IMEIs?. Yes asks Tied to, Device or IMEI. No asks for Cellular WAN 1 or Cellular WAN 2.
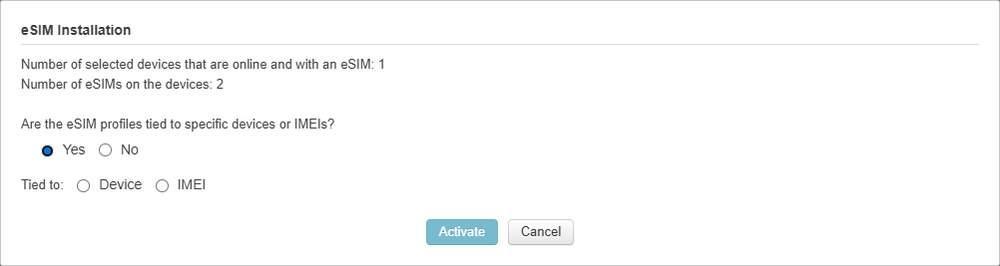
Step 3. The device and eSIM counts at the top, the tied to question with Yes selected, and Tied to offering Device or IMEI. Activate is at the foot.
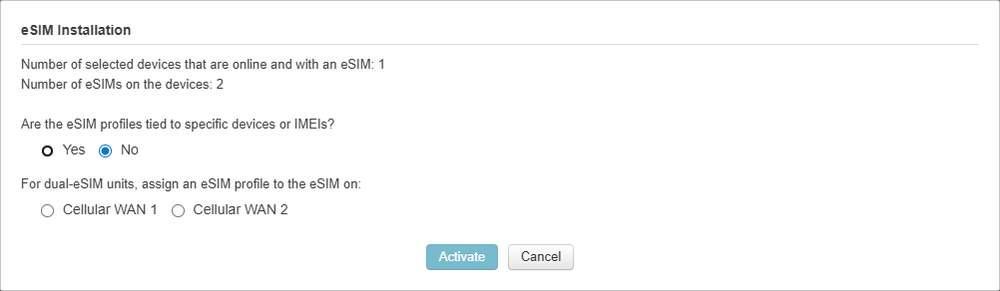
Step 3 when the profiles are not tied to devices: No selected. For dual eSIM devices, the form then asks whether the profile goes to the eSIM on Cellular WAN 1 or Cellular WAN 2.
- 4.Click Activate. No profile is activated until it is clicked.
Full detail: 13.1.9 eSIM Installation
6.1.9. Delete an eSIM
Use this when an eSIM profile must be removed from one device, for example to free a slot before installing another. The device must be online.
- 1.Open Device > Settings > Device Tools and select eSIM Deletion in Command.

Step 1. The Command list with eSIM Deletion outlined in red. Selecting it shows the eSIM picker and Delete.
If the device has no eSIM installed, the form shows No eSIM has been installed on any cellular WAN. in place of the picker.

eSIM Deletion on a device with no eSIM installed. The message outlined in red replaces the picker and the Delete button.
- 2.Select the eSIM in the picker and click Delete.
- 3.Read the confirmation, then accept it.
Caution: Because installation needs an active Internet connection, deleting the only working eSIM on a device can leave no connection over which to install a replacement. Before using eSIM Deletion, confirm the device has another working WAN.
Full detail: 16.4 Device Tools, 16.4.9 eSIM Installation Fields
6.1.10. Check That a Device Is on Peplink eSIM
Use this when confirming which SIM a device is using.
- 1.Open the device at Device > Device Details.
- 2.In Status, under WANs, find the cellular WAN row.
- 3.An e badge on that row means Peplink eSIM is active.
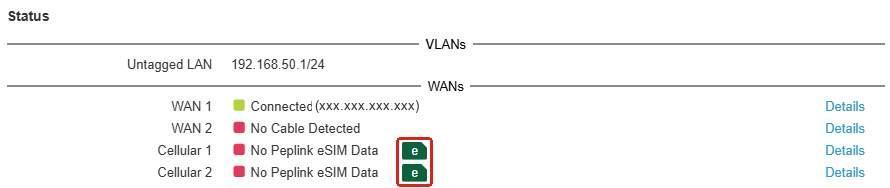
Step 3. The e badge, outlined in red, on the Cellular 1 and Cellular 2 rows under WANs in the Status panel.
- Across a group, Group > Settings > Device Management shows the status icon eSIM Pooled Plan against a device on an eSIM pooled plan.
Full detail: 14.1.10 Status, 13.1.2 Status Icons
6.1.11. Check Cellular Signal History
Use this when checking whether a cellular WAN went down because of poor signal.
- 1.Open Device > Reports > WAN Quality Reports.
- 2.In WAN:, select the cellular WAN, and set the day with the date picker.
- 3.Tick Signal Bars, Signal Strength or Signal Quality to plot them.
- 4.Hover over a point to read Band, Channel, Strength (RSRP), Quality (SINR) and Quality (RSRQ) at that time.
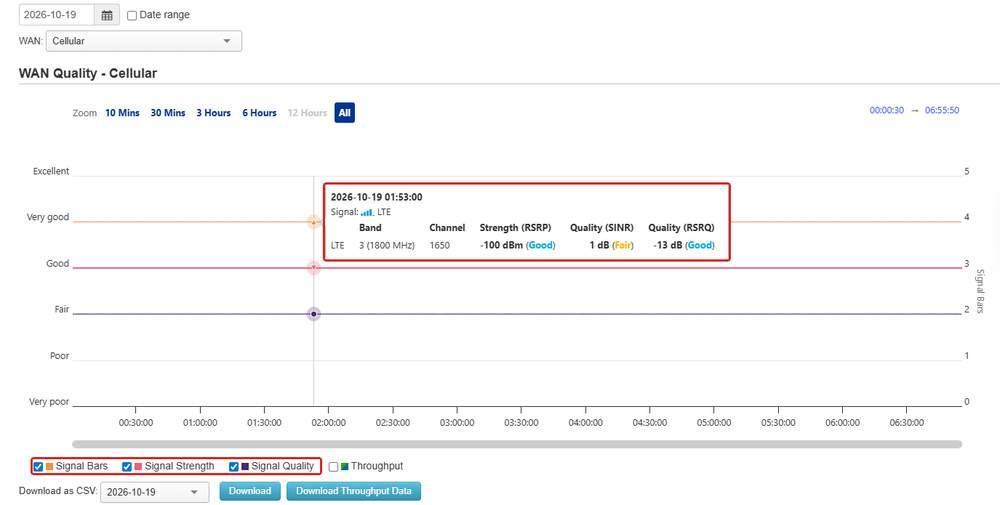
Steps 3 and 4. The Signal Bars, Signal Strength and Signal Quality checkboxes at the foot, and the hover panel giving Band, Channel, Strength (RSRP), Quality (SINR) and Quality (RSRQ), both outlined in red.
- Compare the signal series with Connection Up/Down History for the same WAN. A drop that follows a fall to Poor or Very poor indicates signal as the cause.
Full detail: 15.6.4 Cellular Signal
6.2. How the Pooled Plan Works
The organization holds one shared pool, and each eSIM holds its own quota. Auto top up moves data from the pool to an eSIM. It does not buy more data.
Quota | What it is | Where it appears |
The pool's quota | The organization's shared allowance, bought once and drawn on by every attached eSIM | Remaining quota, in Peplink eSIM Data Pooled Plan Detail |
An eSIM's quota | The data that one eSIM currently holds | Remaining Quota, in the ICCID Detail row for that eSIM |
When an individual eSIM's own quota falls below the trigger, it is topped up by the auto top up amount, drawn from the pool. Auto top up adds nothing to the pool.
Once the trigger and amount are set, every eSIM with Auto Top Up on is refilled from the pool when it runs low. No device needs a manual top up while the pool holds data.
Both fields in the top panel apply to an individual eSIM, not to the pool:
- Trigger auto top up when an eSIM's remaining quota is below is the level at which one eSIM is refilled.
- Auto top up amount is how much that eSIM receives.
The Auto Top Up control in the ICCID Detail grid is per row, and sets whether auto top up applies to that one eSIM.
Data is added to the pool itself with Top Up... on the eSIM Pooled Plan screen (6.3 eSIM Pooled Plan), not by auto top up. Plan purchase and renewal are handled in the Peplink eStore.
Two further limits apply, as stated on Peplink's eSIM data plans page, linked below:
- A pool is shared within one organization only. It cannot be spread across two organizations, so this screen exists at organization level only. An account with several organizations needs a pooled plan for each.
- Router devices need firmware 8.3.0 or above for Peplink eSIM Data Plans.
Plan sizes, validity periods, regional coverage and the conversion rate between Global and regional data are commercial terms, not interface behaviour, and are subject to change. Peplink publishes the current terms at peplink.com/services/products-esim-data-plans, which is also the target of the information icon on this screen.
Most controls on this screen act on a live subscription rather than on a setting:
- Top Up... adds data to the pooled plan
- Top Up Settings changes when, and by how much, an individual eSIM is refilled from the pool
- Add / Remove ICCID attaches or detaches an eSIM
- Change Data Region changes where an eSIM draws its data
- Auto Top Up controls automatic top up of an individual eSIM from the pool
- Display in Web Admin changes what the plan publishes to the device
Each is described again where it appears below. InControl 2 shows a confirmation step for these that states what is about to change. Read it before confirming.
6.3. eSIM Pooled Plan
This screen shows how much data the pool holds, which ICCIDs draw on it, and what has been allocated or returned over time. It exists at organization level only, with no group level or device-level equivalent.
Where to find it
Organization > eSIM Pooled Plan
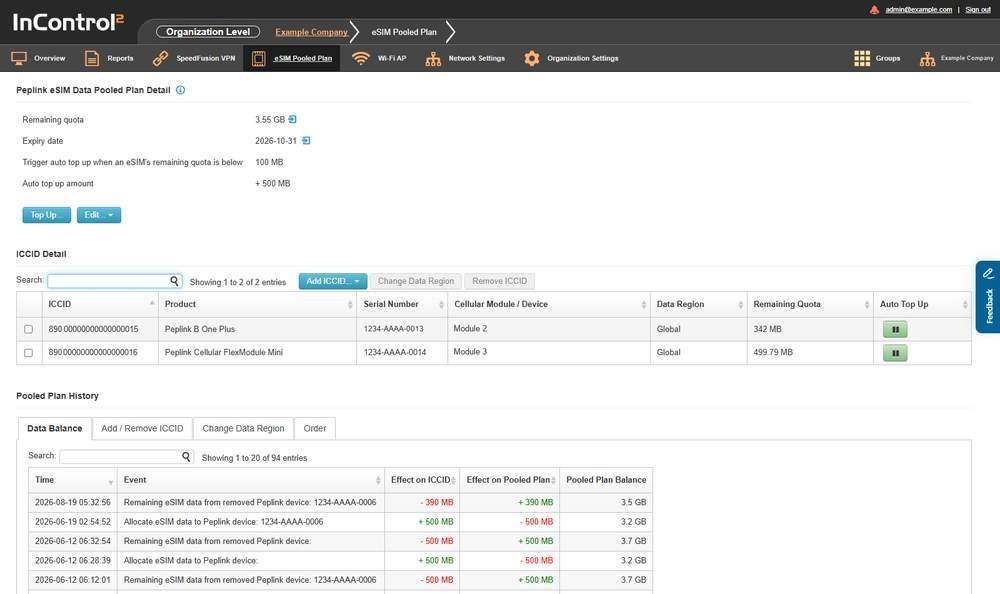
The eSIM Pooled Plan screen, with three stacked panels: the plan summary at the top, the ICCID list in the middle, and the history grid at the bottom.
6.3.1. What This Screen Shows
The screen has three panels, in this order.
Panel | What it covers |
Peplink eSIM Data Pooled Plan Detail | The state of the pooled plan itself and its auto top up settings |
ICCID Detail | The ICCIDs currently attached to the pooled plan |
Pooled Plan History | A dated record of pooled plan activity, split across four tabs |
6.3.2. Controls on This Screen
Control | What it does |
Top Up... | Starts a top up of the pooled plan |
Edit... | Opens a menu with Top Up Settings and Display in Web Admin |
Add ICCID... | Opens a menu with By Peplink device and By ICCID (Third-party device) |
Change Data Region | Acts on the ICCID rows selected in ICCID Detail. Greyed out while no row is ticked |
Remove ICCID | Removes the ICCID rows selected in ICCID Detail from the pooled plan. Greyed out while no row is ticked |
Search: | Filters a grid. ICCID Detail and Pooled Plan History each have their own Search: box |
Download as CSV | Exports Pooled Plan History as a CSV file |
Previous / Next | Pages through the Pooled Plan History grid |
Three of these change the live plan:
- Top Up..., in Peplink eSIM Data Pooled Plan Detail beneath the plan fields, acts on the pooled plan itself, not on any single eSIM.
- Change Data Region and Remove ICCID, in ICCID Detail, act on the ICCID rows ticked in that grid.
Caution: Top Up..., Top Up Settings, Display in Web Admin, the two Add ICCID... routes, Change Data Region, Remove ICCID and the per row Auto Top Up control each change a live plan. Read InControl 2's confirmation step before accepting. For help with these settings, contact Peplink support or your Peplink partner.
6.3.3. Peplink eSIM Data Pooled Plan Detail
The top panel is a read-only summary of the plan, with the two action buttons beneath it.

The four plan fields, and the Top Up... and Edit... buttons below them.
Field | What it reports |
Remaining quota | The data still held by the pooled plan |
Expiry date | The date recorded against the plan |
Trigger auto top up when an eSIM's remaining quota is below | The per eSIM threshold at which an automatic top up occurs |
Auto top up amount | The quantity added by each automatic top up |
Note the following:
- Remaining quota and Expiry date each carry an indicator icon to the right of the value, labelled Displayed in Web Admin. To change the setting, use Display in Web Admin on the Edit... menu, described below.
- The panel heading has an information icon. Its tooltip gives the definition of the pooled plan quoted at the start of this chapter, and links to https://www.peplink.com/services/products-esim-data-plans/ for more information.
Plan pricing is not shown in InControl 2. For purchase and renewal, see 6.2 How the Pooled Plan Works.
Check Remaining quota and Expiry date regularly.
6.3.4. The Edit... Menu
Edit... is a menu button, not a dialog. Clicking it opens two items below the button.
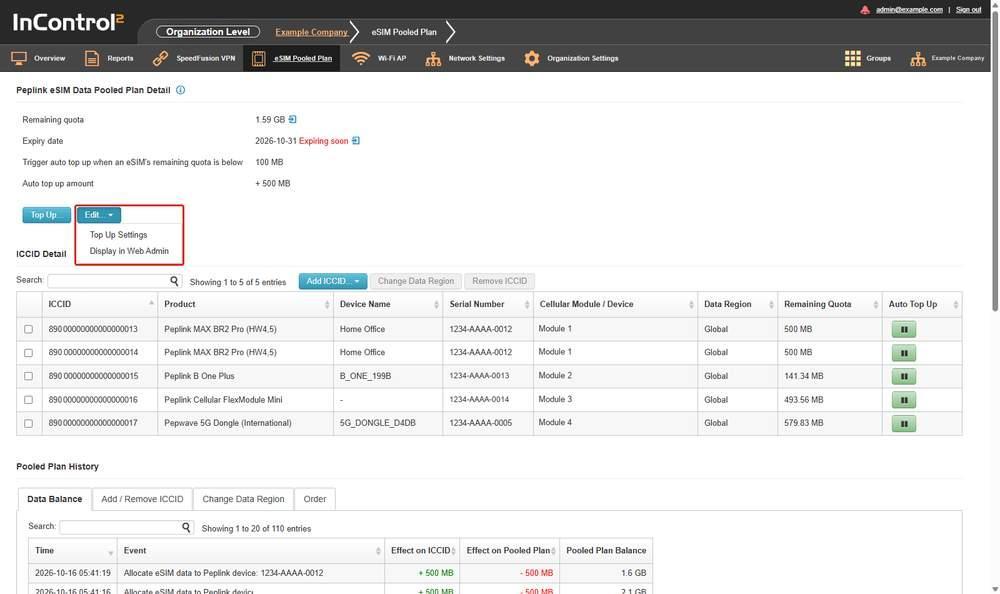
Edit... opened, showing its two menu items directly beneath the button. The button and its menu are outlined in red.
Menu item | Relates to |
Top Up Settings | The two auto top up fields in the panel above, Trigger auto top up when an eSIM's remaining quota is below and Auto top up amount |
Display in Web Admin | The Displayed in Web Admin marking on Remaining quota and Expiry date |
Top Up Settings sets the two auto top up fields above: when an individual eSIM is topped up automatically, and by how much. It does not add data to the pooled plan. Display in Web Admin sets the Displayed in Web Admin marking, which controls what the plan publishes to the device web admin. Both change a live plan.
6.3.5. ICCID Detail
The middle panel lists the ICCIDs attached to the pooled plan, one per row.

The ICCID list, with the selection checkbox at the left of each row and the greyed out Change Data Region and Remove ICCID buttons.
Column | What it shows |
ICCID | The identifier of the eSIM |
Product | The Peplink product that holds the eSIM |
Serial Number | The serial number of that device |
Cellular Module / Device | The cellular module reported for the eSIM |
Data Region | The data region set for the eSIM |
Remaining Quota | The data still held by that individual eSIM. It is a separate figure from Remaining quota in the top panel, which is the pool, and the two can differ |
Auto Top Up | Whether that individual eSIM is topped up automatically from the pool when its own quota falls below the threshold. A per row control |
Caution: Change Data Region and Remove ICCID act on every ticked row at once, and removing an ICCID returns its remaining data to the pool, as Pooled Plan History records. Check which rows are ticked before clicking either.
A checkbox column to the left of ICCID selects the rows that Change Data Region and Remove ICCID act on.
A count line above the grid shows how many entries are shown out of the total, and the panel's own Search: box filters the list by ICCID or serial number. To find eSIMs close to empty, compare the Remaining Quota column with the trigger set in the top panel.
The Auto Top Up column holds one control per ICCID row, shown as a small button. It acts on that one eSIM, not on the pool, and changes how that eSIM is topped up from a live plan. Click it only to change that setting.
6.3.6. The Add ICCID... Menu
Add ICCID... is also a menu button. Clicking it opens two items below the button, the two routes for attaching an eSIM to the pooled plan.
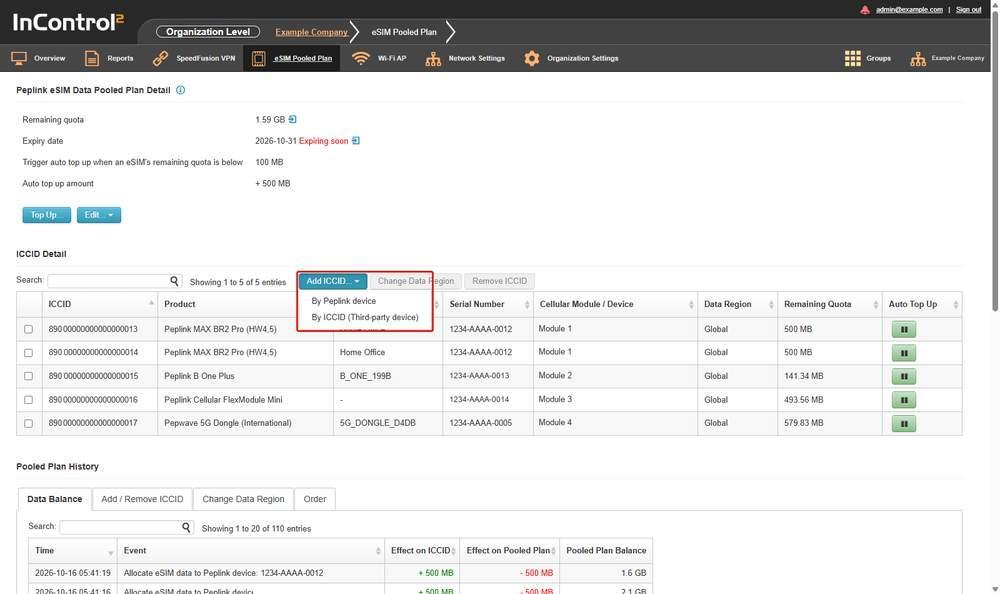
Add ICCID... opened, showing the two ways of identifying the eSIM to add. The button and its menu are outlined in red.
Menu item | Route |
By Peplink device | Identify the eSIM by the Peplink device holding it |
By ICCID (Third-party device) | Identify the eSIM by its ICCID |
Attaching an eSIM changes which devices draw on the live plan. Select the route that matches how the eSIM can be identified.
To add many Peplink devices at once, select them in Group > Settings > Device Management and use Peplink eSIM Data..., Add device to Peplink eSIM Data Pooled Plan... from the Actions menu.
6.3.7. Pooled Plan History
The bottom panel is a dated log of pooled plan activity.
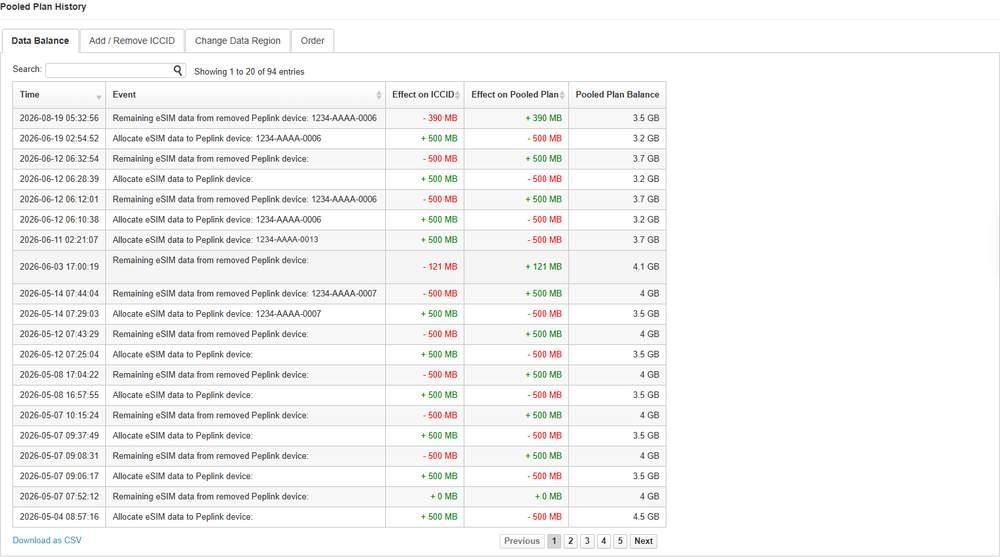
The history grid under the Data Balance tab, with the tab strip above it and Download as CSV below.
Column | What it shows |
Time | The date and time of the entry |
Event | A description of the event, naming the Peplink device involved |
Effect on ICCID | The change applied to the eSIM, signed |
Effect on Pooled Plan | The change applied to the pool, signed |
Pooled Plan Balance | The pooled plan balance after the entry |
The grid shows which device drew data from the pool and when. Each Event names the Peplink device, and Effect on ICCID gives the amount.
- Effect on ICCID and Effect on Pooled Plan move in opposite directions on an allocation. Data allocated to a device is added to the eSIM and subtracted from the pool.
- Removing a device reverses this: the remaining eSIM data is subtracted from the eSIM and returned to the pool.
- Pooled Plan Balance is a running figure, so the top row of the grid reflects the most recent state.
Below the grid are Download as CSV and the Previous and Next paging links. A count line above the grid shows how many entries are shown out of the total, and the panel has its own Search: box.
Download as CSV exports Pooled Plan History as a CSV file.
6.3.8. The Pooled Plan History Tabs
The tab strip is inside Pooled Plan History, between the panel heading and the grid. It has four tabs, each with its own history grid.
Tab | What it shows |
Data Balance | The data balance history. The screen opens on this tab, and the grid described above is its grid |
Add / Remove ICCID | The history of ICCIDs added to and removed from the pooled plan |
Change Data Region | The history of data region changes |
Order | The order history |
The tabs show history only. The grids of the other three tabs have columns such as Time, Action, ICCID, Product, Serial Number and Device Name.