
16. Device Level Tools
Device Level Tools covers the Settings menu of an individual device. These screens act on one device only, and several of them override or opt out of the group settings. Two entries, Remote Web Admin and Web CLI, open the device's own interface instead of an InControl 2 screen.
Menu entries by product and state
- The device Settings menu is not a fixed list. The entries depend on the product type and the state of the device.
- An access point does not show the router only entries, and a device with no Wi-Fi radio shows no Wi-Fi entries.
- On an offline router, Remote Web Admin, Web CLI and Device Tools stay in the menu but are greyed out and cannot be opened. InTouch, Firmware Management and Certificate Management remain available. The greyed entries become available again when the device is back online.
- An AP One has no Web CLI entry. When it is offline, its Remote Web Admin and Device Tools are greyed out.
- A FusionHub lists Firmware Management, Certificate Management and Device Tools.
- A missing entry reflects the product type or device state. This is expected and does not indicate a fault.

Device > Settings on an offline router, dropdown outlined in red. Remote Web Admin, Web CLI and Device Tools are greyed out. InTouch, Firmware Management and Certificate Management remain available.
16.1. Firmware Management
Firmware Management sets the firmware for one device. The device either follows the group policy or is pinned to a version, for example to test a release before a group rollout or to keep one site on its current version. To set firmware for many devices, use Group > Settings > Firmware Policy (13.9 Firmware Policy (Group Level)), which lists Devices not following the policy: beneath its grid.
Where to find it
Device > Settings > Firmware Management
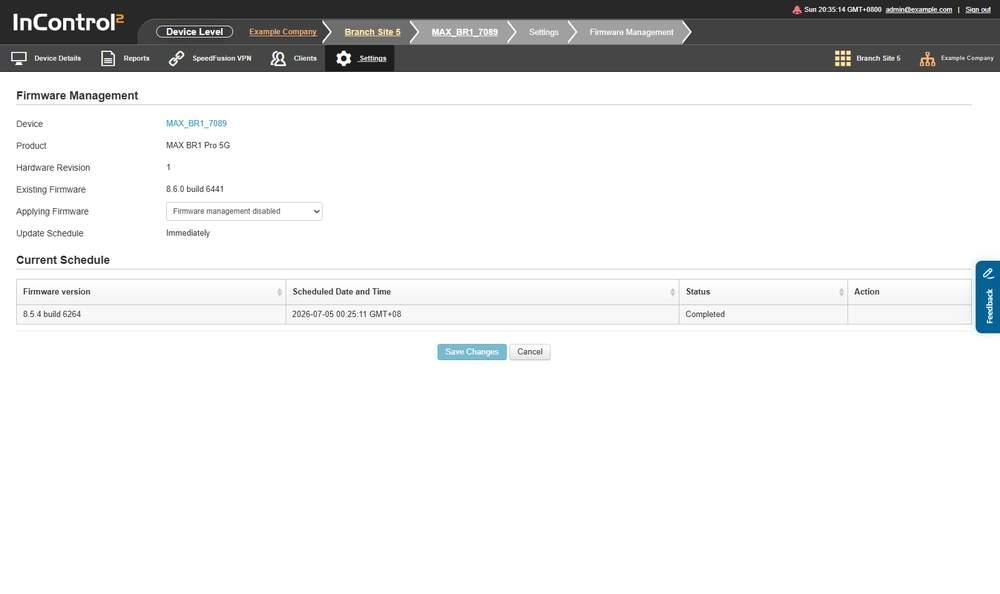
Firmware Management. The Applying Firmware dropdown is the only editable field, and Current Schedule below it records the last scheduled update.
16.1.1. What This Screen Shows
Field | What it shows |
Device | The device name, as a link |
Product | The product model |
Hardware Revision | The hardware revision of the device |
Existing Firmware | The version and build currently on the device |
Applying Firmware | The dropdown that sets the firmware the device should run |
Update Schedule | When the change is applied, for example Immediately. See Update Schedule below |
16.1.2. Applying Firmware

The top of Firmware Management. Applying Firmware reads Firmware management disabled, and Update Schedule reads Immediately.
Option | What it means |
Follow group policy | The device uses the firmware set by the group firmware policy |
Firmware management disabled | InControl 2 does not manage firmware on this device |
A version and build | Pins the device to that firmware. The list offers the versions available for this product |
Custom | Takes a firmware URL instead of a version from the list. See Custom below |
Reboot to last firmware | Returns the device to the firmware it ran before the current one. The option names that version in brackets |
If a device does not operate correctly after an upgrade, select Reboot to last firmware to return it to the version named in brackets.
The version list differs by product and hardware revision.
16.1.3. Custom
Selecting Custom adds three items to the screen.
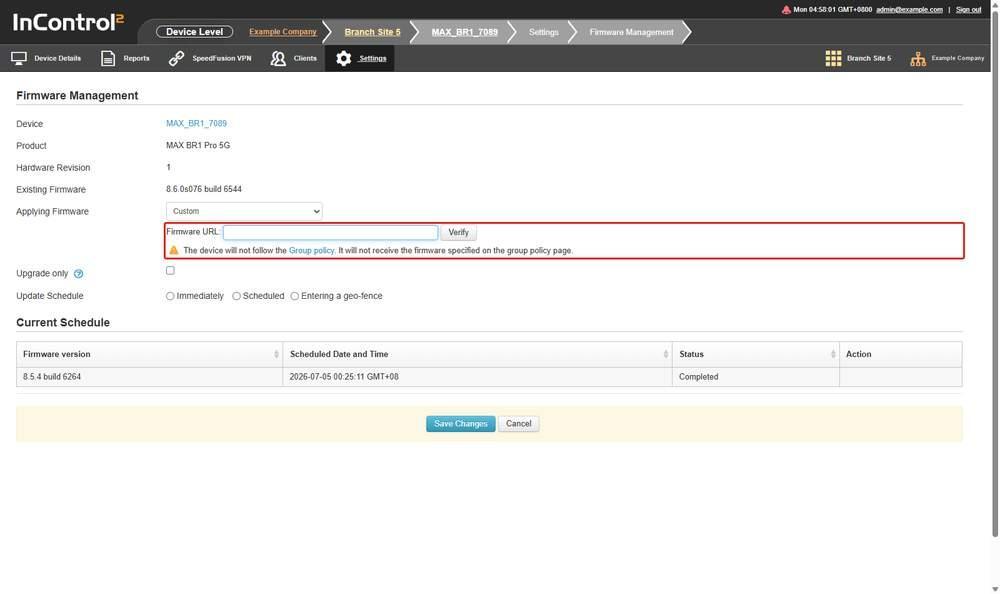
Custom selected. The Firmware URL field with its Verify control and the warning about group policy, outlined in red, appear beneath the dropdown, and Update Schedule gains its three radio buttons.
What appears | Notes |
Firmware URL: | A text field for the address of the firmware file |
Verify | A control beside the field. It checks the address entered rather than setting a value |
A statement on the page | It reads: the device will not follow the Group policy, and it will not receive the firmware specified on the group policy page |
To return the device to the group firmware policy, select Follow group policy.
The Upgrade only checkbox and the Update Schedule radio buttons also appear with the URL field. Both are described below.
16.1.4. Upgrade Only
Upgrade only qualifies the firmware selected above. It sets whether the running version must be older before InControl 2 applies the specified one.
State | What InControl 2 applies |
Selected | The specified firmware is applied only if the running firmware version is lower than the specified one |
Not selected | The specified firmware is applied only if the running firmware version is different from the specified one |
When selected, a device already running a newer version is left unchanged. When cleared, the specified version is applied to that device as well, because a newer version is a different version.
Upgrade only appears once a firmware selection is made. It is not shown while Applying Firmware is set to Firmware management disabled.
16.1.5. Update Schedule
Update Schedule sets when the selected firmware is applied. Like Upgrade only, it offers controls only once a firmware selection is made. With Applying Firmware set to Firmware management disabled, the screen shows the single word Immediately and no controls.
Once a firmware is selected, Update Schedule offers three radio buttons:
Option | Notes |
Immediately | Applies the firmware as soon as the change is saved |
Scheduled | Applies the firmware on a schedule rather than at once |
Entering a geo-fence | Applies the update when the device enters a geo-fence rather than at a set time. This suits vehicles: the update waits until the device enters a geo-fence, for example a depot, rather than running mid route |
Scheduled requires a schedule, and Entering a geo-fence requires a geo-fence.
16.1.6. Current Schedule

Current Schedule with one entry. It shows the targeted build, when the update was scheduled with its time zone, and a Status of Completed.
Column | What it shows |
Firmware version | The version and build the update targeted |
Scheduled Date and Time | When the update was scheduled, with the time zone |
Status | The outcome, for example Completed |
Action | Per row actions for that schedule entry |
16.1.7. Controls on This Screen
Control | What it does |
Applying Firmware | Selects the firmware policy for this device |
Firmware URL: | Takes the address of the firmware file. Shown only when Applying Firmware is set to Custom |
Verify | Checks the address entered in Firmware URL:. Shown only with Custom |
Upgrade only | Restricts the change to a device running a lower version. See Upgrade only above |
Update Schedule | Selects Immediately, Scheduled or Entering a geo-fence |
Save Changes | Applies the selection. Greyed out until a change is made |
Cancel | Discards the selection |
Device name link | Returns to Device Details for this device |
16.2. Certificate Management (Device Level)
Certificate Management loads the private keys and certificates that one device presents, by category, for example its web admin certificate. The captive portal certificate and the MediaFast CA certificates are managed at group level.
Where to find it
Device > Settings > Certificate Management
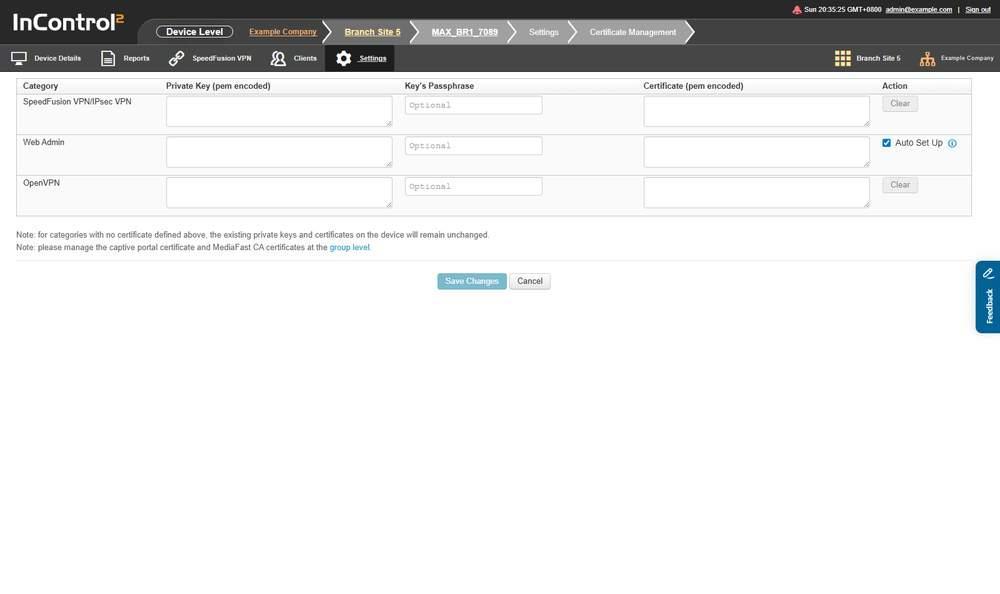
Certificate Management. One row per category, with the two notes below the grid explaining what happens to categories left blank.
16.2.1. What This Screen Shows
One row per certificate category.
Column | What it holds |
Category | The purpose the certificate serves on the device |
Private Key (pem encoded) | A text box for the pem encoded private key. Treat keys entered here as confidential |
Key's Passphrase | A text box for the key passphrase, marked Optional. Treat the passphrase as confidential |
Certificate (pem encoded) | A text box for the pem encoded certificate |
Action | Clear for most rows, and Auto Set Up on the Web Admin row |
Three categories are offered:
Category | Action offered |
SpeedFusion VPN/IPsec VPN | Clear |
Web Admin | Auto Set Up |
OpenVPN | Clear |
16.2.2. Controls on This Screen
Control | What it does |
Clear | Removes the key and certificate held for that row. Greyed out while no certificate is loaded. Leaving a row empty is not the same as clearing it: as the screen states, for categories with no certificate defined, the existing private keys and certificates on the device remain unchanged |
Auto Set Up | Offered on the Web Admin row only. See Auto Set Up on the Web Admin row below |
group level | Opens the group level certificate screen, where the captive portal and MediaFast CA certificates are managed |
Save Changes | Applies the entered keys and certificates. Greyed out until something is entered |
Cancel | Discards the entries |
16.2.3. Auto Set Up on the Web Admin Row

The certificate grid. On the Web Admin row the Action column holds the ticked Auto Set Up box and its information icon. The other two rows offer Clear.
Auto Set Up replaces manual certificate handling for the web admin interface. Its tooltip states:
- InControl automatically acquires a web admin SSL certificate from letsencrypt.org for the Find My Peplink Address.
- It does so every 76 days and installs the certificate to the device.
The installed certificate covers the Find My Peplink Address. If the device must present a name you control, load your own key and certificate into the Web Admin row instead.
16.3. InTouch
InTouch gives access from InControl 2 to cameras, controllers and other equipment on the LAN behind this device, over http, https, ssh, telnet, rdp or vnc, under a saved name rather than a raw address.
Entries are per device and describe equipment on the LAN behind it. This screen defines entries. Saved entries are opened from the InTouch panel on the group dashboard, where they appear as InTouch profiles arranged by group or by device, each listed by name as a link. See Group Dashboard, 10.1.7 The InTouch Panel.
Where to find it
Device > Settings > InTouch
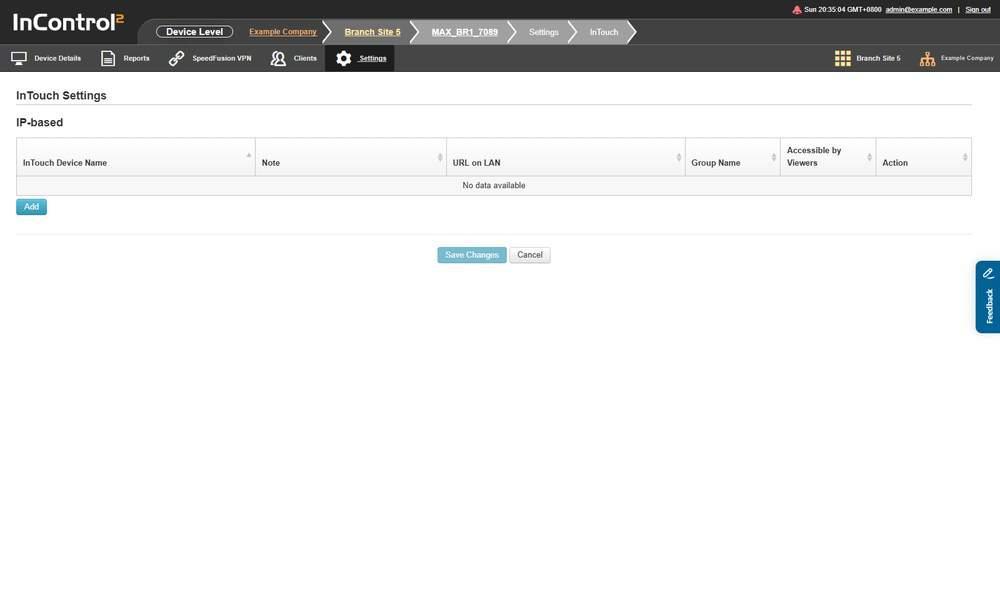
InTouch Settings. The IP-based grid is empty until entries are added, and Save Changes is greyed out until then.
16.3.1. What This Screen Shows
The screen holds one grid, IP-based.
Column | What it shows |
InTouch Device Name | The name given to the entry. Each saved name is a link |
Note | Free text recorded against the entry |
URL on LAN | The protocol, host, port and path of the equipment on the LAN |
Group Name | The group the entry is filed under |
Accessible by Viewers | Whether viewers may open the entry |
Action | Per row actions for that entry. Three icons: the first carries the tooltip Clone, the second is a waste bin, and the third is a play icon. On an offline device the play icon is greyed out and carries the tooltip Device is offline |
An empty grid shows No data available.
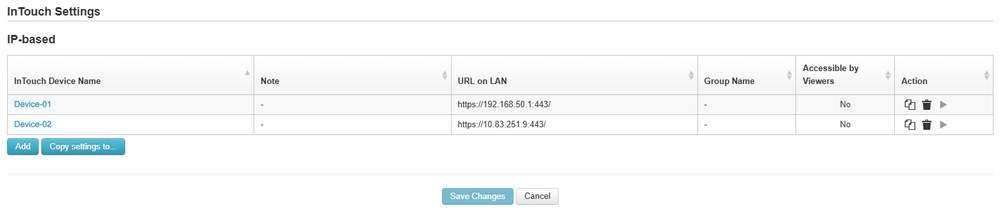
Two saved entries in the IP-based grid. Each name is a link, and the Action column holds a clone icon, a waste bin and a play icon. Copy settings to... sits beside Add.
16.3.2. Adding an Entry
Add opens the entry editor.
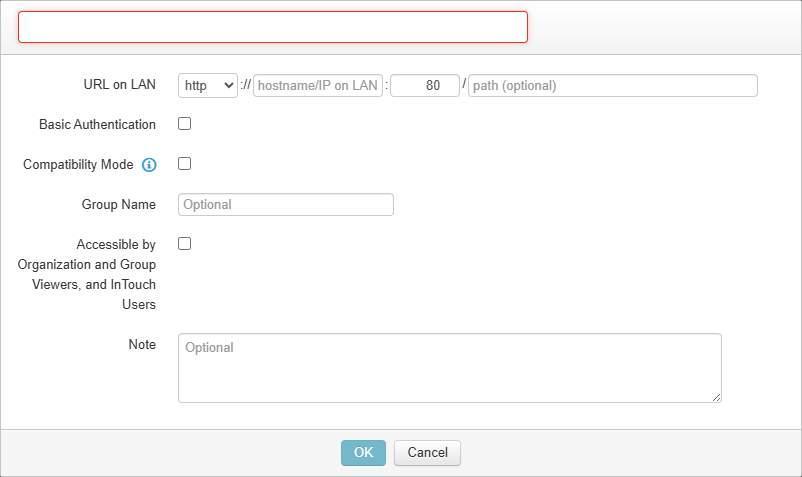
The Add dialog. The InTouch Device Name field is at the top, and the URL on LAN row is built from four separate inputs.
Field | Notes |
InTouch Device Name | The InTouch Device Name field at the top of the dialog. Required, and outlined in red until filled |
URL on LAN | Built from four parts on one row: a protocol dropdown, then three inputs whose placeholders read hostname/IP on LAN, port and path (optional). The row shows the separators :// and : and / between them |
Basic Authentication | A checkbox on the row below URL on LAN, cleared by default |
Compatibility Mode | A checkbox with an information icon. See Compatibility Mode below |
Group Name | A text field whose placeholder reads Optional |
Accessible by Organization and Group Viewers, and InTouch Users | A checkbox that sets who, in addition to administrators, may open the entry. Tick it to allow read-only users or customers to open the entry. Leave it clear for equipment that only administrators should access |
Note | A text area whose placeholder reads Optional |
The protocol dropdown offers http, https, ssh, telnet, rdp and vnc, so entries are not limited to web interfaces.
Three inputs are marked optional in their placeholder text: the path at the end of the URL on LAN row, Group Name and Note. The name at the top is the only required field.
16.3.3. Compatibility Mode
Compatibility Mode is for equipment whose interface does not display correctly through InTouch. Its tooltip states:
- Enable one of the HTTP compatibility modes if web pages load incompletely or appear broken.
- Enable the WebSocket compatibility mode if live streaming content, for example video or dashboard data, cannot be loaded.
- The compatibility modes are disabled by default.
Leave it off unless an entry does not display correctly, then select the mode that matches the symptom.
16.3.4. Controls on This Screen
Control | What it does |
Add | Opens the entry editor |
Copy settings to... | Beside Add. Opens Copy InTouch Settings to..., which offers a Group selector, a Device selector, a Remove settings from the source device checkbox, and Copy and Cancel. Use it to give a new site the same InTouch entries as an existing one |
OK | Accepts the entry in the editor |
Cancel (in the editor) | Closes the editor without adding the entry |
Save Changes | Saves the grid. Greyed out until an entry is added or changed |
Cancel | Discards unsaved changes to the grid |
Caution: Ticking Remove settings from the source device in Copy InTouch Settings to... removes the entries from this device. Leave it clear unless the entries are to be moved rather than copied.
16.4. Device Tools
Device Tools runs a ping, traceroute or other single command on this device from InControl 2.
Device Tools works on one device at a time, and only while the device is online. For many devices, use the group equivalents: Restore to factory defaults..., eSIM Installation... and Download diagnostic reports... in the Actions menu of Group > Settings > Device Management (13.1.7 What Each Entry Opens), Scheduled Reboot in Group > Settings > Device System Management (13.4.8 Scheduled Reboot), and Group > Network Settings > Connection Tests for scheduled tests, including SpeedTest (8.16 Connection Tests). Results of scheduled tests are in Group > Reports > Connection Test Reports (11.10 Connection Test Reports). Reports remain available for an offline device. See Device > Reports > Event Log, Offline History and Online History (15.9.3 Offline History and Online History).
Where to find it
Device > Settings > Device Tools
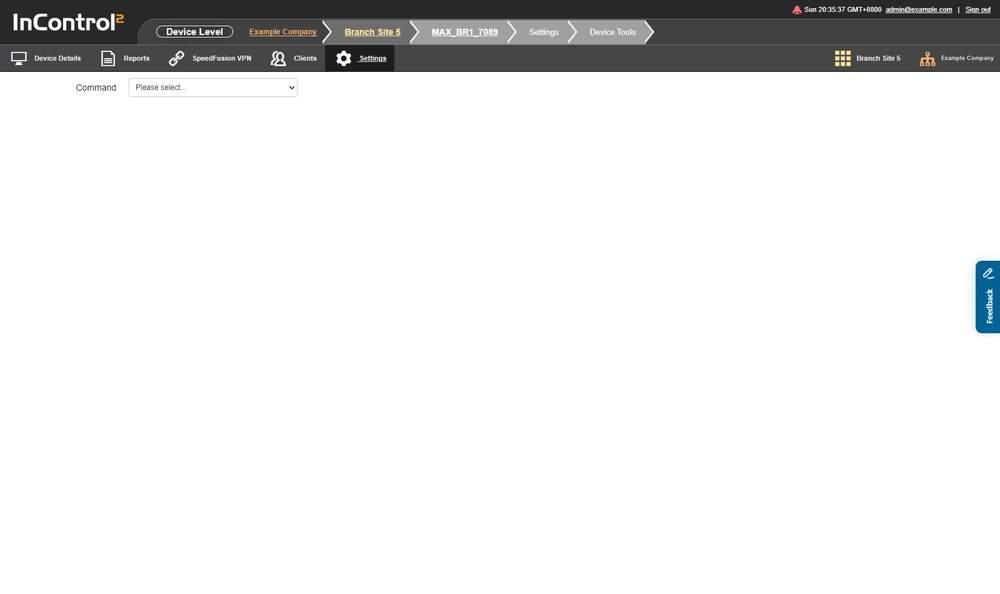
Device Tools. The screen holds one Command dropdown and shows nothing else until a command is selected.
16.4.1. What This Screen Shows
- A single field, Command, holding a dropdown that opens on Please select....
- Nothing else is shown until a command is selected. The rest of the screen then appears beneath the dropdown.
The dropdown offers eight commands:
- Ping
- Traceroute
- eSIM Installation
- eSIM Deletion
- WAN Performance Analysis Server
- Remote Assistance
- Reboot
- Reset to Factory Defaults
Selecting a command does not run it. Each command first shows its own fields or controls.
- Ping, Traceroute and eSIM Installation each ask which connection on the device to use (Connection or WAN).
- Reboot and Reset to Factory Defaults show an Apply button.
- eSIM Deletion shows an eSIM picker and a Delete button.
- Remote Assistance and WAN Performance Analysis Server show the switches described below.
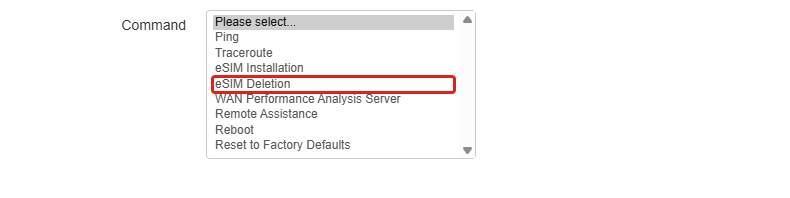
The Command list expanded. eSIM Deletion, outlined in red, removes an eSIM profile from the device.
Reboot, Reset to Factory Defaults, eSIM Deletion and Remote Assistance also ask for confirmation before they run.
Caution: Reboot takes the site offline until the device restarts, and Reset to Factory Defaults erases the device's configuration, including its WAN settings. Confirm the device before clicking Apply, and read the confirmation before accepting it.
Speed tests are scheduled under Group > Network Settings > Connection Tests (8.16 Connection Tests), and the results are viewed in Group > Reports > Connection Test Reports (11.10 Connection Test Reports).
16.4.2. How to Isolate a Fault from InControl 2
- 1.Run Ping from each WAN in Connection to a public address. If one WAN fails while the others pass, the fault is with that ISP or link.
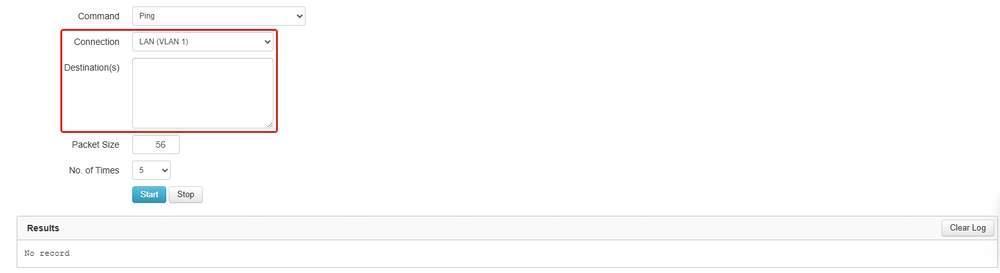
Step 1. With Ping selected, select the WAN in Connection and enter the address in Destination(s), both outlined in red, then click Start. Output appears under Results.
- 2.Run Traceroute from the failing WAN to find where the path stops.
- 3.Run Ping from LAN (VLAN 1) to equipment at the site to check the LAN side. Destination(s) accepts more than one address per run.
- 4.If the equipment has its own interface, open it through an InTouch entry.

Step 4. Saved InTouch entries, each listed by name as a link in the InTouch panel on the group Dashboard.
- 5.Reboot only if the steps above point to the device itself.
16.4.3. Ping
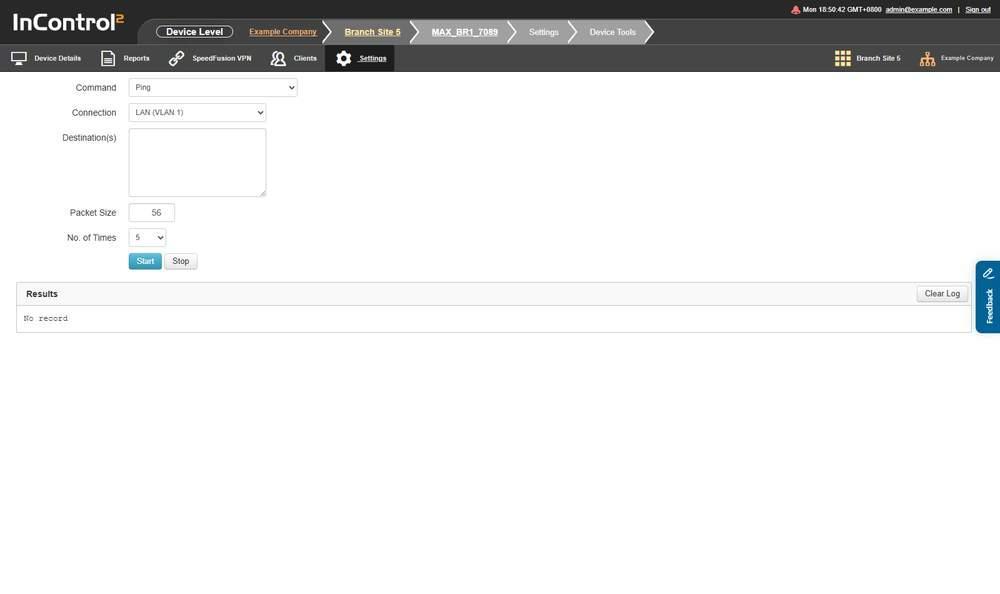
Ping selected. Four fields, then the Start, Stop and Clear Log controls, and a Results area that reads No record until a run produces output.
Field | Type | Notes |
Connection | dropdown | The connection on the device the ping is sent from. The list is built from the device's own connections, so it differs between devices. For example: LAN (VLAN 1), WAN and an SFC relay client entry |
Destination(s) | text area | A text area, so more than one destination can be entered. Separate entries with a space or a new line |
Packet Size | number | Default 56 |
No. of Times | dropdown | 1 through 10 |
Control | What it does |
Start | Runs the ping |
Stop | Ends a run in progress |
Clear Log | Clears the output |
Output appears in a Results area beneath the controls. It reads No record until a run produces output.
16.4.4. Traceroute
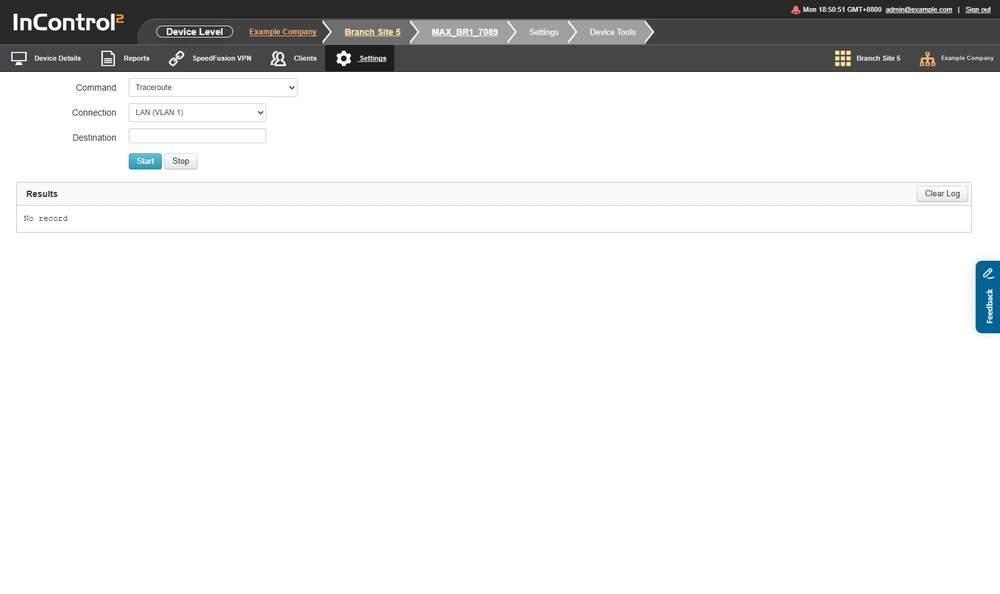
Traceroute selected. It takes a single Destination rather than the text area Ping offers, and has the same Start, Stop and Clear Log controls.
Field | Type | Notes |
Connection | dropdown | The same list of the device's own connections that Ping offers |
Destination | text | A single line field. One destination per run |
Traceroute has the same Start, Stop and Clear Log controls and the same Results area as Ping.
16.4.5. WAN Performance Analysis Server
Field | Type | Notes |
On / Off | switch | Turns the server on or off on this device |
Control Port: | number | Default 6000 |
The screen notes: Leaving this screen will stop the server after 60 minutes. A device that does not support the feature shows This device does not support WAN Performance Analysis.
16.4.6. Remote Assistance
Field | Type | Notes |
On / Off | switch | Turns remote assistance on or off for this device |
Turn off after [n] days. Disallow direct connection. | radio | Remote assistance ends after the number of days entered |
Allow direct connection. Remote assistance remains enabled until disabled manually. | radio | Remote assistance stays on until it is switched off manually. Switch it off when it is no longer needed |
The form ends in Apply and Cancel.
To turn Remote Assistance on for a set number of days, or off, for several devices, use Remote assistance... in the Actions menu of Group > Settings > Device Management, which offers Turn off after a number of days (13.1.7 What Each Entry Opens).
16.4.7. eSIM Installation
eSIM Installation installs an eSIM profile from an eSIM provider on one cellular WAN of one device, remotely. To install profiles on many devices at once, use eSIM Installation... in the Actions menu of Group > Settings > Device Management (see eSIM Installation in the Group Settings chapter, 13.1.9 eSIM Installation).
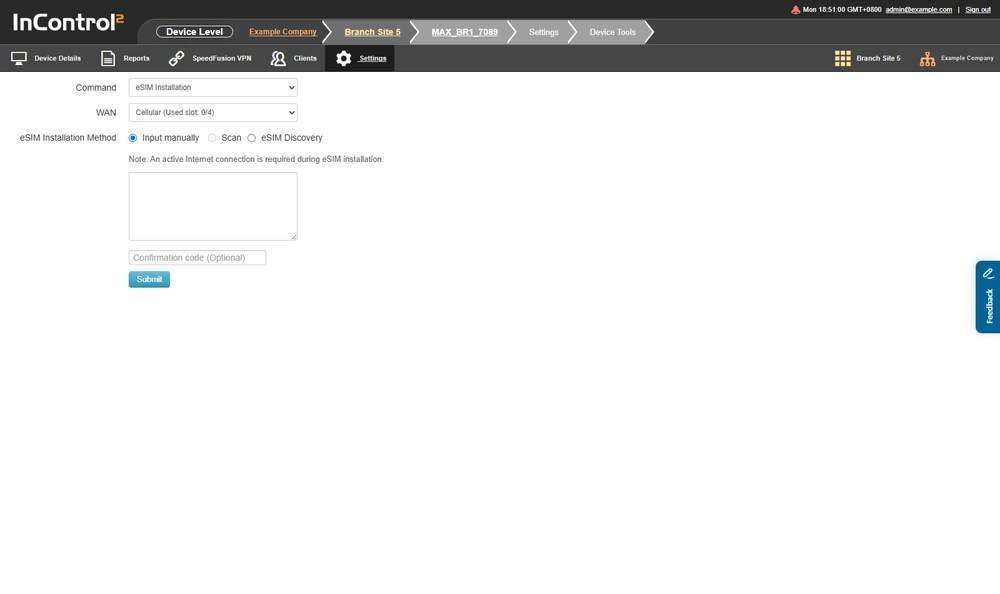
eSIM Installation selected. The WAN dropdown names the cellular WAN and the slots in use, the three installation methods are radio buttons, and the form ends in Submit rather than Start.
Before you start:
- The device must be online. Device Tools is unavailable on an offline device.
- The device needs EssentialCare or PrimeCare. Without it, the form shows EssentialCare or PrimeCare is required for eSIM installation. in place of its fields.
- Keep another WAN connected to the Internet, such as Ethernet, Wi-Fi WAN or USB. A physical SIM in the same cellular module cannot serve as that connection.
16.4.8. How to Install an eSIM
- 1.Open the device and go to Device > Settings > Device Tools.
- 2.In Command, select eSIM Installation.
- 3.In WAN, select the cellular WAN that receives the eSIM. Each entry reads like Cellular 1 (Used slot: 0/4): the eSIM slots already in use on that WAN, out of the maximum it holds. When every slot is used, the form shows Sorry, up to [n] eSIMs can be installed. Please delete one and try again. and hides the rest of the form. Remove one with eSIM Deletion first.
- 4.Under eSIM Installation Method, select the method that matches what the eSIM provider supplied. The table below compares the three.
- 5.Provide the profile:
- Input manually: paste the activation code from the eSIM provider into the text area. If the provider also issued a confirmation code, enter it in the field below. Then click Submit.
- Scan: click Scan and hold the provider's QR code up to the camera.
- eSIM Discovery: no entry is required. Click Acquire.
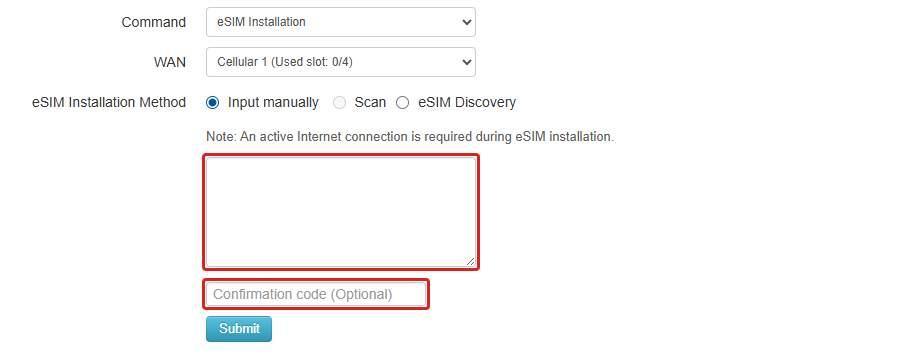
eSIM Installation with Input manually selected. The text area for the activation code and the optional Confirmation code field are outlined in red.
- 6.Wait while the device downloads the profile. The form's controls lock and a progress message, such as Downloading..., appears beside the button.
- 7.Read the result beside the form:
- 8.Confirm that the Used slot count for that WAN in WAN has increased by one. Then check the state of the cellular WAN in the WANs block of Device > Device Details (14.1.10 Status).
- eSIM profile installed successfully. after Input manually or Scan
- [n] eSIM(s) discovered and installed. after eSIM Discovery
- Failed to install eSIM profile. with a reason, when it did not complete

eSIM Installation with eSIM Discovery selected. The text area and confirmation code field are replaced by the note and the Acquire button, outlined in red.
Method | What it needs | Button |
Input manually | The activation code from the eSIM provider, plus its confirmation code if one was issued | Submit |
Scan | The provider's QR code and a camera on the computer or tablet running InControl 2, with camera access allowed in the browser. Scan is greyed out when the browser finds no camera | Scan |
eSIM Discovery | A profile the provider has already linked to the device's EID. InControl 2 describes it as Acquire purchased network operator profile automatically. Offered only on devices that support it | Acquire |
16.4.9. eSIM Installation Fields
Field | Type | Notes |
WAN | dropdown | One entry per cellular WAN, each naming the slots in use, in the form Cellular 1 (Used slot: 0/4) |
eSIM Installation Method | three radio buttons | Input manually, Scan and eSIM Discovery. Exactly one applies |
Text area | text area | Shown for Input manually. Takes the eSIM profile, which is the activation code from the eSIM provider. Required |
Confirmation code | text | Shown for Input manually. Its placeholder reads Confirmation code (Optional). Leave it empty unless the provider issued a confirmation code |
The form states that an active Internet connection is required during eSIM installation.
Caution: Because installation needs an active Internet connection, deleting the only working eSIM on a device can leave no connection over which to install a replacement. Before using eSIM Deletion, confirm the device has another working WAN.
The form ends in Submit, or Acquire for eSIM Discovery. Progress and the result appear as a message beside the button.
16.5. Remote Web Admin
Remote Web Admin opens the device's own web administration interface from InControl 2, outside the InControl 2 screens. For the contents of that interface, refer to the documentation for the device firmware.
Where to find it
Device > Settings > Remote Web Admin

The device Settings menu, opened by hovering over Settings. Remote Web Admin and Web CLI are outlined in red. The arrow on Remote Web Admin opens a list of direct links to pages of the device's own interface.
Hover over the arrow beside the entry to list shortcuts to individual pages of that interface, such as Dashboard, Network > WAN and Advanced > Port Forwarding.
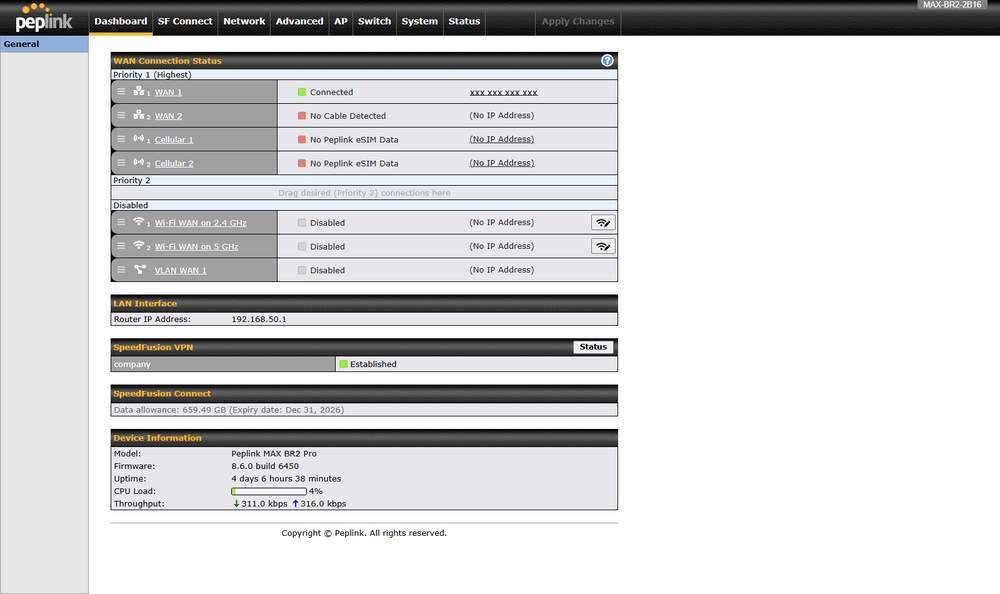
Remote Web Admin opens the device's own Dashboard, with its own menu bar (Dashboard, SF Connect, Network, Advanced, System, Status). This is the device's interface, not an InControl 2 screen.
16.5.1. What It Does
- Reaches the device's own settings page through InControl 2, including devices behind carrier NAT.
- Opens the web administration interface served by the device itself.
- Opens directly to the device's own Dashboard. No separate device login page is shown.
- The device must be online. The entry is greyed out and unavailable on an offline device.
- All pages shown belong to the device, not to InControl 2. Using it changes no InControl 2 screen, and changes made there are made on the device.
Caution: For Wi-Fi AP SSID and Radio, SpeedFusion VPN, Outbound Policy, Firewall Rules, Web Admin Settings and Time zone, where InControl 2's management option is enabled, changes made on the device are reverted and overwritten by InControl 2, as Group > Settings > Bulk Configurator states (13.12.1 What the Page Tells You First). Check the badges on Device > Device Details (14.1.2 Status Badges on the Heading Line) first, and make lasting changes in those areas in InControl 2.
16.6. Web CLI
Web CLI opens a command line session on the device from InControl 2, outside the InControl 2 screens. For the available commands, refer to the documentation for the device firmware.
Where to find it
Device > Settings > Web CLI

The device Settings menu, opened by hovering over Settings. Web CLI is outlined in red, below InTouch.
16.6.1. What It Does
- Opens the device's own command line interface in the browser.
- The device must be online. The entry is greyed out and unavailable on an offline device.
Caution: Remote Web Admin and Web CLI both open sessions through InControl 2, but a change made in either is made directly on the device, not in InControl 2's configuration. The caution under Remote Web Admin about areas InControl 2 manages also applies here (16.5 Remote Web Admin).