
14. Device Level Management
Device Level Management covers the screen InControl 2 opens when a single device is selected. It describes one device rather than a group and is almost entirely read only. Configuration for the same device is under the device Settings menu, described in Device Level Tools (16 Device Level Tools).
14.1. Device Details
Device Details shows the identity, subscription state, connection status and location of one device on a single page.
Where to find it
Device > Device Details
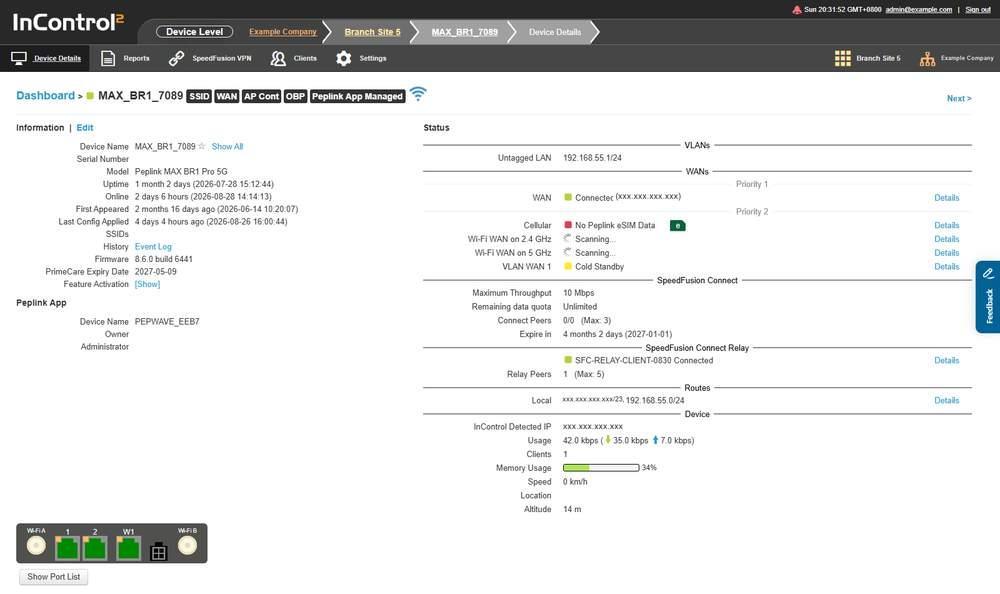
Device Details. Information and the Peplink App on the left, Status on the right, and the status badges on the heading line beside the device name.
The page has five areas:
- The heading line, with the device name and its status badges
- Information, the device identity and subscription fields
- Peplink App, the device's owner and administrators, below Information
- Status, the current operational state, on the right
- The port panel and the location map at the bottom of the page
Hover over the square beside the device name to see the device's state, for example Online.
14.1.1. Checking a Device's Status
- 1.Hover over the square beside the device name to check whether the device is Online.
- 2.Compare Uptime with Online under Information. A short Uptime means the device restarted or lost power. A long Uptime with a short Online means the device lost its connection to InControl 2 while running.
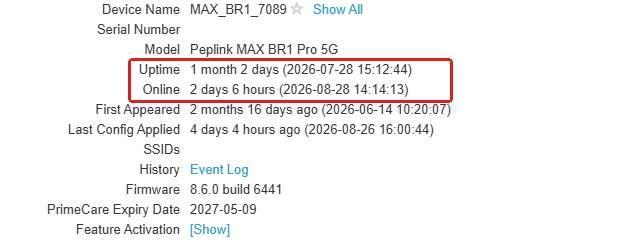
Step 2. Uptime and Online, outlined in red, each with the date and time they count from.
- 3.Under Status > WANs, identify any WAN that is down and open its Details link.
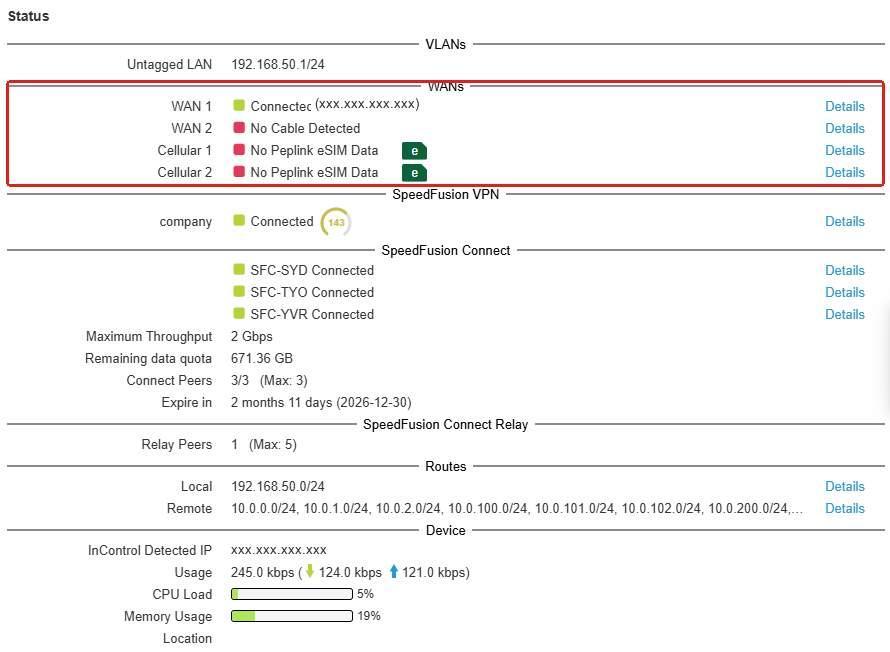
Step 3. The WANs group, outlined in red: one row per WAN with its state and a Details link on the right.
- 4.Check Last Config Applied. If a change was applied shortly before the problem, Group > Settings > Operation Log shows who made it. See 13.18 Operation Log (Group Level).
- 5.Open History > Event Log for details. See 15.9 Event Log (Device Level).
14.1.2. Status Badges on the Heading Line
Each badge beside the device name marks an area InControl 2 manages. A badge appears only when its condition applies, so a device can show all, some or none of them.

The heading line. The device name is followed by the SSID, WAN, AP Cont, OBP and Peplink App Managed badges.
Badge | What it means |
SSID | SSID and radio settings are being managed |
WAN | Device's WAN settings are being managed |
AP Cont | AP Controller enabled: Wi-Fi configuration is disabled for this device |
OBP | Outbound Policy is being managed |
Peplink App Managed | This device is managed by InControl and the Peplink App at the same time |
For Wi-Fi AP SSID and Radio, SpeedFusion VPN, Outbound Policy, Firewall Rules, Web Admin Settings and Time zone, where InControl 2's management option is enabled, changes made directly on the device are reverted and overwritten by InControl 2, as Group > Settings > Bulk Configurator states (see 13.12.1 What the Page Tells You First). Check the badges before changing a device through Remote Web Admin or Web CLI.
Each description above is the badge's own tooltip.
AP Controller. AP Controller is a function of the device's own web admin, not of InControl 2. With it, a router acts as the controller for the access points connected to it and manages their Wi-Fi. Only one of the two can own a device's Wi-Fi configuration, so enabling AP Controller in web admin removes Wi-Fi configuration from InControl 2. The AP Cont badge reports this condition.
If a device does not apply the SSID settings configured in Wi-Fi AP, check Device Details for this badge before checking the settings.
Other badges appear when their condition applies. Their tooltips read:
- VLAN networks are being managed
- Device's LAN IP settings are being managed
- Firewall Rules are being managed
- SpeedFusion VPN connections being managed
- AP availability is scheduled
- Connection tests are scheduled
- Bulk configuration applied
- Synergy Controller enabled
- Synergy mode enabled
- Service provider default
Three badge conditions state that InControl 2 is not managing the device:
- Device disabled configurations from InControl
- Controller Managed: Configuration of this device is disabled on InControl.
- Device's configuration and firmware are under Peplink app's control. InControl is not managing them. This is the tooltip of the SFC App Managed badge
If a device does not apply a configuration change, check for these three badges first. Each means configuration is refused or handled elsewhere.
14.1.3. When a Change Cuts a Device Off
If an outbound policy or firewall rule change from InControl 2 leaves a device unable to reach InControl 2, the device rolls the change back and InControl 2 stops configuring it. Correct the rule, then save a change to outbound policy or firewall rules. If the device lost contact for another reason, use the HERE link described below.
A separate page indicator reports this state. Its tooltip states:
- Configuration to this device has stopped
- A change to outbound policy or firewall rules applied from InControl 2 left the device unable to reach InControl 2, so the device rolled the configuration back
- InControl 2 applies no further configuration to the device until a change is made to outbound policy or firewall rules
- The tooltip has a HERE link that attempts to apply the configuration again, for the case where the device lost contact for another reason
14.1.4. Information
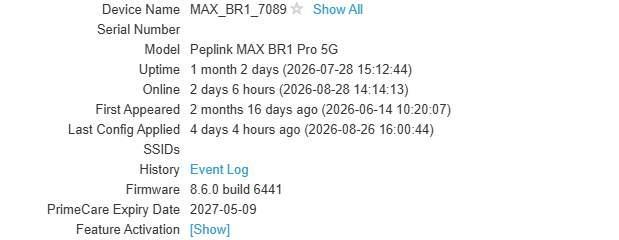
The Information block, with the Show All link beside the device name and the Event Log and [Show] links further down. Serial number and SSID values are hidden in this image.
Field | What it shows |
Device Name | The device name in InControl 2, with a Show All link beside it |
Serial Number | The serial number of the device |
Model | The Peplink product model reported by the device |
Uptime | How long the device has been running, with the date and time it is counted from |
Online | How long the device has been online, with the date and time the current online period began |
First Appeared | How long ago the device first appeared in InControl 2, with the date and time |
Last Config Applied | How long ago configuration was last applied to the device, with the date and time |
SSIDs | The SSIDs on the device. Hover over an SSID to see its security mode and its BSSID on each band |
History | An Event Log link for this device. Event Log search covers a rolling 31 days. Log archive retrieval covers 12 months at device level (24 months at group level) and is a separate function on a different screen (see 15.9.4 Log Archive Download) |
Firmware | The firmware version and build the device is running |
PrimeCare Expiry Date | The expiry date of the device's PrimeCare subscription. PrimeCare and SpeedFusion Connect are separate subscriptions with separate dates. This date is not the SpeedFusion Connect Expire in date under Status |
Feature Activation | A [Show] link. See Feature Activation below |
Rows appear only when the device reports them. A device without a cellular WAN, without Wi-Fi or without a GPS fix shows fewer rows than the example.
For the difference between Uptime and Online, see 14.1.1 Checking a Device's Status. A device that reconnects keeps its uptime and restarts its online figure.
The group Dashboard shows Uptime, Online and Last Config Applied for every device in the group (see 10.1.3 The Devices Grid), so a fleet wide power or reboot event is visible on one page.
For expiry across the organization, use Subscription Status in Organization > Organization Settings > Subscriptions and Licenses (9.9.1 Subscription Status). It lists each device's Subscription Status and Subscription Expiration Date and filters to About to expire or Expired.
14.1.5. The Expanded Information View
Show All expands Information in place and changes to Hide. The expanded view keeps every field above and adds the following.
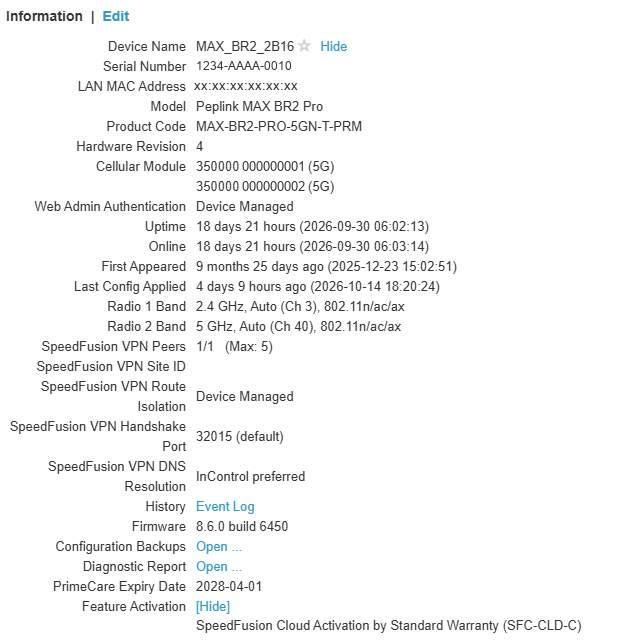
Information after Show All, with Hide beside the device name. Rows such as LAN MAC Address, Product Code and the SpeedFusion VPN fields are now listed. The Site ID value is hidden in this image.
Field | What it shows |
LAN MAC Address | The MAC address of the device LAN interface |
Product Code | The ordering code of the device |
Hardware Revision | The hardware revision of the device |
Cellular Module | The IMEI of each cellular module, with the module type in brackets, for example (5G) |
Web Admin Authentication | Where web admin authentication is decided, for example Device Managed |
Radio 1 Band | The band, the channel selection and channel, and the 802.11 modes in use on the first radio |
Radio 2 Band | The same for the second radio |
Supported SSIDs | How many SSIDs the device supports |
SpeedFusion VPN Peers | Peers in use against the device licence limit |
SpeedFusion VPN Site ID | The site identifier the device uses for SpeedFusion VPN |
SpeedFusion VPN Route Isolation | The route isolation setting, for example Device Managed |
SpeedFusion VPN Handshake Port | The handshake port, marked when it is the default |
SpeedFusion VPN DNS Resolution | How SpeedFusion VPN resolves names, for example InControl preferred |
Configuration Backups | An Open ... link to the configuration backups held for this device. See Configuration Backups below |
Diagnostic Report | An Open ... link to download a diagnostic report from this device. See Diagnostic Report below |
The SpeedFusion VPN identity of the device, including Site ID and handshake port, is shown only in the expanded view.
Configuration Backups and Diagnostic Report each have an Open ... link that opens a dialog.
14.1.6. Configuration Backups
Configuration Backups shows when the device's configuration was saved and by what, and can return the device to an earlier configuration.
Open ... opens a dialog listing the backups as a tree, with Expand all and Collapse all above it.
Column | What it shows |
Name | A folder per date, holding one file per backup, named by its time |
Type | Folder or File |
Size | The size of the backup file |
Made By | What saved the configuration: InControl, Web admin or Command-line interface |
Action | Download and Apply, on each file |
Download saves the backup file. Apply loads that backup onto the device. Close closes the dialog.
Caution: Apply loads that backup onto the device and replaces its current configuration. Check the date and Made By of the file before clicking it.
14.1.7. Diagnostic Report
To download a diagnostic report from one device, for example at the request of Peplink support:
- 1.Click Show All, then Open ... beside Diagnostic Report. The dialog is titled Download Diagnostic Report.
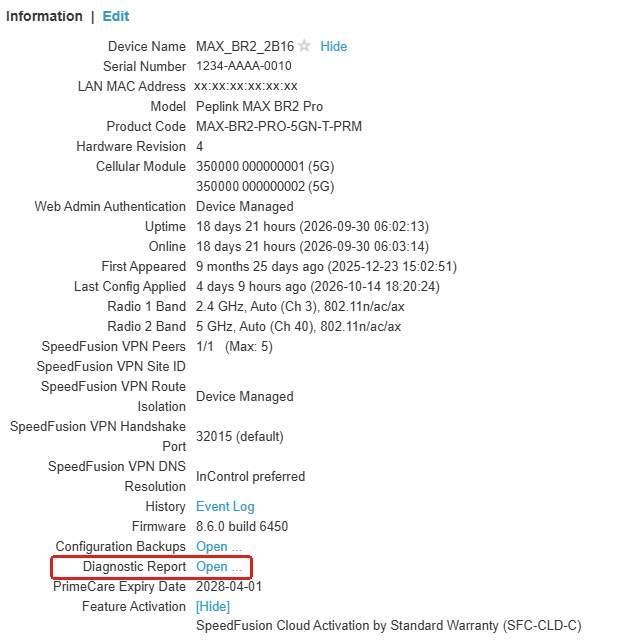
Step 1. The Diagnostic Report row and its Open ... link, outlined in red, near the bottom of the expanded Information view.
- 2.Click Request for a report. The device prepares a new report.
- 3.Download the latest report from the link shown with its date.
- 4.Click Close.
While the device is offline, the dialog reads Device is offline and no report can be requested.
To download diagnostic reports from several devices at once, use Download diagnostic reports... in the Actions menu of Group > Settings > Device Management. See 13.1.7 What Each Entry Opens.
14.1.8. Feature Activation
[Show] expands the Feature Activation list in place and changes to [Hide]. For each activated feature on the device, the list gives:
- The activated feature
- The source of the activation, for example a standard warranty, with the activation SKU in brackets
- The associated plan, where one applies

Feature Activation after [Show]. The link now reads [Hide] and the activation is listed beneath it with its SKU in brackets.
Hover over an entry to see the date the activation was applied, for example Applied on 2021-08-03. Activations on the same device can have different dates.
14.1.9. Peplink App
The Peplink App block below Information shows the device as recorded in the Peplink App.
Field | What it shows |
Device Name | The device name recorded in the Peplink App. It can differ from the InControl 2 device name |
Owner | The single owner of the device, with an × control beside the entry. Click × only to change the device's owner in the Peplink App |
Administrator | The administrators of the device, listed one per line |
This block corresponds to two badges on the heading line. Only one of them leaves InControl 2 in charge:
- Peplink App Managed: the device is managed by InControl and the Peplink App at the same time.
- SFC App Managed: the device's configuration and firmware are under the Peplink app's control and InControl 2 is not managing them.
Check which badge the device shows before changing its settings in InControl 2.
14.1.10. Status
Status is grouped under headings. A group appears only when the device has data to report under it.
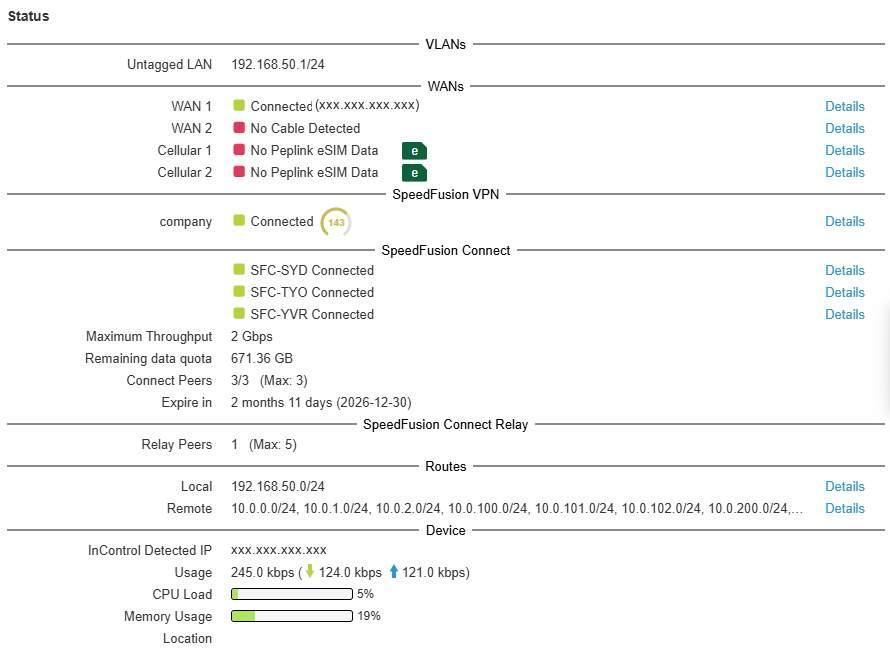
The Status panel with its group headings: VLANs, WANs, SpeedFusion VPN, SpeedFusion Connect, SpeedFusion Connect Relay, Routes and Device. The Location value is hidden in this image.
Group | What it lists |
VLANs | Each VLAN on the device and its address and prefix, including the untagged LAN |
WANs | Each WAN interface, its priority band, its current state and a Details link. Cellular, Wi-Fi WAN and VLAN WAN interfaces all appear here |
SpeedFusion VPN | Each SpeedFusion VPN peer and its state, with a Details link |
SpeedFusion Connect | Maximum Throughput, Remaining data quota, Connect Peers, Expire in, then each connected peer with its own Details link |
SpeedFusion Connect Relay | The relay peers, with the number active and the device's limit |
Routes | The local routes the device reports, with a Details link |
Device | The operational counters listed below |
Fields in the Device group:
Field | What it shows |
InControl Detected IP | The address from which the device connects to InControl 2 |
Usage | Current throughput, broken out into download and upload |
Clients | The number of clients currently on the device |
CPU Load | A bar and a percentage |
Memory Usage | A bar and a percentage |
Speed | The reported ground speed of the device |
Location | The reported coordinates as a link, with the time they were reported |
Altitude | The reported altitude |
Four items have tooltips:
- Connect Peers shows how many connections are connected, how many are configured, and the device licence limit.
- Relay Peers shows the peers, how many are active, and the device licence limit.
- The e badge on a cellular WAN row means Peplink eSIM is active.
- The Find My Peplink hostname of a WAN, for example wan.null.mypep.link, can be copied from the page. When the WAN's IP address is private and the Find My Peplink option Resolve Private IP Address is off, the tooltip reads Unresolvable as the Find My Peplink option "Resolve Private IP Address" is off.
The licence limits in those two tooltips apply to that device only.
Using the Status panel:
- The WANs rows show which link is currently down. For when and how often it dropped, see Device > Reports > Connection Up/Down History (15.12 Connection Up/Down History). For latency before it dropped, see Device > Reports > WAN Quality Reports (15.6 WAN Quality Reports).
- CPU Load and Memory Usage show current values. Check them when a site is slow while its WANs are healthy.
- To top up SpeedFusion Connect on several devices, use Top Up SFC Usage Plan... in the Actions menu of Group > Settings > Device Management. See 13.1.7 What Each Entry Opens.
14.1.11. The Port Panel
- A graphic of the device's physical ports appears below Information. Each port is drawn in its current state and labelled as on the hardware.
- Wireless radios appear on the same graphic, labelled Wi-Fi A and Wi-Fi B on the model shown.
- The graphic matches the hardware, so a model with different ports or without a second radio shows a different graphic.
- Hover over a port to see its details. A LAN port shows Link Status, Speed, Port Type and Networks. The WAN port shows its Name, Link Status, Speed and whether PoE is available.
- Show Port List is below the graphic.
14.1.12. The Port List
Show Port List opens the port table in place and changes to Hide Port List. The table has a Search: box and one row per port.
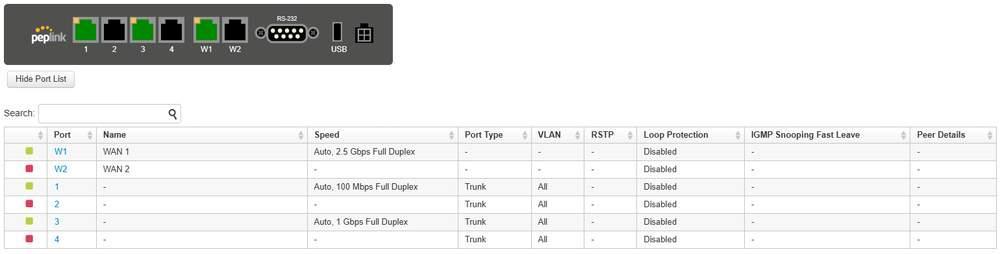
The port graphic with the port list open beneath it. Hide Port List has replaced Show Port List, and the table has one row per port.
Column | What it shows |
Port | The port label as marked on the hardware |
Name | The name given to the port |
Speed | The negotiated speed and duplex, and whether the speed is set to auto |
Port Type | The port type, for example Trunk |
VLAN | The networks carried on the port |
RSTP | The RSTP state of the port |
Loop Protection | Whether loop protection is on for the port |
IGMP Snooping Fast Leave | The IGMP snooping fast leave state of the port |
Peer Details | Details of what the port is connected to |
Columns that do not apply to a port show -. A WAN port therefore leaves most of the switching columns empty.
14.1.13. The Location Map
The map at the bottom of the page plots the locations the device reported and can replay a track over a selected day.
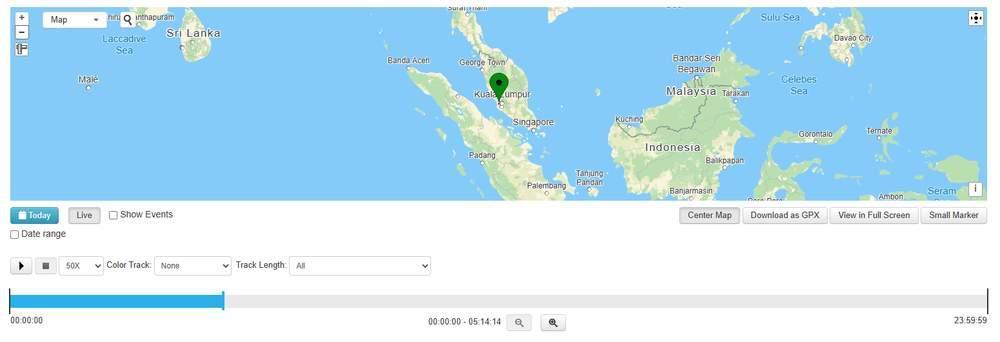
The location map. Below it are the date button, Live, Show Events and Date range on the left, and Center Map, Download as GPX, View in Full Screen and Small Marker on the right, then the playback controls and the timeline.
Control | What it does |
Map | Selects the map's base layer, Map or Satellite, as on the group Dashboard map. Not shown in every organization |
Zoom in | Zooms the map in |
Zoom out | Zooms the map out |
Attributions | Shows the map attributions |
The date itself | Opens the date picker. The button is labelled with the day currently shown |
Date range | Switches the selection from a single day to a range |
Live | Follows the device live |
Show Events | Adds events to the track |
Center Map | Recentres the map on the device |
Download as GPX | Downloads the displayed track as a GPX file |
View in Full Screen | Expands the map to fill the browser |
Small Marker | Switches the map marker to a smaller one |
Playback speed | 1X, 10X, 50X, 100X or 200X |
Color Track | None or by Speed, colouring the track by the speed of the device |
Track Length | All, Custom, 4 Hours, 3 Hours, 2 Hours, 1 Hour, 30 minutes or 15 minutes |
A timeline below the map shows the span of the day, with the covered period marked and its start and end times labelled at each end.
The map also has a measuring tool. Its tooltip reads Click to start measuring distance. Other icon controls are the search icon, the playback start and stop buttons, and the timeline zoom buttons. The map shows positions the device has already sent and does not send commands to the device.
For a vehicle that loses connection on a route, select the day, tick Show Events and replay the track to see where on the route each event occurred. Download as GPX exports the track.
The number of points in the track is set by GPS Location Collection in Group > Settings > InControl Options (13.6.2 Low Data Usage Mode). Options range from 30 location points every minute (Default) to 1 location point every hour, or Disabled.
A marker can show a past location. If its tooltip reads This marker indicates the device's location in the past, the marker shows an earlier location, not necessarily the current one.
14.1.14. Controls Elsewhere on This Screen
Control | What it does |
Dashboard | Opens the Dashboard of the group the device belongs to |
Next > | Moves to the next device in the same group |
Edit | On the Information heading line. Opens the editable form for the Information block |
Show All | Expands Information in place, and changes to Hide |
Event Log | Opens the Event Log for this device |
[Show] | Expands Feature Activation in place, and changes to [Hide] |
Location coordinates | Opens a Google Maps search for the reported coordinates, a third-party site outside InControl 2 |
Details | Opens the detail view for that Status row. One appears against each WAN, against each SpeedFusion Connect peer and against Routes |
Show Port List | Opens the port table in place, and changes to Hide Port List |
Wi-Fi AP toggle | Turns the device's Wi-Fi AP on or off from this page. Its tooltip states the current state and the effect of clicking, for example Wi-Fi AP currently on. Click to turn off. While Wi-Fi AP scheduling is enabled, the switch is replaced by an information icon whose tooltip reads Wi-Fi AP scheduling is enabled. Manual AP toggling is unavailable. The heading line badge AP availability is scheduled reports the same condition |
Caution: Turning Wi-Fi AP off with the Wi-Fi AP toggle disconnects every wireless client on this device. Read the tooltip, which states the current state and the effect, before clicking.
Notes on two of these controls:
- Edit opens the form for changing the Information fields.
- Each Details link applies to the row it is on. The link on a cellular WAN row covers that WAN, and the link on Routes covers the routes.