
9. Settings (Organization Level)
This chapter covers the organization-level Settings menu, which holds the settings that apply to the whole organization rather than to one group: device membership, groups, administrators, firmware, and licences and subscriptions. Every screen in this chapter sits at organization level, so a change made here can affect devices in every group. The chapter also covers the Operation Log, which records each administrator change.
9.1. Add Devices (Organization Level)
Registers device serial numbers into the organization and places them into a group, with optional tags. Add Devices... on the Device Management screen (9.2 Device Management (Organization Level)) opens the same screen.
Where to find it
Organization > Organization Settings > Add Devices
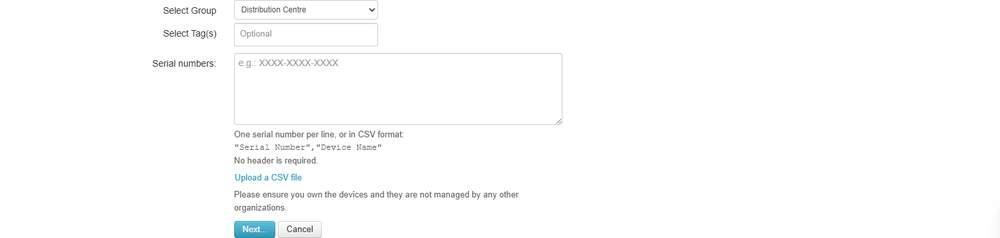
Enter serial numbers one per line or upload a CSV file. Select the group before entering the serial numbers.
9.1.1. What This Screen Asks For
Field | What it takes |
Select Group | The group the devices are added to. The list holds every group in the organization. The selected group applies to every serial number in the box, so add devices for different groups separately |
Select Tag(s) | Optional. Tags to attach to the devices being added |
Serial numbers: | One serial number per line, or CSV lines in the form "Serial Number","Device Name". No header is required |
Caution: The form shows this warning above the buttons: Please ensure you own the devices and they are not managed by any other organizations.
9.1.2. Controls on This Screen
Control | What it does |
Upload a CSV file | Supplies the serial numbers from a file |
Next... | Submits the form. At least one serial number is required |
Cancel | Leaves the form |
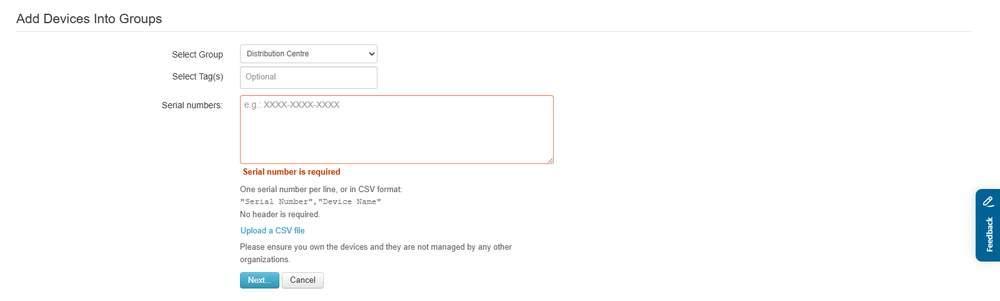
The Serial numbers box is required. When it is empty, the box is outlined in red with the message Serial number is required beneath it.
9.2. Device Management (Organization Level)
Lists every device in the organization across all groups, with its status, group, product and firmware. Use it to identify devices that are offline, have a WAN down, or need attention.
Where to find it
Organization > Organization Settings > Device Management
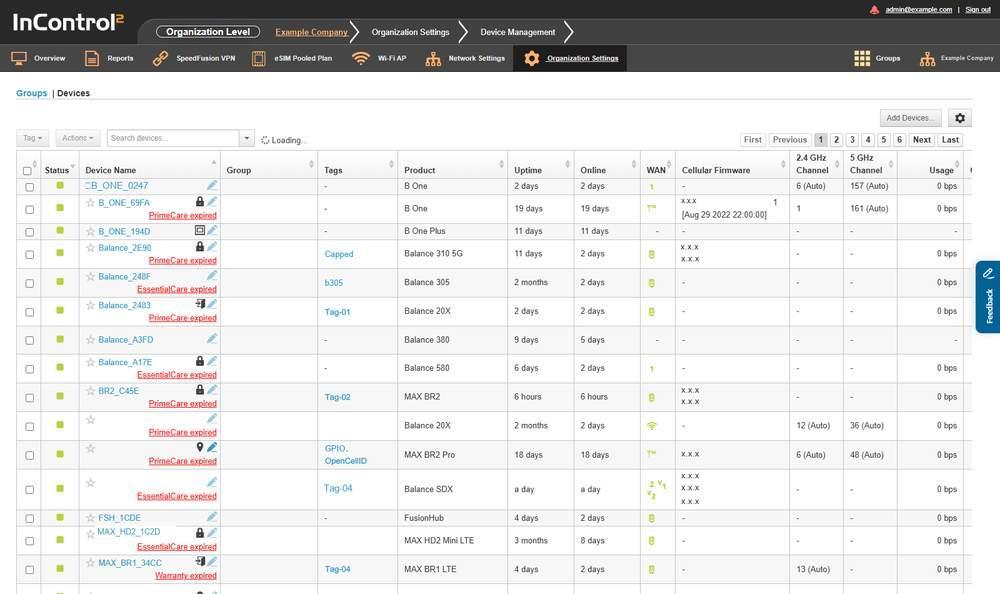
The Devices tab. Subscription and warranty expiry notices appear in red beneath the device name. The Groups link at the top left returns to the group listing.
9.2.1. What This Screen Shows
The page has two headings, Groups and Devices, with the device grid below.
Column | What it shows |
Status | A per-device state indicator. Hovering gives the state, for example Online |
Device Name | The device, linking to its own pages |
Group | The group the device belongs to, linking to that group |
Tags | Tags attached to the device |
Product | The Peplink or Pepwave model |
Uptime | How long the device has been up. Hovering gives the exact timestamp |
Online | How long the device has been online. Hovering gives the exact timestamp |
WAN | WAN connection indicators for the device |
Cellular Firmware | The modem firmware string reported by the device |
2.4 GHz Channel | The 2.4 GHz channel in use |
5 GHz Channel | The 5 GHz channel in use |
Usage | Current throughput |
Clients | Number of connected clients |
Firmware | The firmware version and build running on the device |
Last Config Applied | When InControl 2 last applied configuration. Hovering gives the exact timestamp |
A short Uptime indicates a recent restart. Last Config Applied shows when InControl 2 last applied configuration. Compare it with the Operation Log (9.7 Operation Log (Organization Level)) when a site's behaviour changed after a configuration change.
9.2.2. Status and Condition Indicators
In addition to the Status column, each device row shows condition icons, each with its own hover text.
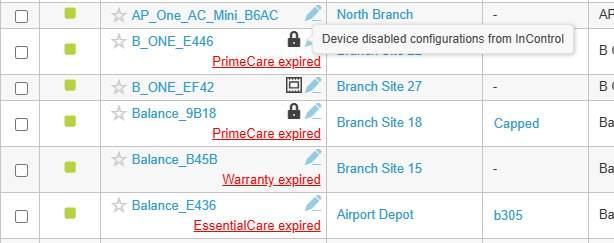
Condition icons beside device names in the grid. The hover text of the lock icon reads Device disabled configurations from InControl.
Indicator text | What it tells you |
Online | The device is reachable by InControl 2 |
InControl stopped to apply configurations to device. | InControl 2 has stopped applying configuration to this device. Group and organization-level settings do not reach it |
Configuration to device stopped. Configuration rolled back. | A configuration attempt was stopped and the device returned to its previous configuration |
Device disabled configurations from InControl | The device is refusing InControl 2 configuration. The device is still listed and still reports status |
Config patches available | Configuration patches are pending for this device. Whether they are sent automatically depends on Auto apply configuration patches to devices in Organization Settings |
Device's web admin password remains with the default one. | The device still uses its factory web admin password |
Invalid license | The licence on the device is not valid |
Priority-1 down WANs | One or more WAN connections in priority 1 are down |
One or more WANs hit 100% usage and are restricted to routing management traffic only. | A WAN has reached its usage allowance and carries management traffic only. User traffic does not pass on that WAN |
Cellular WAN connections are locked to specific SIM cards. | Cellular WANs on the device are tied to specific SIM cards |
Ethernet, Wi-Fi, Cellular | The WAN type the indicator refers to |
Firmware upgrade is available. | A newer firmware exists for the device |
One or more Starlinks connected to this device have firmware pending to install. | A Starlink behind the device has firmware pending installation |
With GPS data | The device is reporting position data |
Follow another device's GPS location | The device takes its location from another device instead of its own GPS |
Captive portal enabled | A captive portal is running on the device |
Router mode | The device is in router mode |
Scheduled reboot | A reboot is scheduled for the device |
eSIM Pooled Plan | The device is on a Peplink eSIM pooled plan |
The arrow beside Search devices... opens the search options, with Match all and the same condition icon sets as on the group screen. Select a condition, for example Priority-1 down WANs, Invalid license, Firmware upgrade is available. or Device's web admin password remains with the default one., to list the matching devices across every group. For the panel, see Status icons under Device Management in Settings (Group Level) (13.1.2 Status Icons).
Four indicators require action:
- InControl stopped to apply configurations to device. and Device disabled configurations from InControl both mean InControl 2 is not managing the device. In the first case InControl 2 has stopped; in the second the device is refusing.
- Device's web admin password remains with the default one. is a security finding.
- One or more WANs hit 100% usage and restricted to routing management traffic only. explains a WAN that appears up but passes no user traffic.
- Invalid license on a device row is the same condition the Subscriptions and Licenses screen reports for FusionHub licences.
9.2.3. Acting on Selected Devices
Tag and Actions sit beside the search box and act on the devices selected in the grid. Both are greyed out until at least one row is selected.
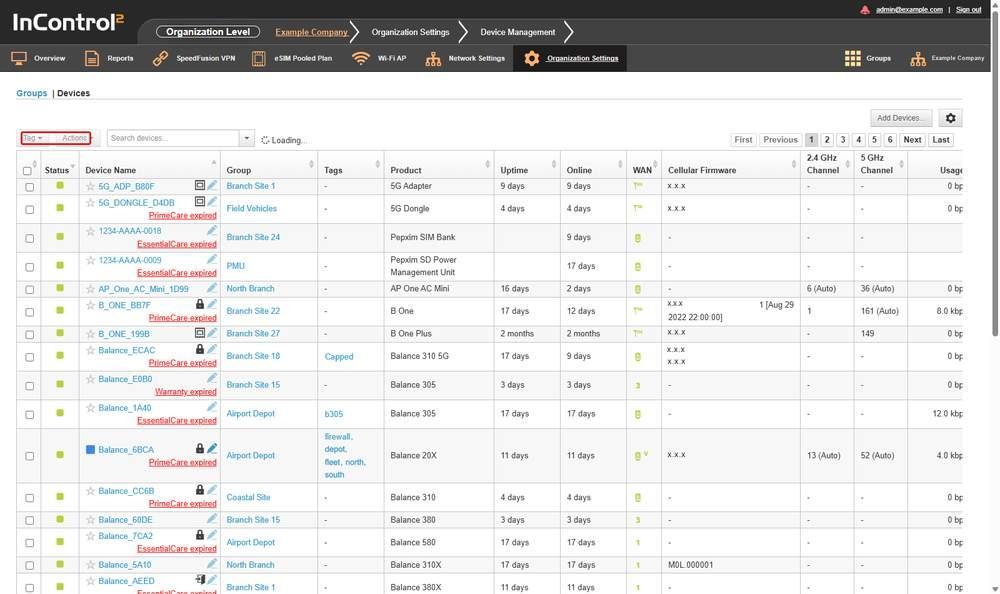
With no device row selected, Tag and Actions, outlined in red, are greyed out and do not open.
When a row is selected, the head of the grid shows Selected 1 devices: followed by the selected device names, and Clear all selections.
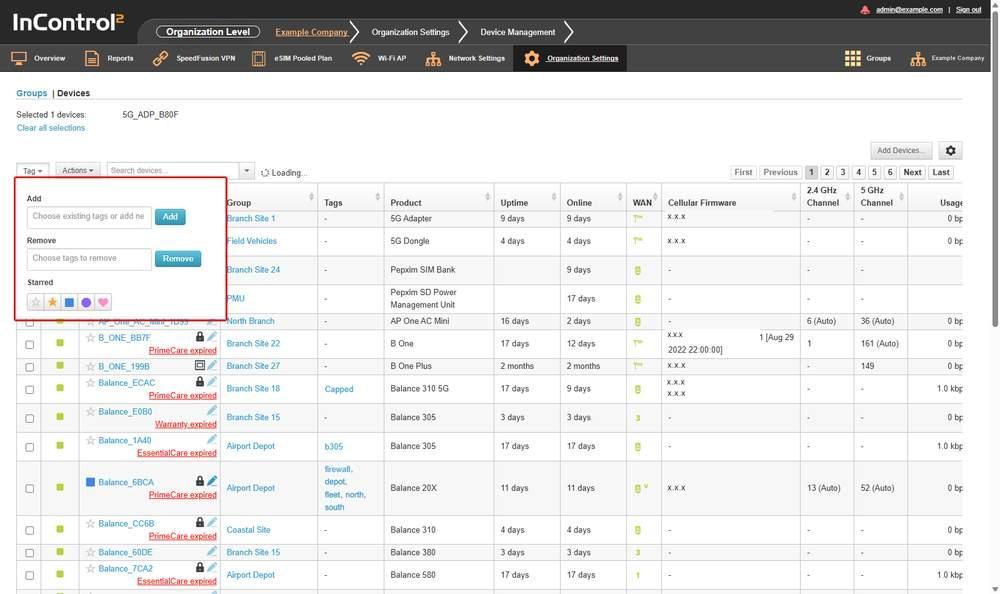
The Tag panel, outlined in red, with one device selected. It holds an Add box, a Remove box and a row of Starred markers. The selection is named above the buttons.
Tag opens a panel of three parts:
Part | What it holds |
Add | A box for selecting existing tags or typing a new one, with an Add button |
Remove | A box for selecting tags to remove, with a Remove button |
Starred | A row of five markers: a plain star, an orange star, a blue square, a purple circle and a pink heart |
Each device name in the grid has a star outline beside it. The Starred row sets one marker for the whole selection.
Actions runs one action on every selected device, which at this level can span several groups. The menu is the one on Group > Settings > Device Management, described under The Actions menu in Settings (Group Level) (13.1.6 The Actions Menu), without four entries that are not offered at organization level:
- Change map marker…
- Hardware watchdog...
- Download diagnostic reports...
- Restore to factory defaults...
For these, use Group > Settings > Device Management in the device's group. Neither menu has a reboot entry. Reboot a single device from Device > Settings > Device Tools (16.4 Device Tools), or schedule reboots under Scheduled Reboot on Group > Settings > Device System Management (13.4.8 Scheduled Reboot).
Caution: The selected action applies to every selected device, in every group the selection spans. Check the Selected N devices: line above the grid before confirming.
9.2.4. Controls on This Screen
Control | What it does |
Groups | Returns to the organization overview and its group listing |
Search devices... | Filters the device grid |
Tag | Adds tags to, or removes tags from, the selected devices, and sets their starred marker. Greyed out until a row is selected |
Actions | Applies a bulk action to the selected devices. Greyed out until a row is selected |
Clear all selections | Clears every selected row. Appears only while a row is selected |
Add Devices... | Opens the Add Devices screen |
Row checkbox | Selects a device row |
Edit | Shows or hides the row checkboxes, Tag, Actions and Update device info by CSV file. These are shown when the page opens |
Hide expiration notices | Hides the red expiry notices under device names: PrimeCare expired, EssentialCare expired or Warranty expired. These notices do not indicate a device fault. The checkbox sits beside Edit below the grid |
Download as CSV | Exports the device list |
Update device info by CSV file | A link under the device table that uploads device names and locations from a CSV file. See Update device info by CSV file below |
9.2.5. Update Device Info by CSV File
Renames devices or sets their site addresses in bulk across every group.
Update device info by CSV file is a link under the device table, beside Download as CSV. It opens a dialog with a drop zone, Drop CSV file here to upload (or Click), and a Done button.
The dialog states these rules for the file:
- The file holds either two fields, "SN", "Name", or five fields, "SN", "Name", "Address", "Latitude", "Longitude".
- The first line must be a field header.
- Every value is required except latitude and longitude. When those are empty, they are derived from the address.
- Uploaded addresses, latitudes and longitudes overwrite each device's static location.
- A device that reports its own GPS location ignores the static location.
Caution: An upload with the five field layout replaces the static location of every device listed in the file. Download the device list with Download as CSV first, so the previous names and locations can be restored.
9.3. Create Group
Creates a new group, optionally copying settings from an existing group, and sets its address and time zone.
Where to find it
Organization > Organization Settings > Create Group
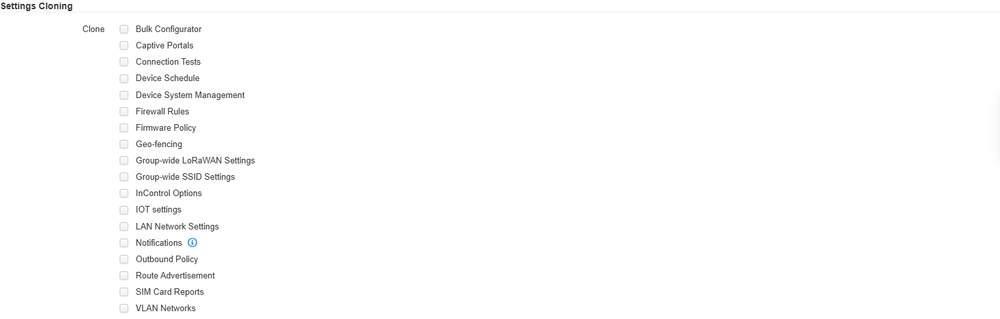
The Clone list. Every box is clear by default, so no settings are copied unless selected.
The screen is divided into four sections: Name your group, Settings Cloning, Address and Time Zone.
9.3.1. Name Your Group

Group Name, and below it a Description box with the Optional placeholder.
Field | Notes |
Group Name | The name of the new group. Required |
Description | Optional free text |
9.3.2. Settings Cloning
Settings can be copied from an existing group used as a template, so alerting, firewall rules, firmware policy and VLANs match from the start. Recipients set to a specific administrator are not cloned and must be selected again.
The Clone list has eighteen checkboxes. Each one names a set of group level configuration to copy into the new group:
- Bulk Configurator
- Captive Portals
- Connection Tests
- Device Schedule
- Device System Management
- Firewall Rules
- Firmware Policy
- Geo-fencing
- Group-wide LoRaWAN Settings
- Group-wide SSID Settings
- InControl Options
- IOT settings
- LAN Network Settings
- Notifications
- Outbound Policy
- Route Advertisement
- SIM Card Reports
- VLAN Networks
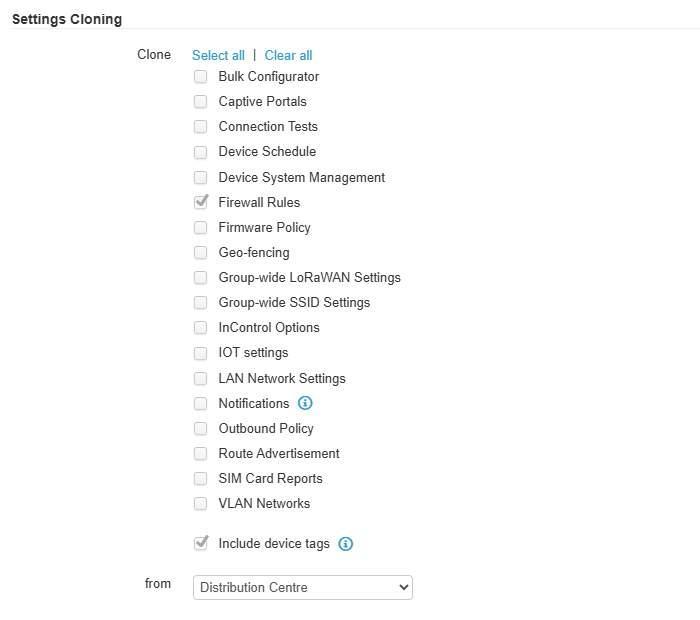
One Clone box selected. The from dropdown below the list names the source group. Include device tags is selected.
Every box is clear when the screen opens. If none is selected, the new group inherits none of these settings.
Caution: The from dropdown below the list names the source group. It lists every group in the organization and appears once a Clone box is selected. Check the source group before creating a group with any box selected.
The information icon on Notifications states: Note: notification recipients of a specific organization or group administrator will not be cloned. The notification profile is copied, but its recipients are not and must be set again in the new group.
Include device tags sits outside the Clone list and, unlike the eighteen checkboxes, is enabled by default. It controls the scope of cloned rule sets and profiles in the new group, not whether they are copied.
State | What is cloned |
Selected. This is the default | Device tags used in VLAN Network profiles, Firewall Rules and Outbound Policy rulesets are copied with them, so each profile or ruleset keeps its tag-based targeting |
Not selected | The profiles and rulesets are applied to all devices in the group |
The tooltip reads: If this option is selected, any devices tags in VLAN Network profiles, Firewall Rules and Outbound Policy rulesets will also be copied over. If this option is not selected, the profiles and rulesets will be applied to all devices in the group. Default: Enabled
Clearing it extends every cloned firewall rule set, VLAN profile and outbound policy from a tagged subset to the whole group. Keep it selected unless that is intended.
9.3.3. Address
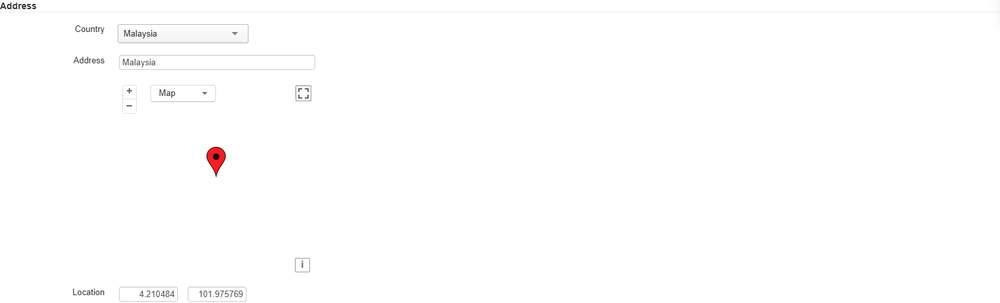
Country and Address above the map, with the zoom buttons and full screen icon on the map. The two Location boxes below hold the latitude and longitude.
Control | What it does |
Country | Sets the country for the group. The list covers the standard set of countries and territories |
Address | Free text address for the group |
Map | Places the group on the map from the address entered |
Zoom in | Zooms the map in. Drawn as + |
Zoom out | Zooms the map out. Drawn as – |
Attributions | Shows the map attributions. Drawn as i |
Toggle full-screen | Expands the map |
Latitude | The group's latitude, editable directly |
Longitude | The group's longitude, editable directly |
The Address heading shows the warning: The Location field may not correspond to the address. Confirm the latitude and longitude after entering an address.
9.3.4. Time Zone

The Time Zone list, with Devices follow this time zone setting selected beneath it.
Control | What it does |
Time Zone | Sets the group's time zone. The list runs from (UTC-12:00) International Date Line West to (UTC+14) Kiritimati Island |
Devices follow this time zone setting | Applies the group's time zone to the devices in the group. When cleared, the group records the time zone only |
9.3.5. Controls on This Screen
Control | What it does |
Create group | Creates the group with the settings above |
Cancel | Discards the new group |
9.4. Group Management
Lists the groups in the organization with their device counts, and provides access to group creation, renaming and deletion. Bulk operations on devices are on Device Management (9.2 Device Management (Organization Level)).
Where to find it
Organization > Organization Settings > Group Management
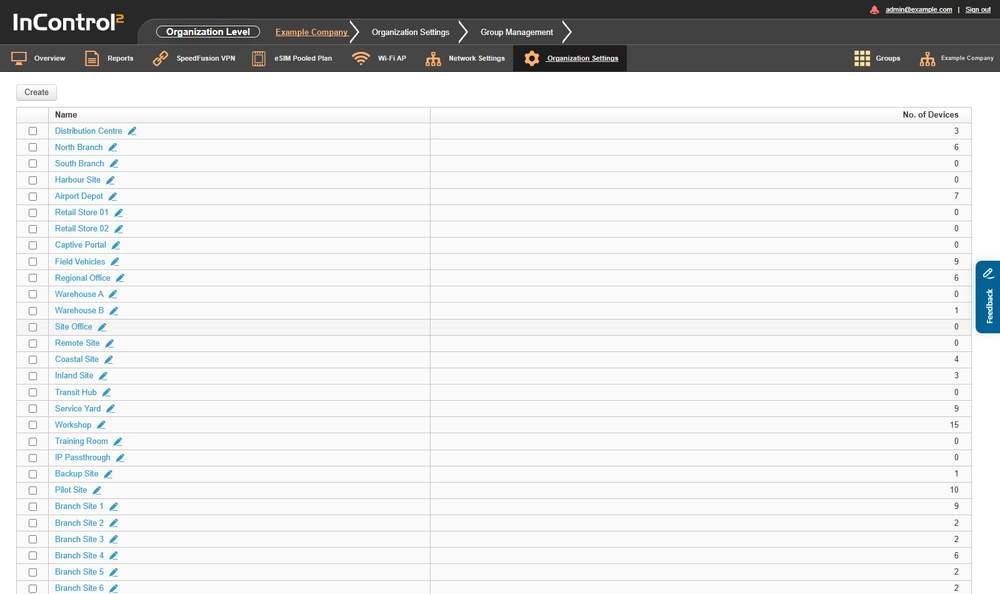
Each group name has a pencil icon for renaming it in place. The device count on the right shows which groups are empty.
9.4.1. What This Screen Shows
Column | What it shows |
Name | The group name, linking to that group's overview. A pencil icon beside it edits the name in place |
No. of Devices | The number of devices in the group. Empty groups also appear in group lists such as Add Devices (9.1 Add Devices (Organization Level)) and the Add to Group list in Create FusionHub Serial Number (9.9.6 Creating FusionHub Serial Numbers) |
9.4.2. Controls on This Screen
Control | What it does |
Create | Opens the Create Group form (9.3 Create Group) |
Row checkbox | Selects a group row and shows Delete and Move to a new organization... |
Delete | Bulk action on the selected group rows. Appears once a row is selected |
Move to a new organization... | Bulk action on the selected group rows. Appears once a row is selected |
Pencil icon | Edits the group name in place |
Download as CSV | Exports the group list |
Caution: Delete and Move to a new organization... act on every selected group. Check No. of Devices on each selected row first.

One group row selected. Delete and Move to a new organization... appear beside Create above the list.
9.5. Report E-mailing (Organization Level)
Sets whether usage reports for the organization are e-mailed, how often, and to whom. Usage Reports is the only report offered at this level. Device Reports, Wi-Fi Reports, Captive Portal Reports and Connection Test Reports are e-mailed per group from Group > Settings > Report E-mailing, which also sends each group its own usage report. See 13.8 Report E-mailing (Group Level).
Where to find it
Organization > Organization Settings > Report E-mailing

One row, Usage Reports, with Disabled selected. Recipients shows a dash because no recipient is set.

Monthly and Weekly selected for Usage Reports. The Recipients dropdown, outlined in red, replaces the dash. Send weekly report every appears below the grid with Sunday or Monday.
9.5.1. What This Screen Shows
Column | What it shows |
Disabled | No report is sent |
Monthly | A monthly report is sent. The column header has an information icon reading the first of every month |
Weekly | A weekly report is sent. Selecting it shows Send weekly report every, with Sunday or Monday |
Daily | A daily report is sent |
Recipients | Who receives the report. A dash means no recipient is set. Four options are offered at this level: All organization users, All organization administrators, All organization viewers and Other e-mail addresses. Group roles are not offered |
The grid has a single row, Usage Reports.
9.5.2. Controls on This Screen
Control | What it does |
Disabled | Turns report e-mailing off for Usage Reports. It is selected by default, so no usage report is sent until a frequency is selected |
Monthly | Schedules the report monthly. It is sent on the first of every month |
Weekly | Schedules the report weekly |
Daily | Schedules the report daily |
Save Changes | Save the change. It is greyed out until a change is made |
Cancel | Discards the change |
9.6. Firmware Policy (Organization Level)
Sets, for each product and hardware revision in the organization, the firmware version run by groups that follow the organization policy.
Where to find it
Organization > Organization Settings > Firmware Policy
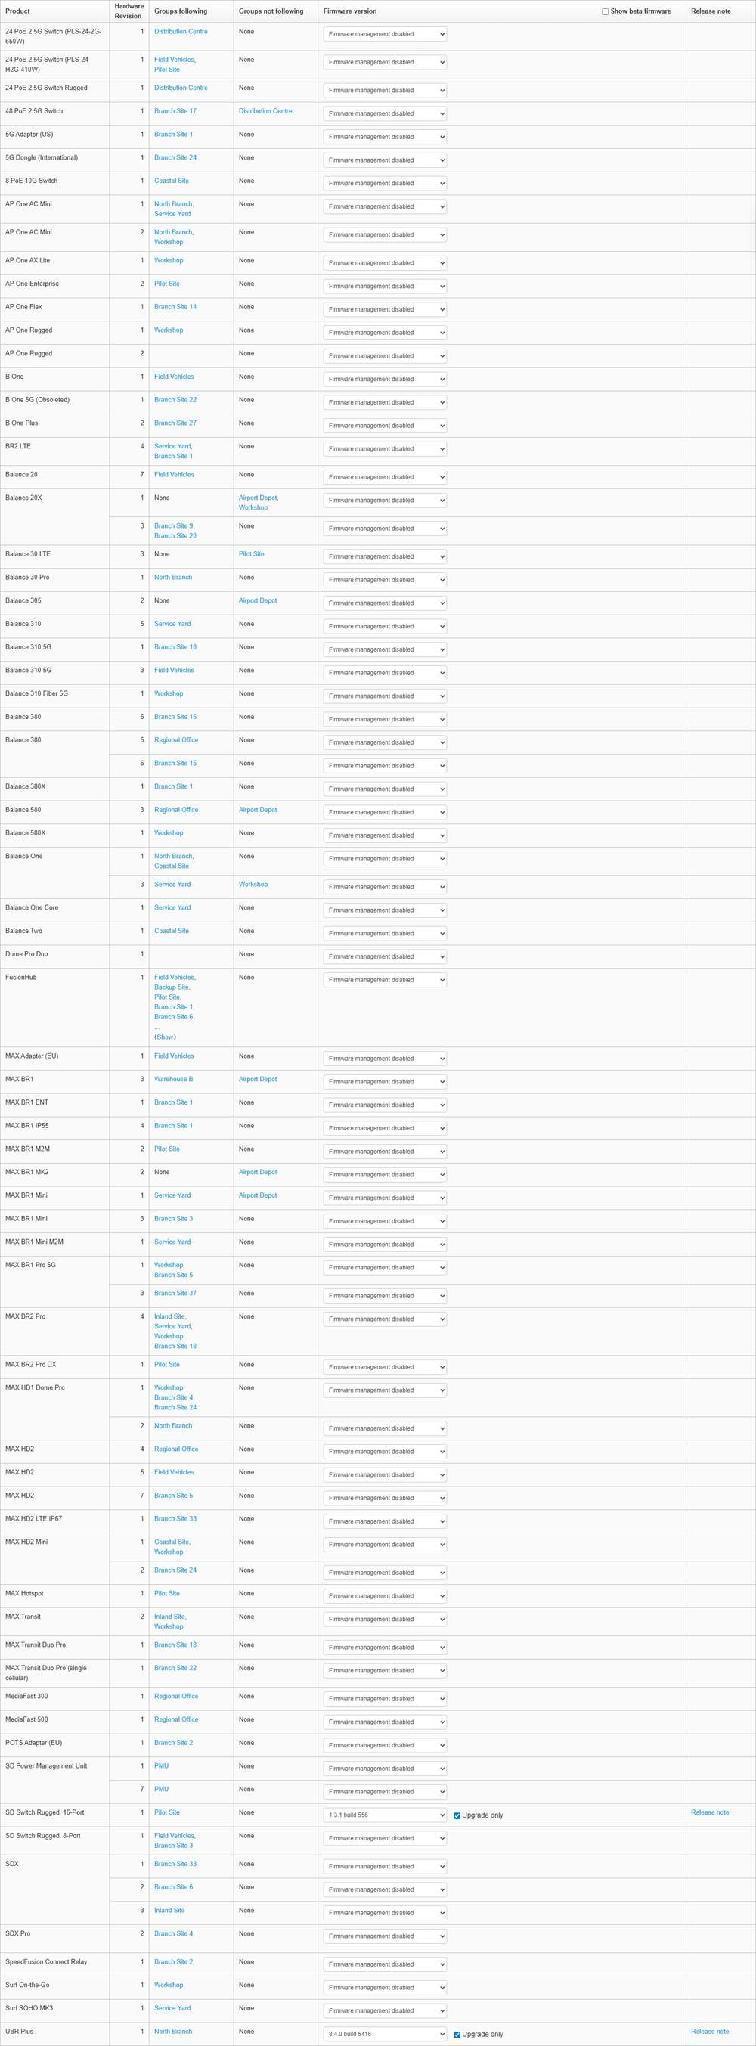
One row per product and hardware revision. Show beta firmware is in the Firmware version column header. Upgrade only and Release note appear once a version is selected.
9.6.1. What This Screen Shows
The page has three headings: Firmware - Organization policy, Update Schedule and Pending Firmware Update Schedules.
Column | What it shows |
Product | The Peplink or Pepwave model the row governs |
Hardware Revision | The hardware revision the row governs |
Groups following | The groups that follow this organization policy, each linking to its own firmware policy page |
Groups not following | The groups that do not follow it. Shows None when every group follows |
Firmware version | The version this policy pins the product to |
Upgrade only | Restricts the policy to devices on an older version. Appears once a version is selected |
Release note | Links to the release notes PDF for the selected version |
A group is moved between Groups following and Groups not following on its own screen. Each product row at Group > Settings > Firmware Policy (13.9 Firmware Policy (Group Level)) offers Follow organization policy as the first entry in its version list. A group that selects it for a product appears under Groups following for that product. A group that selects a version or Firmware management disabled appears under Groups not following. The choice is per product and hardware revision, so the same group can be in Groups following on one row and in Groups not following on another.
The Pending Firmware Update Schedules grid lists queued updates:
Column | What it shows |
Device | The device the update is queued for |
Product | Its model |
Firmware version | The version it will move to |
Scheduled Date and Time | When the update runs |

The pending schedules grid with nothing queued. The four columns sit above a single No data available row.
An empty list shows No data available.
9.6.2. Controls on This Screen
Control | What it does |
Firmware version (per row) | Sets the policy for that product and hardware revision |
Show beta firmware | Adds beta builds to the version lists. It is in the column header and applies to the whole table |
Show | Expands a truncated Groups following list that ends in an ellipsis |
Upgrade only | A per row setting next to the selected version. Limits the policy to devices running a lower version than the one specified. It appears on any product row once a specific version is selected, and is hidden, with Release note, while a row is set to Firmware management disabled |
Release note | Opens the release notes for the selected version |
Update time | Sets when queued updates run |
Save Changes | Saves the policy. It is greyed out until a change is made |
Cancel | Discards the changes |
Caution: Upgrade only determines whether the policy can downgrade a device. The tooltip reads: When this option is selected, the specified firmware will only be applied to device(s) which are running a firmware with a version lower than the specified one. When this option is not selected, the firmware will only be applied to all devices that are running a different version of firmware. A different version includes a newer one. With Upgrade only cleared, a device running a later build than the pinned version is downgraded to the pinned version. Set it before pinning a version in an organization where some devices run newer firmware than others.
9.6.3. The Version List
Every product's Firmware version list has the same structure:
- Firmware management disabled is always the first option.
- Next are the released versions for that product and hardware revision, newest first, each written as version and build, for example 8.6.0 build 6450.
- Custom is always the last option.
The lists are per product and per hardware revision, so two rows for the same product can offer different versions.
9.6.4. Update Schedule
Update time offers three options:
- Immediately
- Scheduled
- Entering a geo-fence
Selecting Scheduled shows the same fields as at group level, plus two that exist only at organization level:
Field | What it sets |
Start date | The day updates begin |
Start time | The time updates begin |
Daily end time | Optional. The screen states: If this is defined, updates will only be performed between the start and end time on the start day and subsequent days. |
Time Zone | UTC (the default) or Follow group settings. Organization level only |
Assign schedules to devices... | in this organization sequentially (the default), or in every group sequentially (i.e. the first affected device of all groups will start updating concurrently.). The second choice adds update at most [n] group(s) a day (0: unlimited). Organization level only |
Time interval between devices | A gap of 0 to 59 minutes and 0 to 59 seconds between one device's update and the next |
For Entering a geo-fence, the screen states that a geofence should be created in each group of the affected devices, with the action Apply Firmware.
Caution: A version set here applies at once to every group in the Groups following column. Immediately runs the update as soon as the policy is saved (see Settings (Group Level), Firmware Policy, 13.9 Firmware Policy (Group Level)), which at this level means every matching device in every group under Groups following. Scheduled outside business hours is recommended.
9.6.5. Rolling Out a Version in Stages
Firmware Policy selects devices by product model and hardware revision only, not by tag. Stage a rollout with groups, or with per-device pins on Device > Settings > Firmware Management (16.1 Firmware Management).
- 1.In a pilot group, set the product row at Group > Settings > Firmware Policy to the new version, with Upgrade only selected.

Steps 1 and 3. Each product row on the group's Firmware Policy has its own version list. Follow organization policy is the first entry.
- 2.Check Device(s) following the policy: on that screen, and the Firmware column on Device Management (13.1 Device Management (Group Level)).
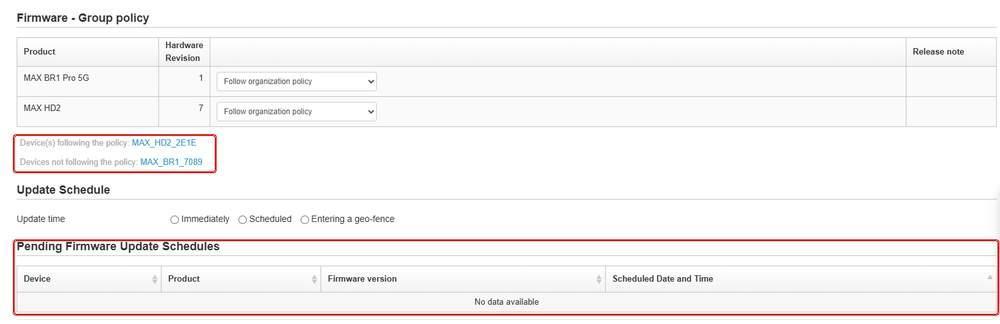
Step 2. Device(s) following the policy and Devices not following the policy name the devices on each side, and Pending Firmware Update Schedules lists what is queued.
- 3.On the Firmware Policy screen of each group that is not ready, set a specific version or Firmware management disabled, so the group moves to Groups not following.
- 4.Set the version at organization level, with Upgrade only selected and Update time set to Scheduled. The version applies to every group listed in Groups following.
- Set Daily end time to keep updates inside a maintenance window, and Time Zone to Follow group settings if that window is local to each group.
- Set Time interval between devices so devices update one after another.
- To limit how many groups start on one day, select in every group sequentially and set update at most [n] group(s) a day.

Step 4. Before saving, check Groups following on the product row. The organization version applies to every group listed there. Groups not following keep their own setting.
- 5.Monitor Pending Firmware Update Schedules for the queued devices.
- 6.Move the remaining groups back to Follow organization policy as each one is ready.
9.7. Operation Log (Organization Level)
Records administrator actions across the organization, with the old and new value for each change, and each sign in with the role, method and source address. Filter by device or group name with Search:. For events reported by the device itself, use the Event Log, whose search covers a rolling 31 days. It is described in the Reports chapter. See 11.11 Event Log (Group Level).
The Operation Log has no export or download control at organization or group level. It is read on screen with Search: and the page controls.
Where to find it
Organization > Organization Settings > Operation Log
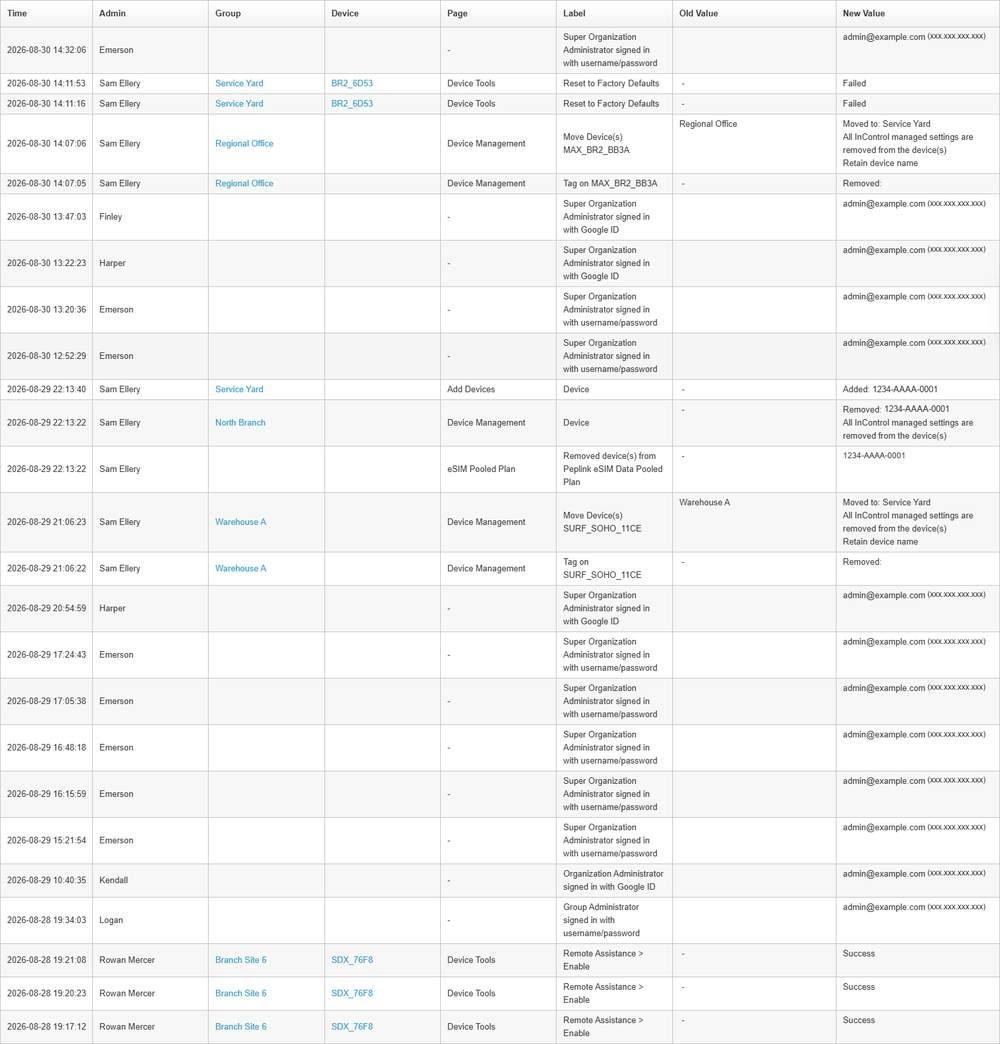
Each row names the administrator, the page and the value before and after. Sign in events show the role and the sign in method.
9.7.1. What This Screen Shows
Column | What it shows |
Time | When the action happened, in the time zone selected above the grid |
Admin | The administrator who performed it |
Group | The group the action applied to, blank for organization-level actions |
Device | The device the action applied to, blank where none applies |
Page | The InControl 2 page the action was performed on, for example Device Tools, Device Management, Add Devices or eSIM Pooled Plan |
Label | What was done, for example Reset to Factory Defaults or Move Device(s) |
Old Value | The value before the change |
New Value | The value after the change, or the outcome, for example Failed or Success. Failed actions are logged as well as successful ones |
The log shows 25 entries per page and states the total number of entries beneath the grid. For comparison, Event Log search covers a rolling 31 days and Log Archive a rolling 12 months at device level and 24 months at group level.
- Sign in events are recorded with the role and the method, for example Super Organization Administrator signed in with username/password or Organization Administrator signed in with Google ID. The New Value column shows the account and the source address.
- Move Device(s) entries show extra lines under the value, recording the options used and the source and destination group, for example All InControl managed settings are removed from the device(s) and Retain device name. The first of these means the move was made with Retain tags and InControl managed settings cleared. A move made with it selected keeps those settings. Check this line when a device behaves differently after a move.
9.7.2. Controls on This Screen
Control | What it does |
Search: | Filters the log |
Time Zone: | Shows the Time column in the selected time zone |
Page | Jumps to a page number |
First, Previous, Next, Last | Move through the pages |
9.8. Organization Settings
Holds the organization's own configuration: administrators, security policy, branding, location and third-party integrations. Alerts are not set here. Notification profiles (e-mail, Pushover, webhook) are set per group under Group > Settings > Notifications (13.7 Notifications), and can be copied to a new group with Settings Cloning (9.3.2 Settings Cloning).
Where to find it
Organization > Organization Settings

Idle Timeout is on with a ten minute window. The OAuth2 API setting below it defaults to All organization users.
The page is one long form with a Name field for the organization at the top, followed by the sections below, and a single Save Changes button at the bottom that saves all of them. Save Changes is greyed out until a change is made.
Caution: Several settings on this page apply to administrators and devices in every group. Review Security, Advanced Settings and Peplink App carefully before saving.
The tables below name each setting by the label shown to the left of its row.
9.8.1. Administration
The two administrator roles differ only in access to social user data, and neither viewer role can edit. To grant access to one group only, use the group roles (13.17.2 Administration).
Lists the organization users. The panel states that these users have administrator access to all groups in the organization, including the current one.
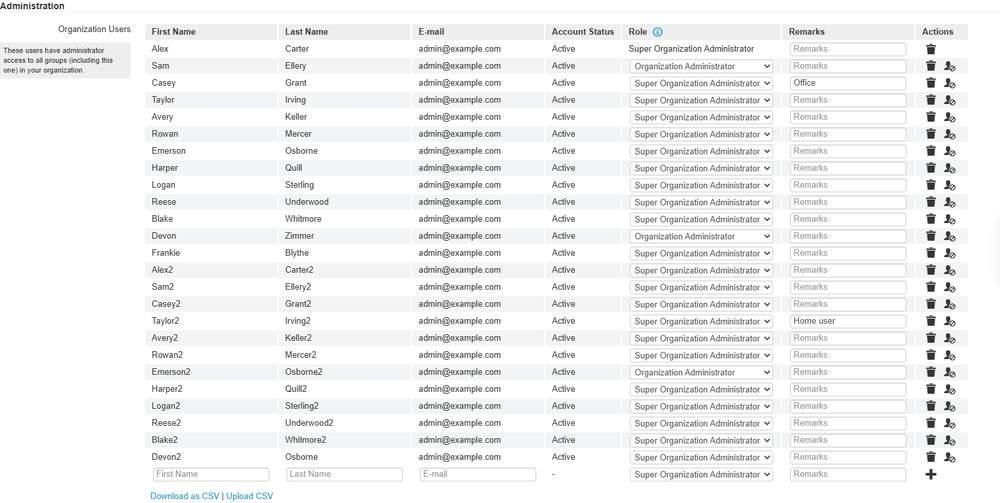
Each row has a Role dropdown and, on the right, a remove action and a suspend action. A new administrator is entered in the empty row at the bottom.
Column | What it shows |
First Name | The user's given name |
Last Name | The user's family name |
The account's e-mail address | |
Account Status | Whether the account is Active |
Role | The user's role, selected from a dropdown |
Remarks | Free text note for the user |
Actions | Per user actions |
Role offers four values. The information icon on the Role column header defines each one:
Role | What it grants |
Super Organization Administrator | These users have full access to your organization. They can view all dashboards, reports, social user data, settings, and device details for all groups. In addition, they can also make configuration changes. |
Organization Administrator | These users have the same access right as Super Organization Administrators except social user data access right. |
Organization Viewer | These users can view the dashboards, reports, device details and some settings for all groups. However, they have no editing ability. |
Organization Dashboard Viewer | These users can only see the organization dashboard and the dashboards for any groups. They cannot see reports, settings, or device details, and they have no editing capability. |
Before granting a role, note the following:
- The administrator roles differ only in access to social user data. All other rights, including configuration changes across every group, are identical. Grant Organization Administrator unless the user needs the social user data collected by captive portals.
- Neither viewer role can edit. An Organization Viewer sees reports, device details and some settings. An Organization Dashboard Viewer sees dashboards only.
- Organization Viewer sees some settings, not all. Visibility is controlled by Display All Settings to Organization Viewers under Advanced Settings on this page. That setting applies to group viewers as well as organization viewers.
- Hiding pages from group administrators in Settings (Group Level), Advanced Settings (13.17.4 Advanced Settings) acts on the browser only, as the tooltips state. Use roles, not hidden pages, to limit what a user can change.
Choosing a role:
Job | Role for the whole organization | Role for one group only |
Monitoring only, no changes | Organization Viewer | Group Viewer |
Wall screen or customer status view | Organization Dashboard Viewer | Group Dashboard Viewer |
Configuration changes | Organization Administrator | Group Administrator |
Access to captive portal social user data | Super Organization Administrator | Captive Portal Administrator or Captive Portal Report Viewer |
Group scoped roles are assigned under Group > Settings > Group Settings, Administration, and restrict a user to one group, such as one customer or region. See Settings (Group Level), 13.17.2 Administration.
Control | What it does |
Bin icon | Removes the user |
Person icon | Suspends or reactivates the user account's administrator privileges. It is a toggle. The hover text names the role, for example Suspended this user account's Super Organization Administrator privileges. or Reactivated this user account's Super Organization Administrator privileges. |
Blank bottom row and + | Adds an administrator. Fill First Name, Last Name, E-mail, Role and Remarks, then click + |
Download as CSV | Exports the administrator list |
Upload CSV | Imports administrators from a file |
Adding an organization user
- 1.Open Organization > Organization Settings and go to Administration.
- 2.In the blank row at the bottom of the list, fill First Name, Last Name and E-mail.
- 3.Select a Role, for example Organization Viewer for read-only access to every group, and optionally add Remarks.
- 4.Click + at the end of the row.
- 5.Click Save Changes at the bottom of the page. This saves all sections of the page.
9.8.2. Security
Setting | What it does |
Idle Timeout | Signs out user sessions after the stated number of minutes of inactivity |
Two-factor Authentication | Forces users to enable two-factor authentication |
Authenticated with Password | Refuses Google ID, Microsoft ID and Apple ID sign in, accepting username and password only |
Users Allowed to Make OAuth2-based API Calls on This Organization | Sets who may call the API against this organization |
The API setting has three options:
- All organization users (Default)
- Specified organization users only
- None
Notes on this panel:
- The Idle Timeout note warns that after a Google or Apple session is signed out, anyone who clicks the Sign-in with Google/Apple button again in that browser may reactivate the session, with no credential required. The reactivation is recorded in the operation log.
- Two-factor Authentication here is an organization policy only. Turning it off does not disable two-factor authentication for users who have enabled it themselves.
- All organization users (Default) allows every organization user, including viewers, to call the API against this organization. To restrict access, select Specified organization users only and name the accounts that require API access.
9.8.3. Peplink eSIM Pooled Plan

Both amounts are entered in MB, here 500 for each top up and 100 as the trigger. Show Plan Info on Web Admin is selected.
Setting | What it does |
Auto Top Up Amount | The size in MB of each automatic top up |
Trigger Auto Top Up When ICCID Remaining Quota Drops Below | The remaining quota in MB at which a top up is triggered |
Show Plan Info on Web Admin | Shows the plan information in the device web admin interface |
9.8.4. Advanced Settings
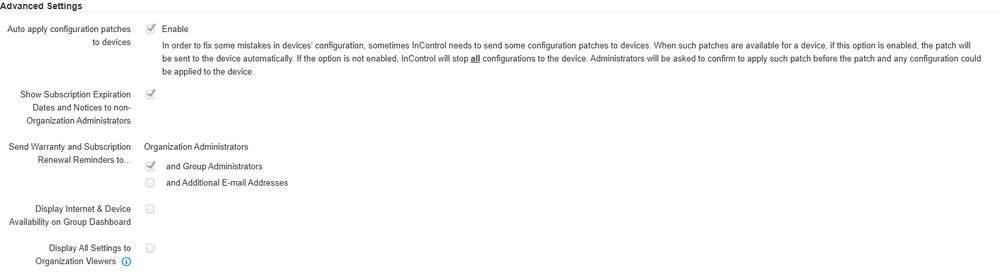
Auto apply configuration patches to devices shows its explanation under Enable. Renewal reminders always go to Organization Administrators, and the two checkboxes beneath add further recipients.
Setting | What it does |
Auto apply configuration patches to devices | Sends InControl 2 configuration patches to devices automatically |
Show Subscription Expiration Dates and Notices to non-Organization Administrators | Shows expiry dates and notices to administrators below organization level |
Send Warranty and Subscription Renewal Reminders to... | Sends renewal reminders. Organization Administrators always receive them. The two checkboxes add recipients |
and Group Administrators | Also sends the reminders to group administrators |
and Additional E-mail Addresses | Also sends the reminders to additional addresses |
Display Internet & Device Availability on Group Dashboard | Adds availability figures to the group dashboard |
Display All Settings to Organization Viewers | Shows all settings to viewers. It applies to group viewers as well as organization viewers |
Auto apply configuration patches to devices: the screen states that when this option is not enabled, InControl 2 stops all configuration to the device, and an administrator must confirm the patch before that patch or any other configuration can be applied.
Display All Settings to Organization Viewers: the note reads Note: Viewers are referred to organization and group viewers. Turning it on shows every setting to group viewers as well as organization viewers. Consider the least privileged viewer in the organization before enabling it.
9.8.5. Peplink App

Two checkboxes, both clear. The second one makes a removal in the app also remove the device from InControl 2.
Setting | What it does |
Allow managing devices in Peplink App | Permits the organization's devices to be managed from the Peplink App |
When removing a device from the app, remove it from InControl too | Makes a removal in the app remove the device from InControl 2 as well |
9.8.6. Logo and Favicon
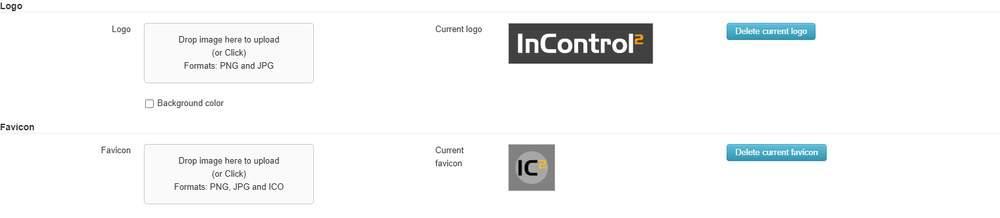
Each drop zone states the formats it accepts. The image in use and its Delete button are to the right.
Control | What it does |
Logo drop zone | Uploads a replacement logo by drag-and-drop or click. Formats: PNG and JPG |
Background color | Applies a background colour behind the logo |
Delete current logo | Removes the uploaded logo |
Favicon drop zone | Uploads a replacement favicon. Formats: PNG, JPG and ICO |
Delete current favicon | Removes the uploaded favicon |
Both panels show the image in use beside the drop zone, labelled Current logo and Current favicon.
9.8.7. Address
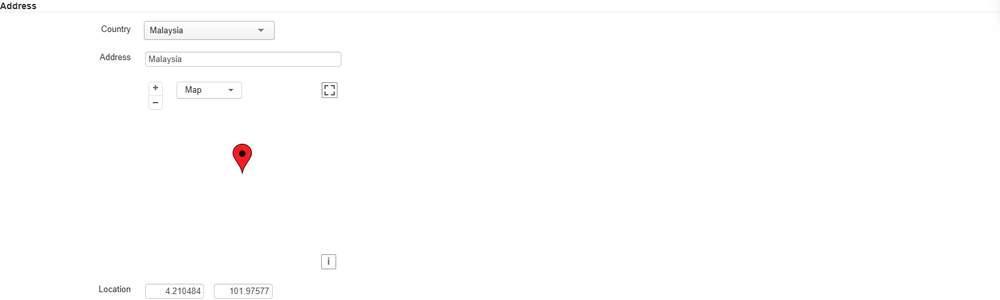
Country and Address above the map. The two Location boxes below hold the latitude and longitude.
Control | What it does |
Country | The organization's country. The list covers the standard set of countries and territories |
Address | Free text address |
Map | Places the organization on the map from the address entered |
Zoom in | Zooms the map in. Drawn as + |
Zoom out | Zooms the map out. Drawn as – |
Attributions | Shows the map attributions. Drawn as i |
Toggle full-screen | Expands the map |
Latitude | The organization's latitude, editable directly |
Longitude | The organization's longitude, editable directly |
As on Create Group (9.3.3 Address), the section shows the warning The Location field may not correspond to the address. Confirm the latitude and longitude after entering an address.
9.8.8. Map

The base map and satellite layer are selected separately. Custom Map Markers takes one image for Online and one for Offline.
Setting | Options |
Map | OpenMapTiles, OpenStreetMap |
Satellite | Google Maps, None |
Custom Map Markers | Two upload slots, Online and Offline, each opened with + |
Custom Map Markers accepts one image for Online and one for Offline, and states two requirements:
- The image must be in PNG format.
- The dimensions will be forcefully resized to 50x50. Use a square image at or near 50 by 50 pixels.
The panel also has a Remove action for clearing a marker in use.
9.8.9. Unit
Unit sets the units used for speed and distance across the organization:
- Metric
- Imperial
- Nautical metric
- Nautical imperial

A single Unit dropdown, set to Metric here.
9.8.10. AWS Transit Gateway Integration Settings
Three credential fields.

The three credential fields, all empty.
Field | Notes |
AWS Access Key ID | The AWS access key ID. Optional |
AWS Secret Access Key | Entered as a password field |
Account ID | The AWS account identifier |
The credentials are saved with the rest of the page by Save Changes at the bottom of Organization Settings.
9.8.11. FlightAware API

Both fields are empty and show the Optional placeholder. An information icon is beside the section heading.
Field | Notes |
FlightAware Username | Optional |
FlightAware API Key | Optional, entered as a password field |
The credentials are used for device location. The screen states: When the username and API keys are defined, and a "FlightAware Ident" is defined on a device's details page, the devices' location will be updated from FlightAware every five minutes.
- Each device to be tracked also needs a FlightAware Ident on its own details page. Without it, the device location is not updated from FlightAware.
- The update interval is five minutes per device, the same interval as Locate Device Position by Cell ID and Signal below. Both are polled location sources, not live feeds.
9.8.12. Locate Device Position by Cell ID and Signal

Location Service, the access token with its Sign up link, and the Availability selector that limits the feature by tag.
When GPS location data is unavailable, InControl 2 can locate a device from its reported cell ID and signal strength by querying Google's or OpenCellID's online services. The panel states that a query is made every five minutes for each device, and that this is most useful for devices with no GPS antenna connected.
Control | What it does |
Location Service | Selects the lookup service |
Access Token | The credential for the selected service. A Sign up link beside it is annotated Costs may be incurred. |
Availability | Scopes the feature to a set of devices |
Tag box | Holds the tags used by the tag-based Availability options |
Location Service offers three values:
- Disabled
- Google Maps GeoLocation API
- UnwiredLabs OpenCellid
Availability offers four values:
- All Balance and MAX devices
- Balance and MAX devices with any of the following tags
- Balance and MAX devices with all of the following tags
- Balance and MAX devices with none of the following tags
To limit the feature to selected devices, tag the devices first, then set Availability to a tag-based option. The feature applies to Balance and MAX devices only.
9.8.13. Organization Removal
The panel states the procedure for removing an organization: delete all devices on the device management page, and the organization is removed after 28 days. The words device management page link to Device Management (9.2 Device Management (Organization Level)).

The section is a single sentence. The words device management page are a link.
9.9. Subscriptions and Licenses
Shows which devices have subscriptions expiring, and holds the FusionHub and SpeedFusion Alliance FusionHub licences owned by the organization.
Where to find it
Organization > Organization Settings > Subscriptions and Licenses
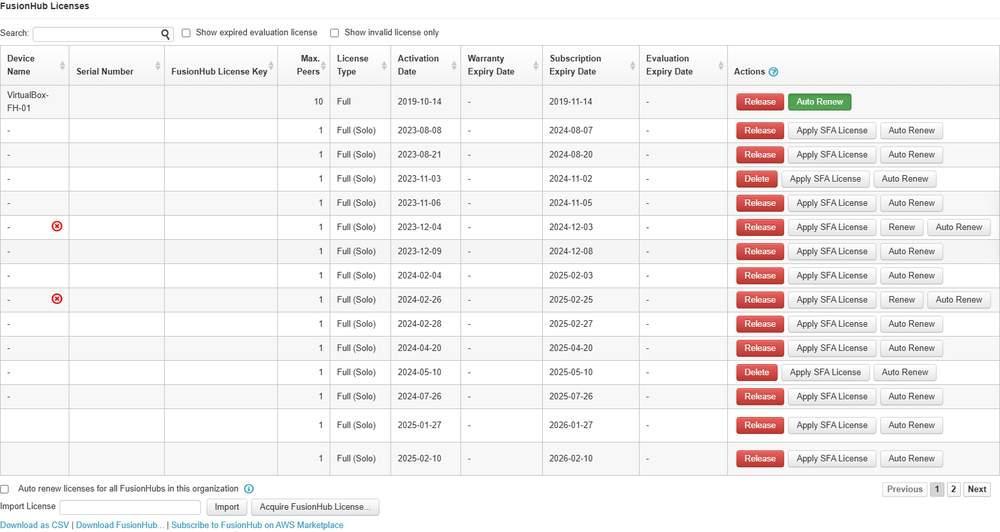
Each licence row ends in its own action buttons. The filters above the grid hide expired evaluation licences and show only invalid ones.
The page has three sections: Subscription Status, FusionHub Licenses and SpeedFusion Alliance FusionHub Licenses.
9.9.1. Subscription Status
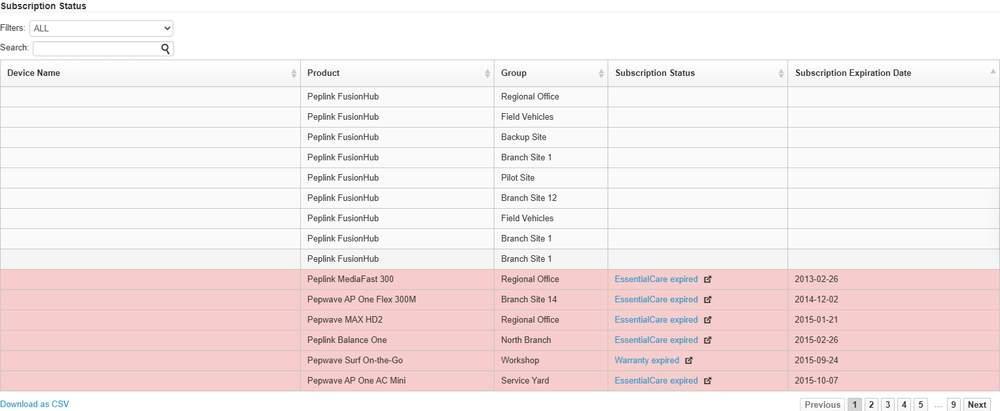
Filters and Search above the grid. Rows with expired cover are shaded red and show the status and expiry date on the right. Device names are hidden in this example.
Column | What it shows |
Device Name | The device, with its serial number in brackets |
Product | The full product name, for example Peplink FusionHub or Pepwave MAX HD2 |
Group | The group the device belongs to |
Subscription Status | The state of the cover, for example EssentialCare expired or Warranty expired |
Subscription Expiration Date | When the cover ended or ends |
Control | What it does |
Filters: | Narrows the list. Offers ALL, About to expire and Expired |
Search: | Filters the list by text |
Download as CSV | Exports the subscription list |
To produce a renewal list, filter by About to expire and click Download as CSV. To send renewal reminders to additional addresses, use and Additional E-mail Addresses under Advanced Settings in Organization Settings (9.8.4 Advanced Settings).
9.9.2. FusionHub Licenses
Column | What it shows |
Device Name | The FusionHub the licence is tied to, or a dash if it is not tied to one |
Serial Number | The FusionHub serial number |
FusionHub License Key | The licence key |
Max. Peers | The number of peers the licence permits |
License Type | The licence tier, for example Full or Full (Solo) |
Activation Date | When the licence was activated |
Warranty Expiry Date | When the warranty ends |
Subscription Expiry Date | When the subscription ends |
Evaluation Expiry Date | When an evaluation licence ends |
Actions | Per licence actions |
Control | What it does |
Search: | Filters the licence list |
Show expired evaluation license | Includes expired evaluation licences in the list |
Show invalid license only | Restricts the list to invalid licences. Not shown in every organization |
Auto renew licenses for all FusionHubs in this organization | Turns Auto Renew on for every FusionHub licence in the organization at once |
Renew | Ties an invalid licence to the FusionHub's new hardware identifiers |
Import License and Import | Adds a licence by pasting its key |
Acquire FusionHub License... | Opens the flow for obtaining a licence |
Download as CSV | Exports the licence list |
Download FusionHub... | Opens the Peplink FusionHub download page |
Subscribe to FusionHub on AWS Marketplace | Opens the FusionHub listing on AWS Marketplace |
9.9.3. How a FusionHub Licence Binds to Hardware
The information icon above the Actions column describes all four row actions.
A licence is tied to virtual hardware IDs that are unique to each FusionHub or VM instance.
Action | What it does |
Release | Unties the licence from the existing FusionHub so the key can be applied to a new one |
Delete | Deletes the licence from the organization, making it available to add to another organization. Shown only once a licence has been released |
Renew | Updates the virtual hardware ID record InControl 2 holds for the licence, making the licence valid for the instance again |
Auto Renew | Updates that record automatically whenever the instance's virtual hardware ID changes |
Note the following before using these actions:
- Shut the FusionHub down before releasing its key. If the licence is not applied to a new FusionHub and the existing one is still running, the licence ties itself back to the existing FusionHub after 12 hours, and the release is undone.
- Renew reboots the instance. The licence becomes valid for the instance again after the reboot.
- Delete does not stop the FusionHub. As long as the licence is not applied to another FusionHub, the existing one keeps operating normally. Delete follows Release.
- With Auto Renew on, a key that is applied to more than one instance, for example because an instance was cloned and run or because the key was applied to another instance, causes both the existing and the new instance to reboot constantly. With Auto Renew off, the licence on the existing instance stays valid in that situation.
Enable Auto Renew only where an instance changes its virtual hardware ID often.
The Auto renew licenses for all FusionHubs in this organization checkbox beneath the grid applies the same setting to every existing and future FusionHub licence in the organization at once, tying licences to new hardware IDs automatically and unconditionally. Its note states that if a licence key is applied to more than one FusionHub instance, every instance using that key will constantly reboot. This setting applies to the whole organization. Confirm that no key has been reused before selecting it.
The actions offered on a row depend on the state of its licence. The possible actions are Release, Delete, Apply SFA License, Renew and Auto Renew.
Apply SFA License applies a SpeedFusion Alliance licence to that FusionHub. The change takes effect immediately. Before clicking it, confirm the licence and the FusionHub, and check the peer counts in the SpeedFusion Alliance FusionHub Licenses summary grid below.
9.9.4. Acquiring a FusionHub Licence
Acquire FusionHub License... opens a dialog headed Type of FusionHub License to Acquire.
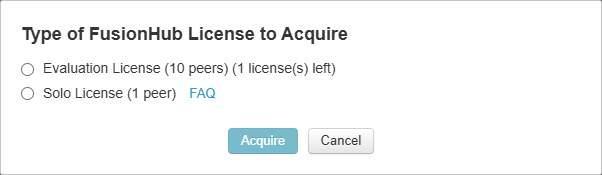
Two licence types, neither selected when the dialog opens. The evaluation entry states how many licences remain. FAQ is beside the Solo entry.
Choice | What it is |
Evaluation License (10 peers) | An evaluation licence for 10 peers. The entry also states how many evaluation licences the organization has left |
Solo License (1 peer) | A licence for a single peer, with a FAQ link beside it |
The peer count is fixed by the licence type: 10 for the evaluation licence and 1 for the Solo licence. Neither option is selected when the dialog opens. The dialog closes with Acquire or Cancel.
9.9.5. SpeedFusion Alliance FusionHub Licenses
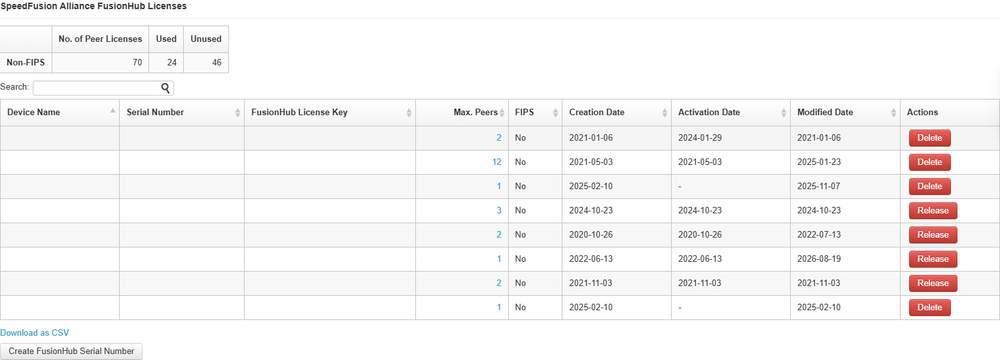
The Non-FIPS summary grid above the licence list, with Create FusionHub Serial Number below. Device names, serial numbers and licence keys are hidden in this example.
The section starts with a summary grid:
Column | What it shows |
No. of Peer Licenses | The peer licences held, split by FIPS and non-FIPS. A Non-FIPS row shows its own peer licence, used and unused counts. The FIPS distinction also appears in the FIPS column below and in the FIPS Support checkbox of Create FusionHub Serial Number |
Used | The number in use |
Unused | The number remaining |
Below it is the licence grid:
Column | What it shows |
Device Name | The FusionHub the licence is tied to, or a dash |
Serial Number | The FusionHub serial number |
FusionHub License Key | The licence key |
Max. Peers | The number of peers the licence permits |
FIPS | Whether the licence is a FIPS licence |
Creation Date | When the serial number was created |
Activation Date | When the licence was activated |
Modified Date | When it was last changed |
Actions | Delete or Release for that licence |
Control | What it does |
Search: | Filters the list |
Download as CSV | Exports the list |
Create FusionHub Serial Number | Opens the creation dialog |
Note: The SpeedFusion Alliance FusionHub Licenses section is not present in every organization. Where it is absent, Subscriptions and Licenses shows only Subscription Status and FusionHub Licenses, and Create FusionHub Serial Number is not available.
9.9.6. Creating FusionHub Serial Numbers
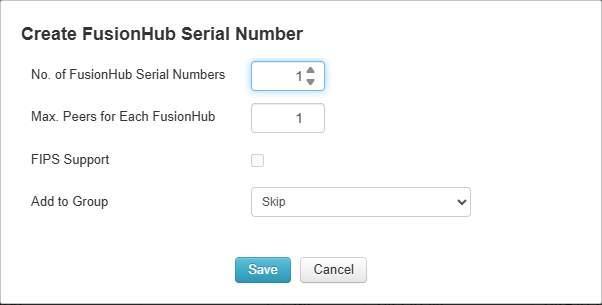
Serial numbers are created in a batch. The peer count and FIPS support apply to the whole batch, and Add to Group defaults to Skip.
Field | Notes |
No. of FusionHub Serial Numbers | The number of serial numbers to create in this batch |
Max. Peers for Each FusionHub | The peer count applied to every serial number in the batch |
FIPS Support | Creates the batch as FIPS licences. Clear by default |
Add to Group | The group the new FusionHubs join. The first option is Skip, followed by every group in the organization. The default is Skip, so new serial numbers are not placed in a group unless one is selected |
The dialog closes with Save and Cancel.
The peer count and FIPS setting apply to the whole batch. Create separate batches for FusionHubs that need different peer counts.