
5. SpeedFusion VPN
SpeedFusion VPN contains the screens that show live SpeedFusion status and the screens that hold SpeedFusion profile configuration. The menu appears at three levels, and each level offers different functions:
- Organization level holds the profile list and the profile wizard, and shows a map of the whole organization.
- Group level switches SpeedFusion VPN on for the group and shows the group's live status.
- Device-level lists the peers of one device in a table.
Screen names repeat across levels, so each section below states the level it applies to.
Two banners recur on these screens:
- At organization level, SpeedFusion VPN is not enabled on all groups. System will only show devices available from SpeedFusion VPN enabled groups.
- At the group level, SpeedFusion VPN is not enabled on this group. Devices will not be available in organization-level profiles.
Tunnel quality and outage history are reported outside this menu:
- Device > Reports > SpeedFusion Score rates each profile and lists InControl 2's suggestions. See 15.1 SpeedFusion Score.
- Device > Reports > Connection Up/Down History, SpeedFusion VPN tab, lists each time a tunnel went down and its monthly availability. See 15.12 Connection Up/Down History.
- The SpeedFusion Score column on the group Dashboard lists the score for every device in the group. See 10.1.3 The Devices Grid.
5.1. How SpeedFusion VPN Works
The settings on these screens rely on three concepts.
SpeedFusion needs both ends. It bonds several WAN connections into one virtual link between two Peplink endpoints: two devices, or a device and a FusionHub. The far end must be a SpeedFusion peer, so SpeedFusion does not accelerate a plain internet connection. A profile describes the tunnel between the endpoints, not the WANs themselves.
A profile describes a tunnel, not a device setting. A profile defines which devices are peers and how the tunnel behaves, and InControl 2 pushes it to every device the profile selects. For this reason the profile list is at organization level, and the switch that lets a group take part is at group level. Devices in a group that is not enabled do not appear in organization-level profiles, as the two banners above state.
Each tunnel option addresses a different problem, and each has a cost. Review the table below before choosing a mode. An unsuitable mode can substantially increase data use and cost.
The problem | What to use | What it costs |
One link does not carry enough bandwidth | Bonding, including Dynamic Weighted Bonding, which aggregates the links into one larger link | Links of very different latency do not bond well. Max Latency Diff manages this |
Packet loss affects a real-time stream, such as video or voice | Smoothing, which sends the same packets over more than one link so that a loss on one link has no effect | Bandwidth. InControl 2 states the overhead as up to 100% for Normal, 200% for Medium and 300% for High. On a metered cellular or Starlink link the overhead counts as data used: Normal can double, and High can quadruple, the data the tunnel uses |
A lossy link, satellite in particular, limits throughput | SpeedFusion Boost | Works only over a SpeedFusion connection, so both ends must be Peplink devices. Added in firmware 8.6.0, for all models |
A link may fail entirely | Hot failover, where a standby link takes over | No aggregation while the primary link is healthy |
SpeedFusion Boost compared with Smoothing.
- SpeedFusion Boost improves throughput on a link with constant packet loss, such as satellite.
- Smoothing reduces the effect of packet loss on real-time traffic, such as voice and video, at the cost of extra bandwidth.
The number of peers a device can have is limited by the model and its subscription. The current figure is shown in two places:
- Device > Device Details, Show All, SpeedFusion VPN Peers (see 14.1.5 The Expanded Information View) shows the peers in use against the licence limit.
- The Device dropdown on the Hub Devices step of the profile wizard states the connections each hub has left, for example 2 connection(s) available.
For the data quotas that tunnel overhead counts against on metered links, see eSIM and SIM Management (6 eSIM and SIM Management) and Group > Reports > SIM Card Reports (11.5 SIM Card Reports (Group Level)).
5.2. How to Check That a Tunnel Is Healthy
Use this procedure for a routine tunnel check, or when a tunnel is slow or has dropped.
- 1.Open Organization > SpeedFusion VPN > Live Status - Map and Logical View (see 5.3 Live Status - Map and Logical View (Organization Level)) and select Logical. A red circle is an offline device and a grey circle is a device of unknown status.
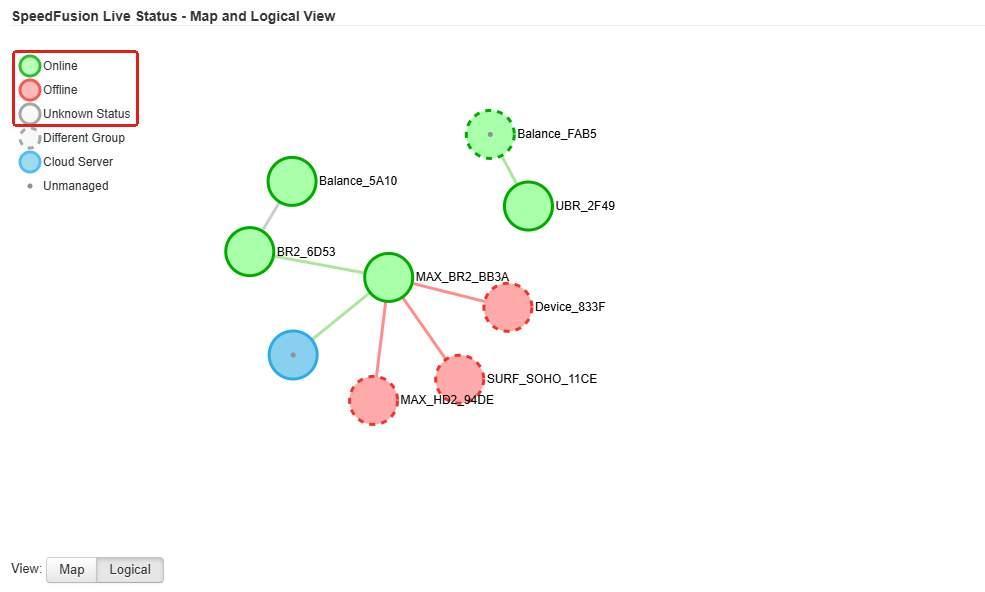
Step 1. The legend in the top left corner of the Logical view, outlined in red: green is Online, red is Offline and grey is Unknown Status. The same circles are used at organization and group level.
- 2.Open Group > SpeedFusion VPN > Live Status - Tabular View (see 5.5 Live Status - Tabular View (Group Level)) and expand the row for the tunnel. Compare Drop Rate and Latency for each WAN at both ends. A WAN with values well above the others is the likely cause.
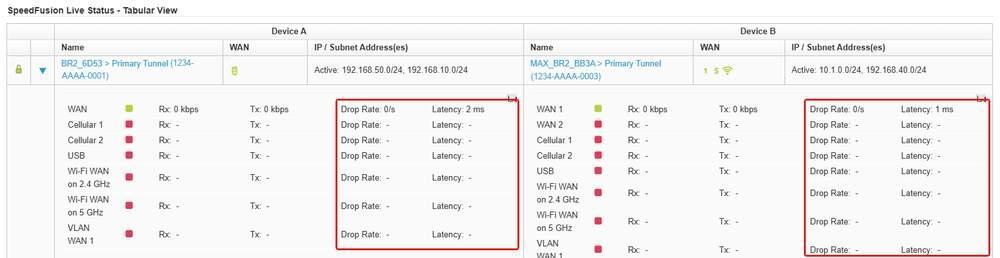
Step 2. Drop Rate and Latency per WAN in the expanded row, outlined in red for Device A on the left and Device B on the right. A dash means there is no current reading for that WAN.
- 3.Hover over the lock icon on the row. Link insecure (data encryption not enabled) means the tunnel carries traffic unencrypted.

Step 3. The lock icon at the start of each row, outlined in red. Hover over it to read Link secure (256-bit AES encrypted) or Link insecure (data encryption not enabled).
- 4.Open Device > Reports > SpeedFusion Score (see 15.1 SpeedFusion Score) for the rating, the Bonded Speed multiple and InControl 2's suggestions.
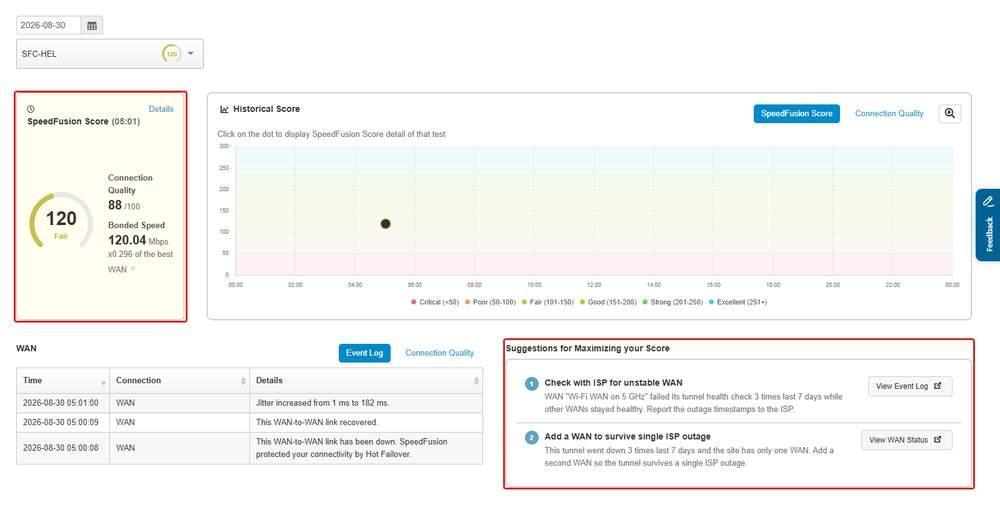
Step 4. The score panel on the left, with the rating word, Connection Quality and the Bonded Speed multiple, and Suggestions for Maximizing your Score on the right, both outlined in red.
- 5.Open Device > Reports > Connection Up/Down History, SpeedFusion VPN tab, for each time the tunnel went down and its monthly availability. See 15.12 Connection Up/Down History.
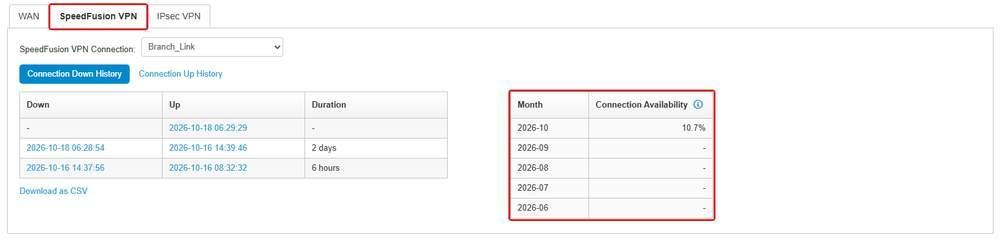
Step 5. The SpeedFusion VPN tab, outlined in red, with each down and up time on the left and the monthly Connection Availability table, outlined in red, on the right.
5.3. Live Status - Map and Logical View (Organization Level)
This view shows tunnel state across every SpeedFusion VPN enabled group, drawn as a map or a logical diagram. For tunnel history, see Connection Up/Down History (SpeedFusion VPN tab, 15.12 Connection Up/Down History) and SpeedFusion Score (15.1 SpeedFusion Score) in Device Reports.
Where to find it
Organization > SpeedFusion VPN > Live Status - Map and Logical View
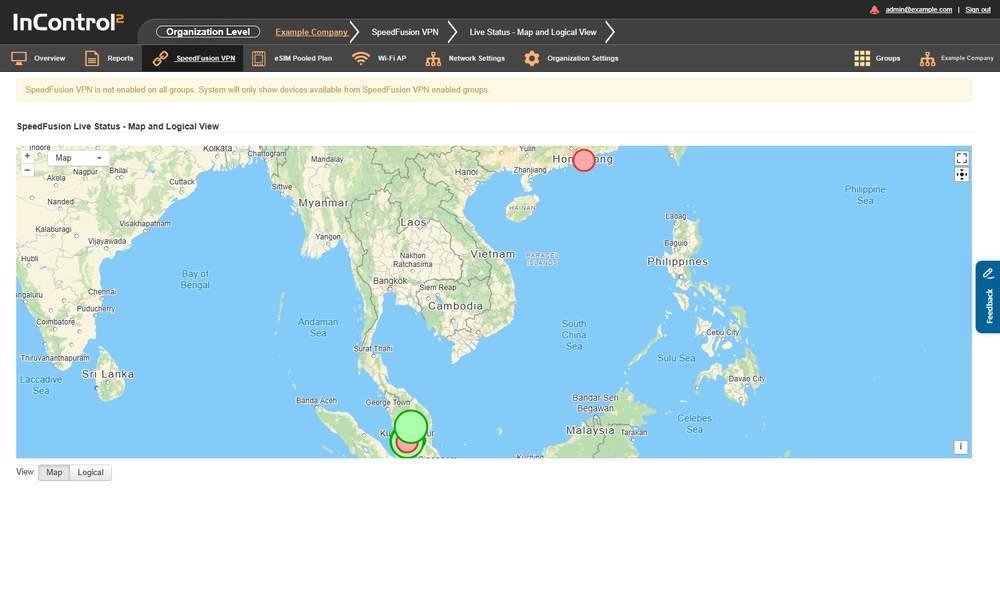
The organization level live status view. The banner above the panel states that only devices in SpeedFusion VPN enabled groups are shown.
5.3.1. What This Screen Shows
- A single panel headed SpeedFusion Live Status - Map and Logical View.
- A view selector reading View: Map Logical, which draws the panel either as a map or as a logical diagram.
- The banner SpeedFusion VPN is not enabled on all groups. System will only show devices available from SpeedFusion VPN enabled groups. Groups that are not enabled contribute no devices to this view. A site missing from the view may belong to a group that is not enabled rather than being offline.
- A legend in the top left corner reading Online, Offline, Unknown Status, Cloud Server and Unmanaged. The group-level version of this view (see 5.6 Live Status - Map and Logical View (Group Level)) is shown populated and explains each entry.
5.3.2. Controls on This Screen
Control | What it does |
Map | Switches the panel to the map view. It places the same devices as markers on the map, with a line between linked devices |
Logical | Switches the panel to the logical view. With profiles enabled, it draws every device in an enabled profile as a circle labelled with its name, and joins two devices with a line where they share a SpeedFusion link. A red circle is an offline device |
Zoom in | Zooms the map in. Rendered as + |
Zoom out | Zooms the map out. Rendered as – |
Attributions | Shows the map attributions. Rendered as i |
Toggle full-screen | Expands the panel to full screen |
5.4. Configuration (Organization Level)
Use this screen to create, review or change the SpeedFusion profiles that build tunnels between sites, from the profile list and its wizard.
Where to find it
Organization > SpeedFusion VPN > Configuration
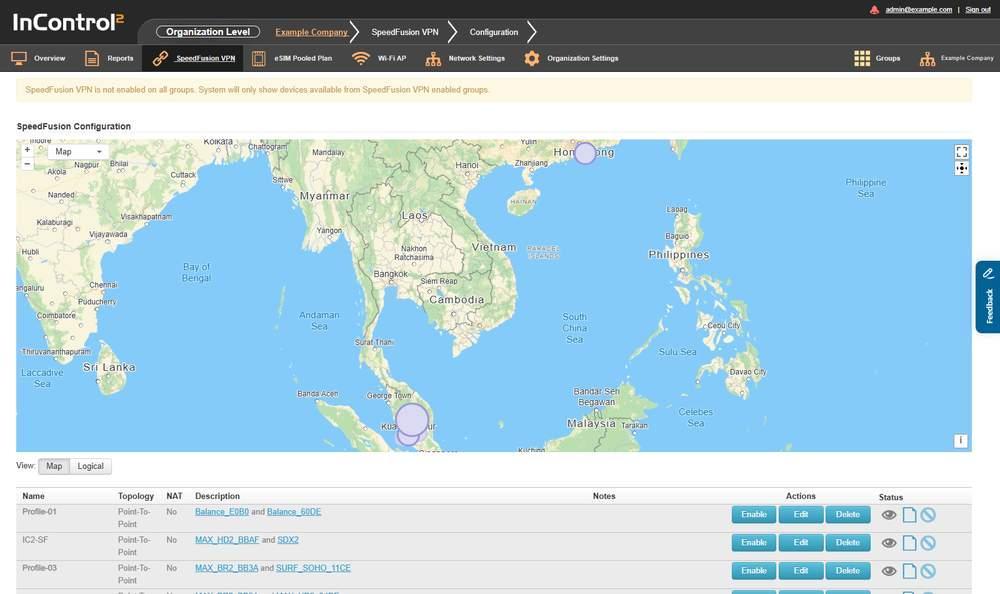
The profile list. Each row carries its own Enable or Disable, Edit and Delete actions, and Add Profile is below the list.
5.4.1. What This Screen Shows
The page carries the same map and logical panel as the live status screen, with the SpeedFusion Configuration grid below it.
Column | What it shows |
Name | The profile name, for example Profile-01 |
Topology | The topology chosen for the profile, for example Point-To-Point |
NAT | Whether NAT is applied, shown as Yes or No |
Description | The devices in the profile, written as <device> and <device>. Each device name links to that device's overview page |
Notes | Free text stored with the profile |
Actions | Per row actions for that profile |
Status | Indicator icons reporting the state of that profile |
5.4.2. Reading the Status Column
The Status column shows indicator icons rather than text. Hover over an icon to read what it reports. There are four indicators, and a profile can show more than one at a time.
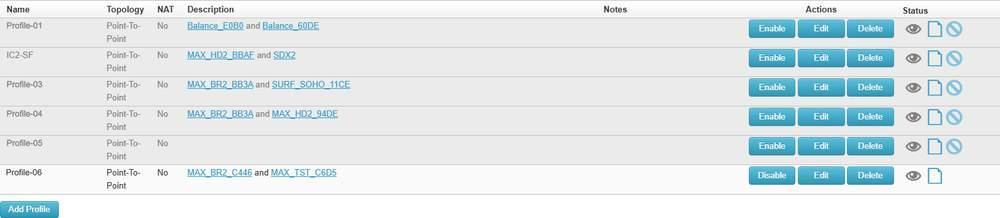
Rows offering Enable show a third Status icon, a crossed circle. The Profile-06 row offers Disable and shows two icons.
Indicator reads | What it tells you |
Profile visible on map/logical view | The profile is drawn on the map and logical views |
Profile hidden from map/logical view | The profile is not drawn on either view. A profile shows either this indicator or the one above |
Profile contains no changes. | The profile has no edits waiting to be saved |
Profile is disabled | The profile is not currently enabled |
The Actions column matches the last indicator. A profile showing Profile is disabled offers Enable as its row action, and an enabled profile offers Disable. To check whether a profile is enabled, hover over the Status indicators or read the row action.
5.4.3. Controls on This Screen
Control | What it does |
Enable | Row action. Present on profiles that are not currently enabled |
Disable | Row action. Present on profiles that are currently enabled |
Edit | Opens the profile wizard for that row, starting at Peer Devices |
Delete | Removes that profile |
Add Profile | Opens the profile wizard for a new profile, starting at Topology |
Save Changes | Commits pending changes to the profile list. Disabled until a change is made |
Cancel | Discards pending changes |
Map, Logical, Zoom in, Zoom out, Attributions, Toggle full-screen | The map panel controls, as described for the organization level live status screen. See 5.3 Live Status - Map and Logical View (Organization Level) |
Save Changes and Cancel are below the grid and apply to the whole list. Row actions alone do not commit changes.
Caution: Disable and Delete act on every device in the profile at once, which on a Star profile is the hub and every endpoint. They take effect when Save Changes is clicked, so check the changed row before saving. After Delete, the row shows Undelete until Save Changes is clicked.
5.4.4. Adding a Profile
Add Profile opens a wizard that starts at Topology.
- A Star profile then asks for Hub Devices, End Point Devices and Profile Options.
- A Point-To-Point profile asks for Peer Devices and Profile Options.
- Both end at Profile Summary.
- Finish adds the profile to the list on screen only. Nothing is saved or sent to devices until Save Changes below the list is clicked. Leaving the page first discards the profile.
- Only devices from groups with SpeedFusion VPN enabled are listed.
Caution: Saving a profile puts the SpeedFusion VPN settings of every device in it under InControl 2. SpeedFusion VPN profiles configured locally on those devices are replaced, and traffic that used them, including any Outbound Policy rule that sends traffic to them, stops working. Before saving, check each device's own SpeedFusion VPN profiles, and note its latest configuration backup (14.1.6 Configuration Backups) so that the device can be restored to it.
The first step carries only Cancel and Next.
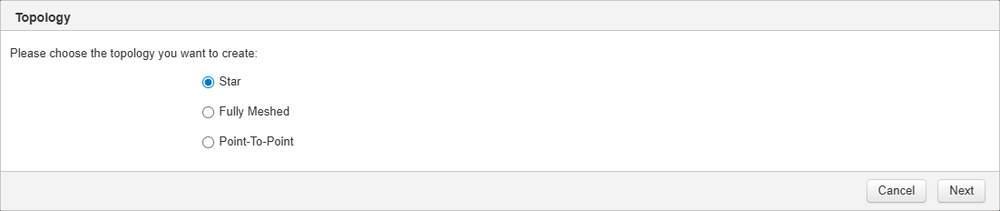
Step one of the wizard asks only for a topology. Cancel and Next are the only buttons.
The first step is headed Topology and reads Please choose the topology you want to create:. It offers three choices:
- Star
- Fully Meshed
- Point-To-Point
Button | What it does |
Next | Moves to the following step of the wizard |
Cancel | Closes the wizard without creating a profile |
Select a topology and click Next to continue to the remaining steps.
The Add Profile wizard carries the same peer device filters and advanced settings as the Edit wizard. Both are described under Editing a profile and Advanced settings below.
The steps after Topology
The steps that follow depend on the topology chosen.
Topology | Steps in order |
Star | Topology > Hub Devices > End Point Devices > Profile Options > Profile Summary |
Point-To-Point | Topology > Peer Devices > Profile Options > Profile Summary. There is no hub step |
- Each step after Topology carries Cancel, Previous and Next, with a Show advanced settings checkbox at the bottom left.
- On Profile Summary, Finish replaces Next. Finish adds the profile to the list; Save Changes saves it.
Star, step two, Hub Devices
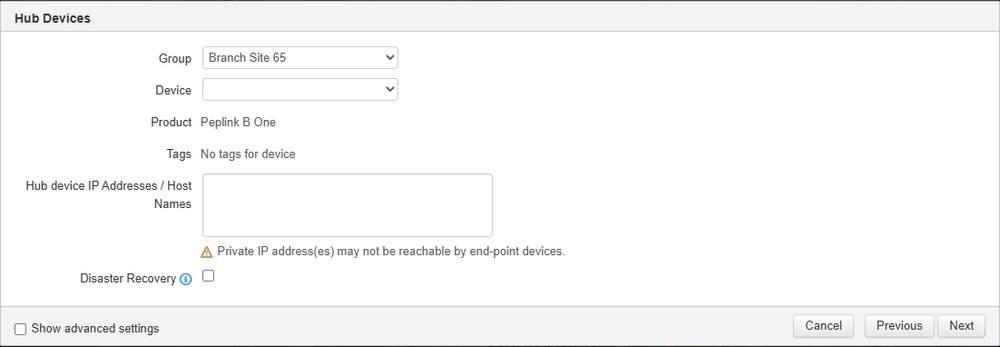
Step two names the hub. Group and Device are dropdowns, Product and Tags report the chosen device, and the address box carries a warning about private addresses.
Field | What it holds |
Group | A dropdown for the group from which the hub device is selected |
Device | A dropdown for the hub device. Each entry shows the device name and its available connections, for example MAX_BR1_D7FC: 2 connection(s) available |
Product | The product model of the chosen device. Read only |
Tags | The tags on the chosen device, or No tags for device |
Hub device IP Addresses / Host Names | Free text for the addresses or host names on which the hub is reached. It is filled in with the hub's addresses once a device is chosen. The step can report Invalid server selected or This field is required. for this field |
Disaster Recovery | A checkbox. Creates a second, lower priority set of SpeedFusion VPN tunnels between each endpoint and the secondary hub. Each endpoint is then required to use two SpeedFusion VPN licenses |
Notes on this step:
- The Device dropdown states the connections available on each device, so the hub's remaining capacity is visible when choosing it. Where the chosen group holds no suitable device, the list reads No device can act as a hub.
- Below the address box the step can show the warning Private IP address(es) may not be reachable by end-point devices. Enter addresses that the end point devices can reach.
Show advanced settings at the foot of this step reveals DNS Resolver 1, DNS Resolver 2 and Use Them Primarily.
Star, step three, End Point Devices
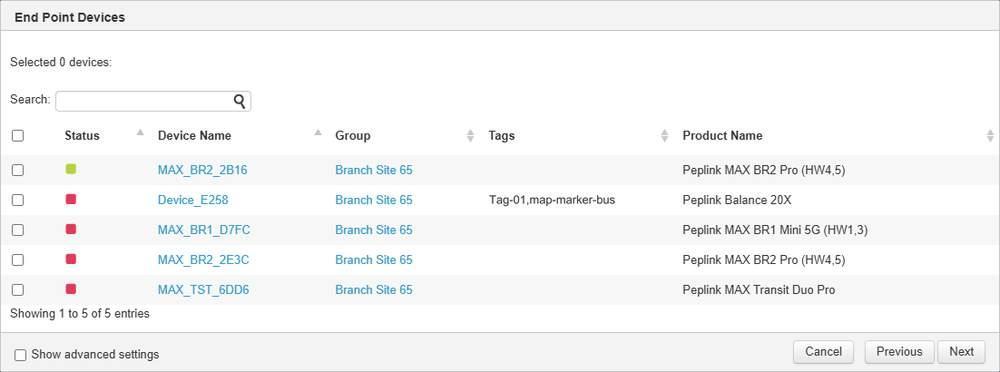
Step three selects the endpoints. The selection summary reads Selected 0 devices until rows are ticked, and each row carries a status square.
- A selection summary in the form Selected 0 devices:, which counts the rows ticked below it.
- A Search: box above the device table.
- A device table with a tick box column and the columns Status, Device Name, Group, Tags and Product Name, with a count line below it.
- Show advanced settings at the foot of the step. On this step it reveals Add Device and Device Filters.
Status is shown as a coloured square, green or red, rather than text.
At least one endpoint must be ticked. Clicking Next with nothing ticked shows Please select at least one device at the top of the step.
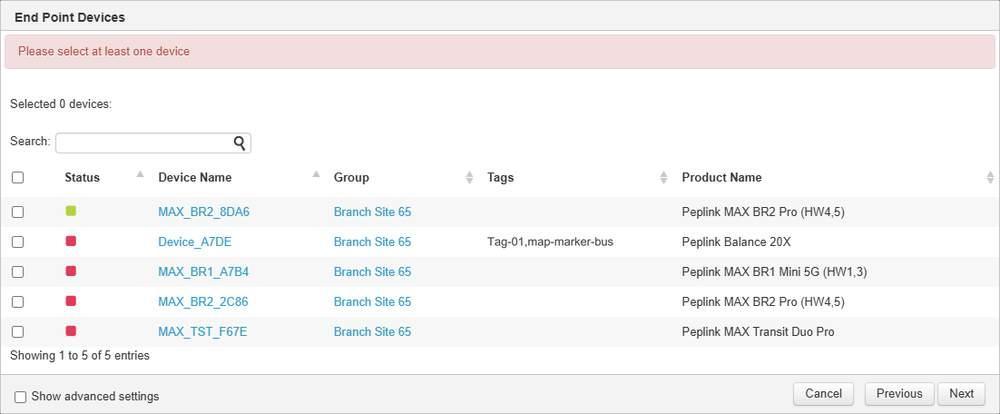
The same step after clicking Next with no device ticked. The message Please select at least one device appears above the selection summary.
Once at least one endpoint is ticked, the summary lists the chosen names, for example Selected 2 devices: followed by two device names, and Next moves to Profile Options.
Star, step four, Profile Options
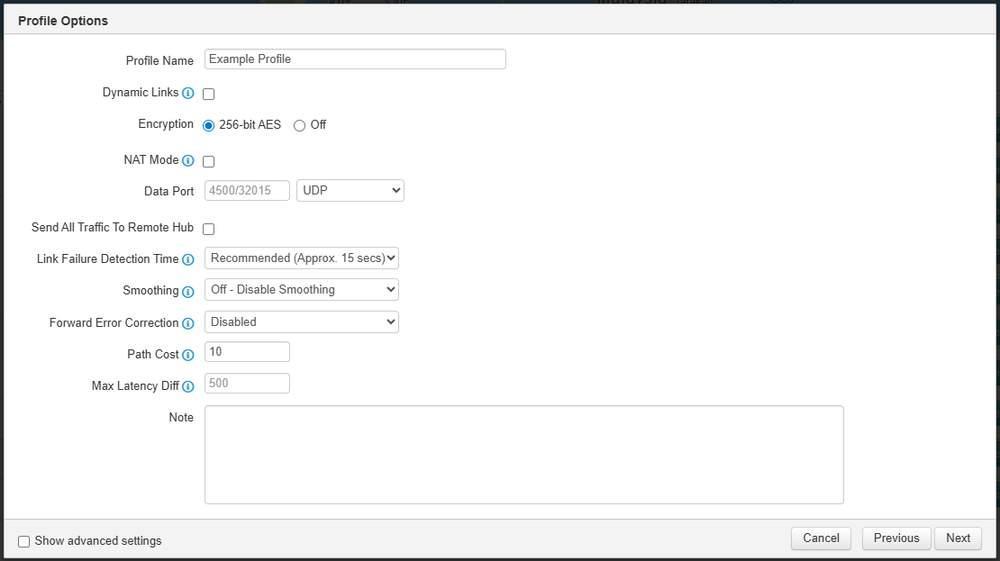
Profile Options for a Star profile, with Example Profile as the name. Encryption is set to 256-bit AES, Data Port reads 4500/32015 with UDP, and Path Cost reads 10.
Field | Type and options |
Profile Name | Text. The name under which the profile is listed |
Dynamic Links | Checkbox |
Encryption | 256-bit AES or Off. The step opens with 256-bit AES selected |
NAT Mode | Checkbox |
Data Port | Port, shown as 4500/32015, and a protocol list: UDP, TCP, TCP (exposed headers) |
Send All Traffic To Remote Hub | Checkbox |
Link Failure Detection Time | Recommended (Approx. 15 secs), Fast (Approx. 6 secs), Faster (Approx. 2 secs), Extreme (Approx. 1 sec) |
Smoothing | Off - Disable Smoothing, then Normal, Medium and High, which state overheads of up to 100%, 200% and 300%, and Maximum, which is uncapped |
Forward Error Correction | Disabled, Adaptive, Low, High |
Path Cost | Number, 10 by default |
Max Latency Diff | Number, shown as 500 |
Note | Free text |
These settings, and the further settings that Show advanced settings reveals on this step, are described under Advanced settings below.
Star, step five, Profile Summary
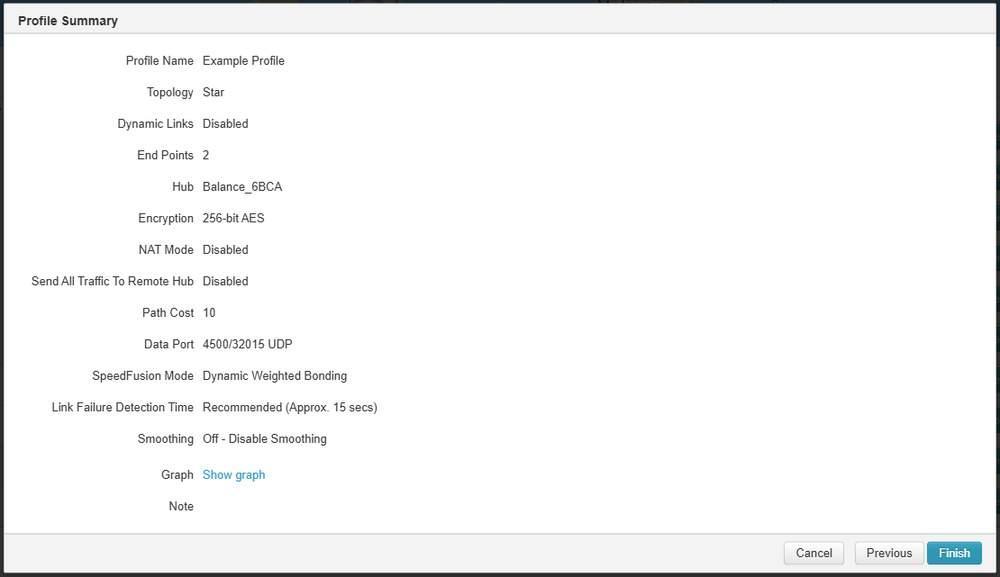
Profile Summary for a Star profile. It lists the choices made, including Topology Star, End Points 2 and the Hub, with SpeedFusion Mode reading Dynamic Weighted Bonding. Finish is at the bottom right in place of Next.
The summary lists Profile Name, Topology, Dynamic Links, End Points, Hub, Encryption, NAT Mode, Send All Traffic To Remote Hub, Path Cost, Data Port, SpeedFusion Mode, Link Failure Detection Time, Smoothing, Graph and Note. SpeedFusion Mode reads Dynamic Weighted Bonding, and Graph carries a Show graph link. Review each row, then click Finish to add the profile to the list, or Previous to change a step. Then click Save Changes to save the profile and send it to the devices.
Point-To-Point, step two, Peer Devices
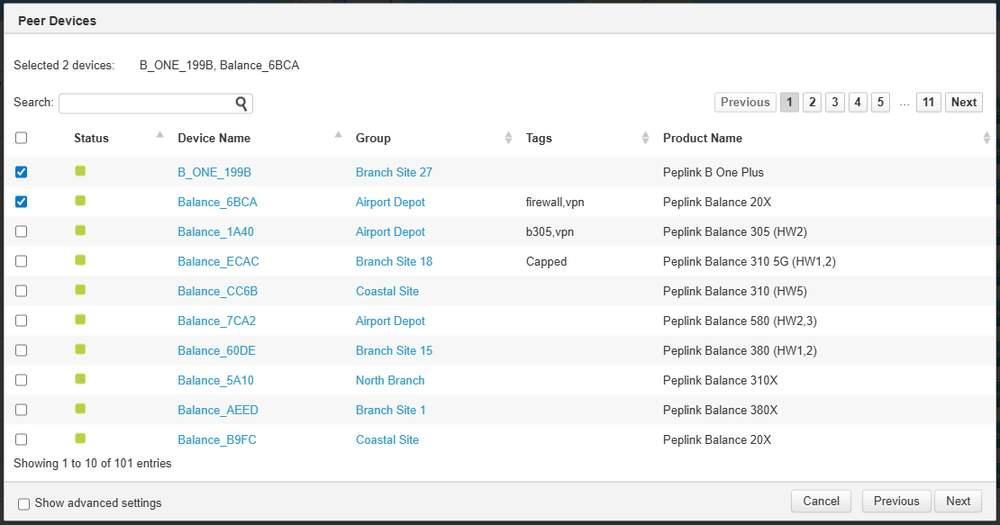
Peer Devices for a Point-To-Point profile, with two devices ticked. The selection summary above the table names both, and the table is paged.
- A selection summary in the form Selected 2 devices: followed by the chosen names.
- A Search: box, and a paged device table with a tick box per row and the columns Status, Device Name, Group, Tags and Product Name.
- Please select at least one device appears if Next is clicked with nothing ticked.
Point-To-Point, step three, Profile Options
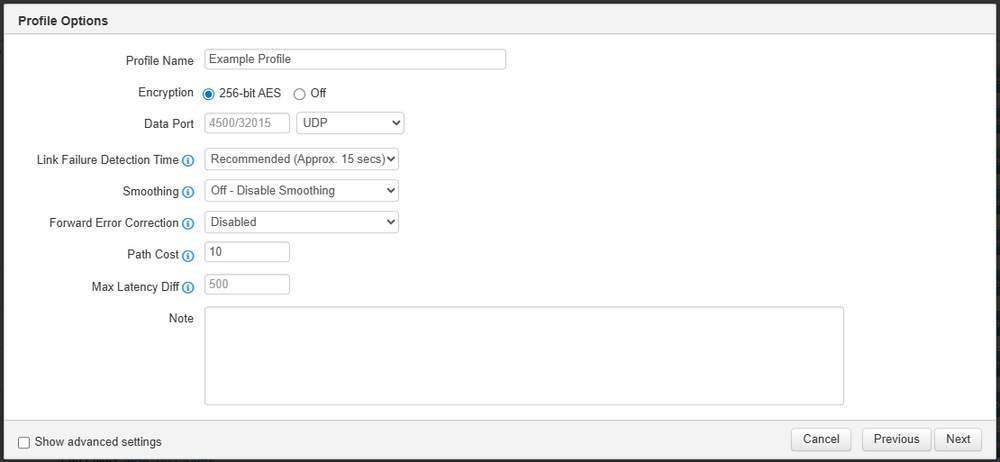
Profile Options for a Point-To-Point profile. The list is shorter than the Star version: Dynamic Links, NAT Mode and Send All Traffic To Remote Hub are absent.
The fields are those of the Star Profile Options step without Dynamic Links, NAT Mode and Send All Traffic To Remote Hub.
Point-To-Point, step four, Profile Summary
The summary carries the same rows as the Star summary, except Hub, NAT Mode and Send All Traffic To Remote Hub. Topology reads Point-To-Point. Click Finish, then Save Changes.
- Step numbers are used in this manual only. In the wizard, each panel heading names the step.
5.4.5. Editing a Profile
Edit opens the same multi step wizard at the Peer Devices step. This step carries Cancel and Next.
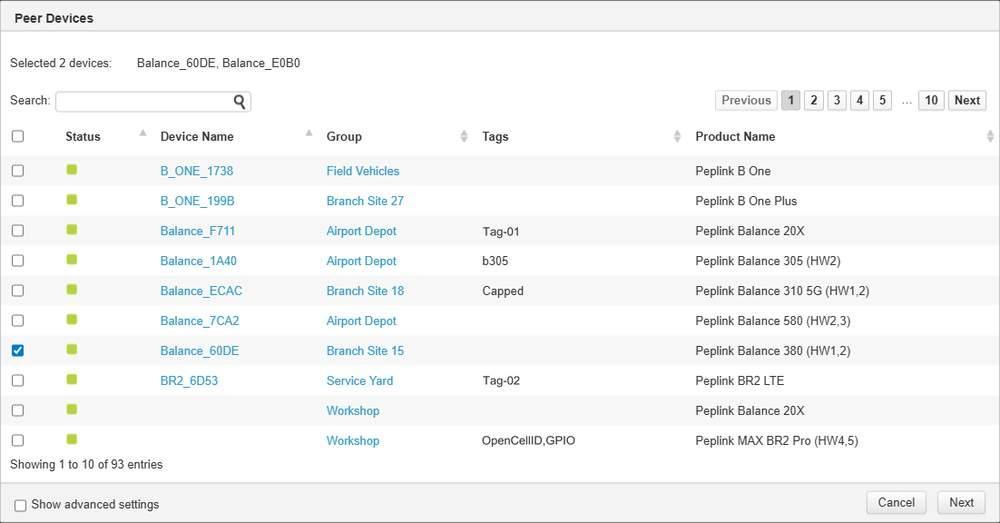
The Edit wizard opens on Peer Devices. The selection summary is above the table and Show advanced settings is below it.
The step shows:
- A selection summary in the form Selected 2 devices: <device>, <device>.
- A Search: box above the device table.
- A paged device table, for example Showing 1 to 10 of 93 entries with pagination reading Previous 1 2 3 4 5 … 10 Next.
- A Show advanced settings control below the table.
The device table carries five columns:
Column | What it shows |
Status | Per-device status indicator |
Device Name | The device name |
Group | The group the device belongs to, for example Airport Depot |
Tags | Tags applied to the device. May be empty |
Product Name | The product model, for example Peplink Balance 305 (HW2) |
In addition to Search:, the step offers filters that widen or narrow the device list. InControl 2 describes each as follows.
Filter | What it does |
Limit to Network | Shows only devices belonging to the selected network |
SpeedFusion VPN Disabled Networks | Shows devices from networks where SpeedFusion VPN has not been enabled. By default the device table lists only devices from groups where SpeedFusion VPN is enabled, as the page banner states. This filter widens the list |
HA Slave Devices | Shows High-Availability (HA) Slave devices |
Config Suspended Networks | Shows devices from networks that have configuration disabled |
All Licenses Used | Shows devices where the license limit has been reached |
Unreported Licenses | Shows devices where the license status has not been previously reported, for example new devices that have not yet been online |
Access Point Devices | Shows Access Point devices |
FusionHub Devices | Shows FusionHub devices |
Unmanaged Devices | Shows Unmanaged devices |
Control | What it does |
Search: | Filters the device table |
Previous, 1 to 10, Next | Move through the pages of the device table |
Show advanced settings | A checkbox at the foot of this step. The profile's advanced settings are revealed by Show advanced settings on the Profile Options step. See Advanced settings below |
Next | Moves to the following step of the wizard |
Cancel | Closes the wizard without saving |
Adjust the selection and click Next to continue.
The steps after Peer Devices
Edit commits changes in the same way as Add Profile:
Action | Effect |
Next and Previous | Move between steps. Nothing is saved |
Cancel, at any step | Discards the edit. The profile is unchanged |
Finish | Shows the edited profile in the list. Nothing is saved yet, and Save Changes becomes available |
Save Changes | Saves the edit and sends it to the devices in the profile. The Operation Log records the change at this point |
An edit can be abandoned without sending it to devices until Save Changes is clicked: click Cancel below the list, or leave the page. Because the profile is already in use, check the edited row in the list before saving.
Notes:
- Profile Name and Note are set on the Profile Options step.
- NAT Mode is among the advanced settings described below.
- After saving an edit, the result is shown on Group > SpeedFusion VPN > Live Status - Tabular View (5.5 Live Status - Tabular View (Group Level)) for each group in the profile, and in the SpeedFusion category of the device's Event Log (15.9 Event Log (Device Level)).
5.4.6. Advanced Settings
These settings tune how a profile's tunnels behave. The Add Profile and Edit wizards carry the same set. In the Add Profile wizard they are on the Profile Options step. The packet loss options trade bandwidth for resilience, for example Smoothing at up to 100% to 300% overhead.
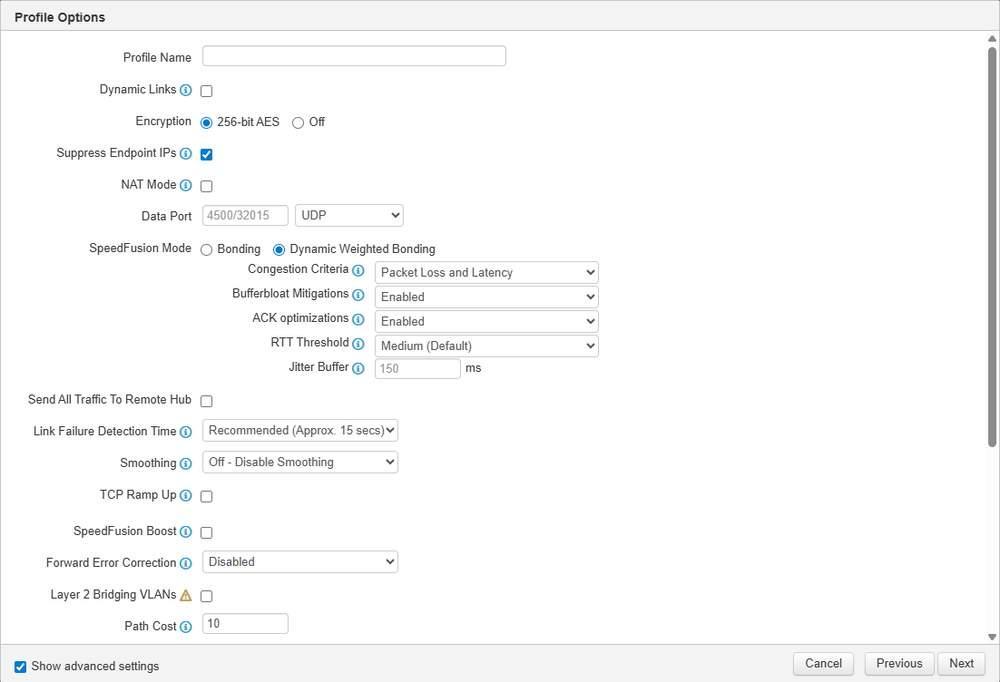
The Profile Options step with Show advanced settings ticked. SpeedFusion Mode is below Data Port, with the Dynamic Weighted Bonding sub settings beneath it.
Show advanced settings appears at the foot of more than one step. On each step it reveals that step's own extra controls:
Step | What Show advanced settings reveals |
Profile Options | SpeedFusion Mode and the other advanced settings described below |
Hub Devices | DNS Resolver 1, DNS Resolver 2 and Use Them Primarily |
End Point Devices | Add Device and Device Filters |
It does not appear on the Topology step. In the Edit wizard it also appears at the foot of Peer Devices. To reach the settings below, tick Show advanced settings on the Profile Options step.
Link health and bandwidth
Control | What it does |
SpeedFusion Mode | Selects the SpeedFusion mode for the profile. Dynamic Weighted Bonding is one of the modes, and its sub settings are listed below |
Link Failure Detection Time | Sets the maximum time a link can remain idle before a health check packet is sent to ensure connectivity. Options are Recommended (Approx. 15 secs), Fast (Approx. 6 secs), Faster (Approx. 2 secs) and Extreme (Approx. 1 sec). Shorter detection times increase the frequency of health checks and incur a higher maximum bandwidth overhead. Fast therefore adds data use on metered links |
Max Latency Diff | The maximum allowable difference in round trip time, in milliseconds, between the highest and lowest latency connections. Connections exceeding the limit are not used for data transfer until latency improves. Per link limits are set in the Advanced Link Settings dialog |
Upload Bandwidth Limit kbps | Maximum bandwidth for all links in the profile. The value can be modified per link in the Advanced Link Settings dialog |
Path Cost | Base OSPF cost used to determine the best route through the network. Default: 10. Cost metrics for individual links are adjusted in the Advanced Link Settings |
Use Packet DF flag | When enabled, SpeedFusion VPN is required to copy the DF (Don't Fragment) flag of the encapsulated packets. Default: disabled |
Dynamic Weighted Bonding sub settings
These are inside the SpeedFusion Mode block. The tooltip of each states its default behaviour.
Control | What its tooltip states |
Congestion Criteria | By default Dynamic Weighted Bonding considers both packet loss and latency as indicators of a congestion event |
Bufferbloat Mitigations | By default Dynamic Weighted Bonding tries to mitigate bufferbloat by reducing TCP throughput when the WAN is congested. This may reduce overall bandwidth |
ACK optimizations | By default Dynamic Weighted Bonding forwards TCP ACK packets to a remote peer immediately. This consumes bandwidth but improves TCP performance |
RTT Threshold | Latency generally rises as links become more congested. Set to Low, Dynamic Weighted Bonding treats the link as congested more aggressively. Set to High, it allows latency to rise further before treating the link as congested |
Jitter Buffer | By default Dynamic Weighted Bonding has a jitter buffer of 150ms, with a range of 0 to 500ms. The buffer may improve TCP performance. The setting is ignored while the Receive Buffer is active |
Packet loss mitigation
Each of these trades bandwidth for resilience. InControl 2 states the overhead where an option has one.
Control | What it does |
Smoothing | Prevents packet loss without incurring any latency penalty, at the cost of a substantial bandwidth overhead. Suited to streaming applications where the average bitrate requirement is much lower than the WAN's available bandwidth. Options are Off, which disables smoothing, Normal, Medium, High and Maximum. Expected overhead is up to 100% for Normal, up to 200% for Medium and up to 300% for High. The overhead of Maximum depends on the number of connected, active tunnels |
Forward Error Correction | Recovers lost packets by using extra bandwidth for redundant data. Options are Disabled, Adaptive, Low and High. Low has an overhead of 13.3% and High an overhead of 26.7%, both requiring SpeedFusion VPN version 8.0.0 or higher. Adaptive adjusts dynamically with up to 20% overhead for each WAN to WAN link independently and requires SpeedFusion VPN version 9.2.2 or higher. If the peer runs a lower version, Adaptive defaults to Low |
TCP Ramp Up | Applies Normal Smoothing for a short period on every new TCP connection, to prevent packet loss during TCP Slow Start |
TCP Traffic Optimization | Attempts to improve TCP throughput on connections with packet loss or high latency. InControl 2 notes that the feature is currently under development and performance may vary |
SpeedFusion Boost | Attempts to improve throughput on connections with packet loss or high latency |
Hub, endpoint and peer identity
Control | What it does |
Suppress Endpoint IPs | Removes endpoint IP addresses from the hub site configuration. This prevents unnecessary configuration updates on the hub site, and the link disconnections that go with them, whenever an endpoint IP address changes. InControl 2 recommends enabling this option unless the network requires that SpeedFusion VPN connections be initiated from the hub site. Where connections must start at the hub, configuration update frequency can instead be reduced by enabling dynamic DNS addressing on the associated endpoints. Changing the option causes all existing connections in the profile to disconnect and reconnect once |
Disaster Recovery | Creates a second, lower priority set of SpeedFusion VPN tunnels between each endpoint and the secondary hub. Each endpoint is then required to use two SpeedFusion VPN licenses |
Dynamic Links Trigger | Enables individual links in the profile whenever both devices at the ends of a link carry a preselected trigger tag. Commonly used with the geofencing options. Between endpoints it allows devices to mesh based on specific geographic areas. Where a hub is involved, both the hub and the endpoint device need the tag, which allows hubs to service specific geographic areas |
Remote IP Address / Host Names (Optional) | Optional remote IP addresses or host names. If this field is left empty, the same field on the remote unit must be filled |
Allow Shared Remote ID | Allows multiple devices to connect using the same Remote ID and PSK combination. Peer connections are allocated on a first come, first served basis, so connections using a shared Remote ID may consume connections allocated through InControl 2 |
SpeedFusion VPN Handshake Port | Sets the port used for the SpeedFusion VPN handshake |
Caution: Changing Suppress Endpoint IPs disconnects and reconnects every connection in the profile once, which on a Star profile is every endpoint linked to the hub. Schedule the change for a maintenance window.
NAT Mode and Layer 2 Bridging
These two options are mutually exclusive. InControl 2 states that NAT Mode and Layer 2 Bridging options cannot both be active at the same time.
Control | What it does |
NAT Mode | Applies NAT to the profile. A Hub VLAN and a Slave VLAN are selected with it. Cannot be active while Layer 2 Bridging is active |
Layer 2 Bridging | Bridges the selected VLANs at layer 2. Cannot be active while NAT Mode is active |
VLANs | The VLANs carried by the bridge. When bridging between the untagged LAN and selected VLAN IDs is active, packets from the remote untagged VLAN are redirected to this VLAN ID, in the range 1 to 4094 |
Remote Network Isolation | Enabled or disabled for the bridge, and set per device rather than per profile. The site IP address override choices are grouped with it and are described below. Where two profiles on the same device differ, Enabled takes precedence over Disabled |
Spanning Tree Protocol | Enabled or disabled for the bridge, and set per device rather than per profile. Where two profiles on the same device differ, Enabled takes precedence over Disabled |
The Layer 2 Bridging settings apply per device rather than per profile. InControl 2 warns that they are common to all SpeedFusion VPN Layer 2 bridges on each device and cause issues if set differently in multiple profiles. Where profiles differ, the following precedence applies:
Setting | Precedence |
Remote Network Isolation | Enabled > Disabled |
Spanning Tree Protocol | Enabled > Disabled |
Site IP Address | Do Not Override > By DHCP > As None |
Further constraints on Layer 2 Bridging:
- Site IP Address settings are unavailable for FusionHub devices and are always treated as Do Not Override.
- The setting cannot currently be used when multiple tunnels are configured between a single pair of devices.
Site IP Address override
The site IP address choices determine whether the LAN addressing at each end is retained when the layer 2 tunnel comes up.
Choice or scope | What it does |
Do not override | The LAN IP address and local DHCP server remain unchanged after the Layer 2 SpeedFusion VPN is up |
Override, applied to the hub | The hub site will not act as a router on the untagged LAN and most layer 3 routing functions cease to work. Applied to the hub device or devices only |
Override, applied to the endpoints | The endpoints will not act as routers on their untagged LANs and most layer 3 routing functions cease to work. Applied to all selected endpoints, except FusionHub devices |
Static hub IP address | Statically configures the hub IP address. Where multiple profiles set a static IP, the highest priority value is used |
Caution: The two Override choices stop the hub, or every selected endpoint, acting as a router on its untagged LAN, and most layer 3 routing functions at those sites cease to work. Apply them in a maintenance window.
5.5. Live Status - Tabular View (Group Level)
This view shows each link in the group and the state of every WAN at both ends. It is populated once the group is enabled on Group > SpeedFusion VPN > Configuration (5.7 Configuration (Group Level)) and a profile that includes its devices is enabled at Organization > SpeedFusion VPN > Configuration (5.4 Configuration (Organization Level)). For tunnel history, see Connection Up/Down History (SpeedFusion VPN tab, 15.12 Connection Up/Down History) and SpeedFusion Score (15.1 SpeedFusion Score) in Device Reports.
Where to find it
Group > SpeedFusion VPN > Live Status - Tabular View
5.5.1. What This Screen Shows
- With no profile enabled, the page shows only the message No SpeedFusion VPN profile enabled.
- The screen has no controls of its own.
5.5.2. With a Profile Enabled

The group level tabular view with two links. Each row pairs Device A with Device B. The second row is a SpeedFusion Connect link to Singapore (SIN), so it has no WAN or networks on the Device A side.
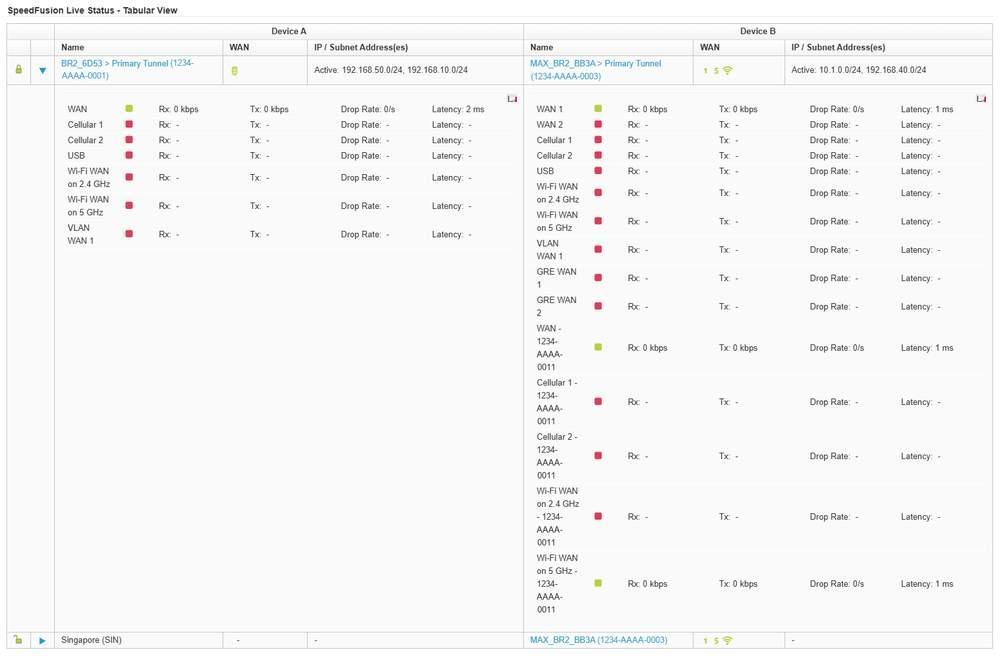
The first row expanded. Each end lists every WAN on that device with a status dot and its current Rx, Tx, Drop Rate and Latency.
The page shows a grid headed SpeedFusion Live Status - Tabular View. Each row is one SpeedFusion link, with its two ends side-by-side under Device A and Device B.
Column | What it shows |
Lock icon | Whether the link is encrypted. Hovering shows Link secure (256-bit AES encrypted) or Link insecure (data encryption not enabled). To confirm that every link in the group is encrypted, check this column for Link insecure (data encryption not enabled) |
Arrow | Expands the row to show the WANs at both ends |
Name | The device name, the tunnel name and the serial number, for example BR2_6D53 > Primary Tunnel (1234-AAAA-0001). Hovering shows the link name. A SpeedFusion Connect location appears by name, for example Singapore (SIN) |
WAN | One icon per connected WAN on that device. Hovering an icon shows the WAN status, WAN Type, IP Address, Subnet Mask, Connection Method, Routing Mode, Default Gateway, DNS Servers, MTU and Health Check Method. A Wi-Fi WAN also shows its SSID, BSSID, band and signal |
IP / Subnet Address(es) | The remote networks that end reaches through the link, for example Active: 10.1.0.0/24, 192.168.40.0/24. A dash means none are listed |
Expanding a row opens a panel under each end. It lists every WAN on that device with a status dot and its current Rx, Tx, Drop Rate and Latency. A dash means there is no current reading for that WAN.
Use this panel to identify which link in a bonded tunnel is causing a problem. Compare Drop Rate and Latency across the WANs at each end, then open Device > Reports > WAN Quality Reports for that WAN to see when it degraded. See 15.6 WAN Quality Reports.
5.6. Live Status - Map and Logical View (Group Level)
This view shows tunnel state for one group's devices and the sites they link to, drawn as a map or a logical diagram. The controls match the organization level version of this screen, but this view covers the selected group only.
Where to find it
Group > SpeedFusion VPN > Live Status - Map and Logical View
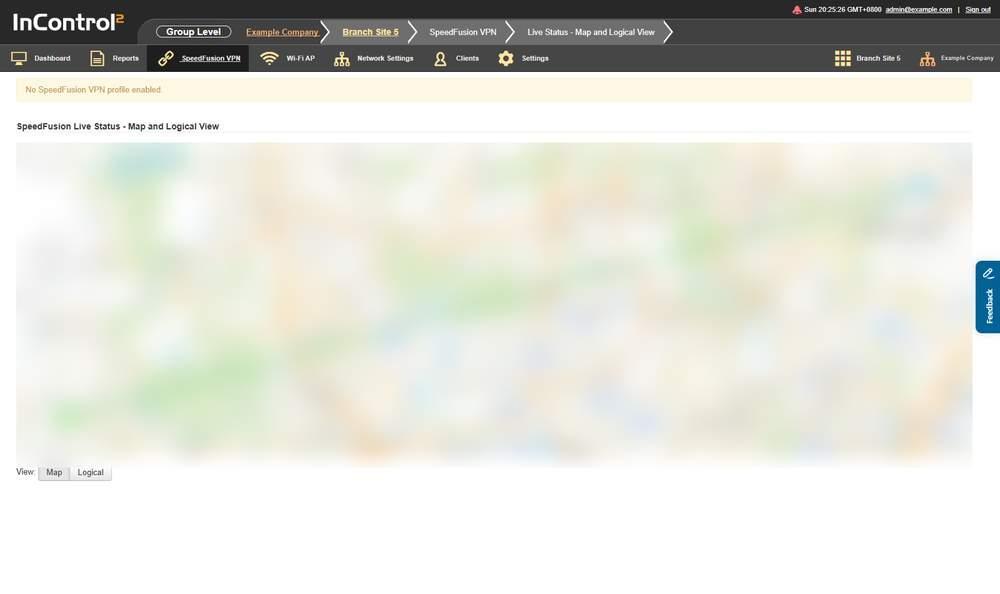
The group level map and logical view. The message No SpeedFusion VPN profile enabled is above the panel.
5.6.1. What This Screen Shows
- The message No SpeedFusion VPN profile enabled. above the panel.
- A panel headed SpeedFusion Live Status - Map and Logical View with the view selector View: Map Logical.
With a profile enabled, Logical draws each device as a circle labelled with its name, joined by a line to each device it shares a SpeedFusion link with.
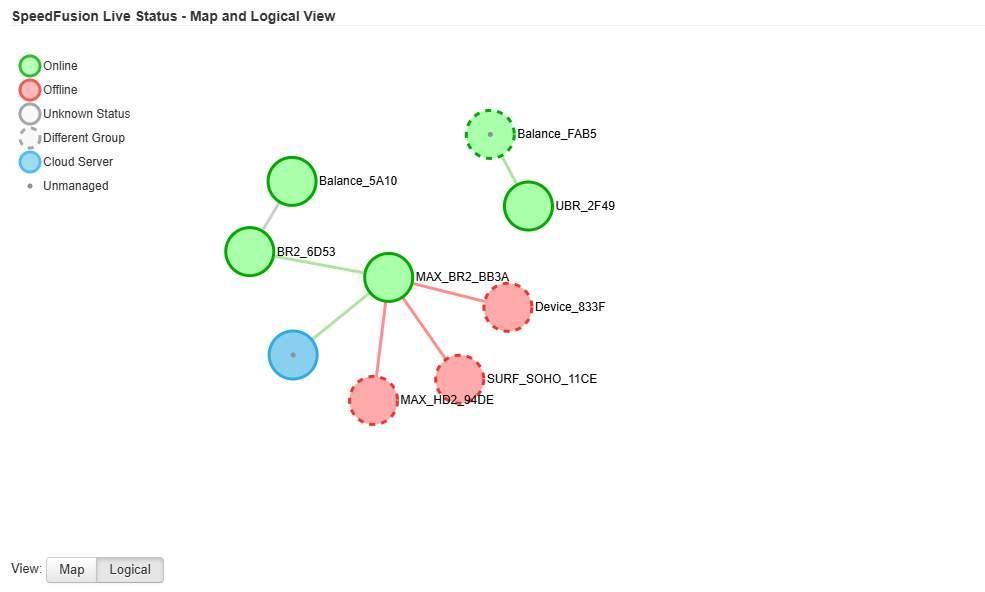
The logical view with profiles enabled. Each circle is a device, lines join linked devices, and the legend in the top left corner explains the circle styles. Dashed circles belong to other groups.
Legend entry | Drawn as |
Online | Green circle |
Offline | Red circle |
Unknown Status | Grey circle |
Different Group | Dashed outline |
Cloud Server | Blue circle |
Unmanaged | A dot in the centre of the circle |
Devices in other groups that share a link with this group's devices are included, drawn with a dashed outline.
5.6.2. Controls on This Screen
Control | What it does |
Map | Switches the panel to the map view. It places the same devices as markers at their locations, with a line between linked devices |
Logical | Switches the panel to the logical view |
Zoom in | Zooms the map in. Rendered as + |
Zoom out | Zooms the map out. Rendered as – |
Attributions | Shows the map attributions. Rendered as i |
Toggle full-screen | Expands the panel to full screen |
5.7. Configuration (Group Level)
Use this screen to let a group's devices take part in organization level SpeedFusion profiles, and to list the profiles that apply to the group.
Where to find it
Group > SpeedFusion VPN > Configuration
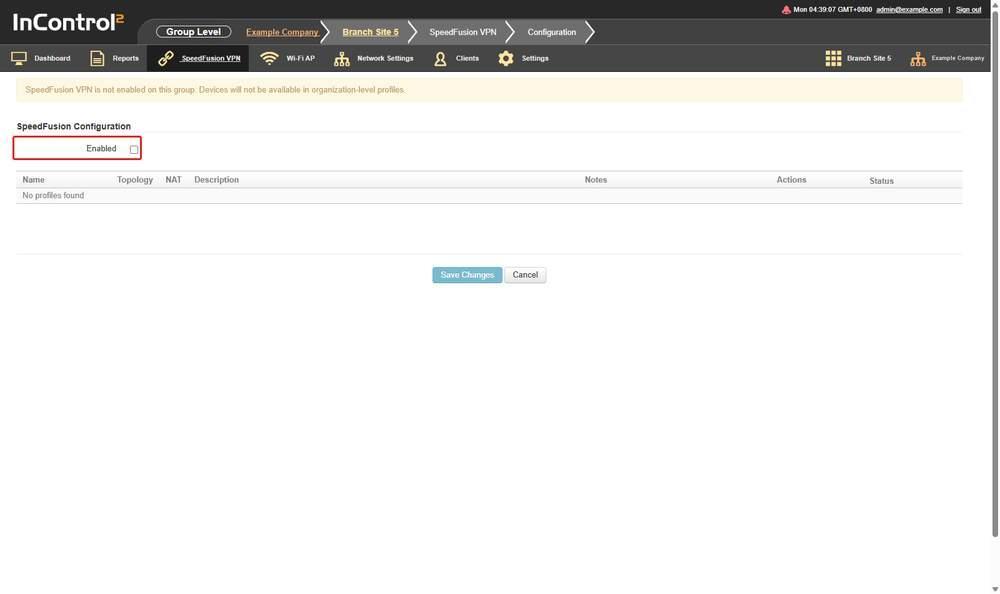
The group level Configuration screen. The Enabled checkbox, outlined in red, is above the grid, and the grid reads No profiles found.
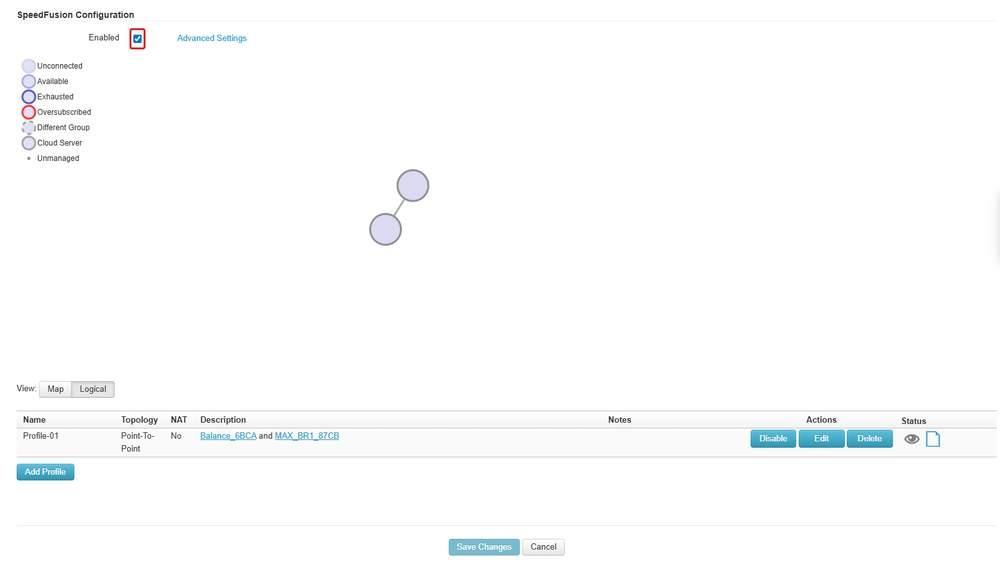
A group with SpeedFusion VPN enabled. The Enabled checkbox, outlined in red, is ticked, the Logical view draws the two peers, and the grid lists one profile with Disable, Edit and Delete buttons and an Add Profile button below it.
5.7.1. What This Screen Shows
- While the group is not enabled, the banner SpeedFusion VPN is not enabled on this group. Devices will not be available in organization-level profiles., and no Add Profile button.
- An Enabled checkbox above the grid.
- A SpeedFusion Configuration grid with the same columns as the organization level list: Name, Topology, NAT, Description, Notes, Actions, Status.
- An empty grid reads No profiles found.
- Once the group is enabled, the banner is removed, an Advanced Settings link appears beside Enabled, a View: Map | Logical panel appears above the grid, each profile row carries Disable, Edit and Delete, and Add Profile appears below the grid.
5.7.2. Controls on This Screen
Control | What it does |
Enabled | Switches SpeedFusion VPN on for this group. The checkbox carries the message Please remove any cross-group profile at organization level before changing this setting, so remove those profiles at organization level first |
Save Changes | Commits the change. Disabled until a change is made |
Cancel | Discards the change |
Caution: Clearing Enabled makes the group's devices unavailable to organization level profiles. This affects every tunnel those devices take part in. Moving a device to another group can also affect its tunnels: the Move to... form in Settings (Group Level) (13.1.7 What Each Entry Opens) warns that a move may lift some group level SpeedFusion VPN profiles to organization level.
5.8. Live Status - Tabular View (Device Level)
This view lists every peer the device links to and the WAN carrying each link. It is the only SpeedFusion VPN screen at device level. Configuration is at organization level and group level, both described above (5.4 Configuration (Organization Level), 5.7 Configuration (Group Level)). For this device's tunnel history, see Connection Up/Down History (SpeedFusion VPN tab, 15.12 Connection Up/Down History) and SpeedFusion Score (15.1 SpeedFusion Score) in Device Reports. For a SpeedFusion Connect location, remaining data quota and expiry are on Device > Device Details under SpeedFusion Connect (14.1.10 Status). To top up several devices at once, use Top Up SFC Usage Plan... in the Actions menu of Group > Settings > Device Management (13.1.7 What Each Entry Opens).
Where to find it
Device > SpeedFusion VPN > Live Status - Tabular View
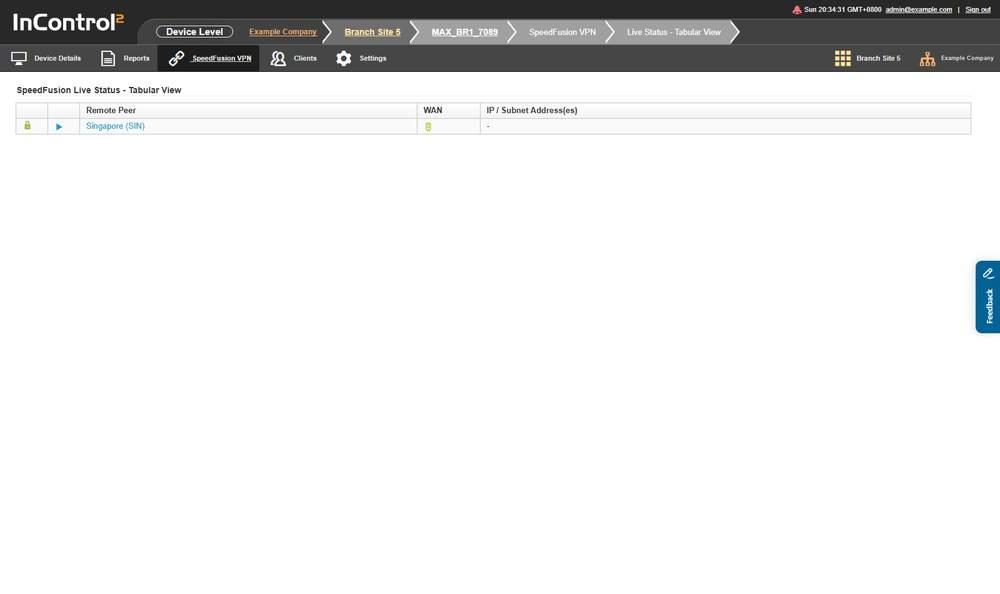
The device level tabular view. Each row is one remote peer, with the WAN used and the addresses reached through it.
5.8.1. What This Screen Shows
A single grid headed SpeedFusion Live Status - Tabular View.

The device level tabular view with two peers, another router and a SpeedFusion Connect location. WAN shows this device's connected WANs as icons.
Column | What it shows |
Remote Peer | The peer at the far end, for example Singapore (SIN) |
WAN | The WAN connection carrying the link to that peer. One icon per connected WAN on this device, for example WAN 1, WAN 5 and a Wi-Fi WAN. Hovering an icon shows that WAN's status and settings, as at group level |
IP / Subnet Address(es) | The addresses or subnets reached through that peer, for example Active: 10.1.0.0/24, 192.168.40.0/24. A SpeedFusion Connect location reads a dash |
As at group level, the lock icon at the start of each row reports encryption on hover, and the arrow expands the row.
The screen has no controls of its own.