RemoteSIM Configurations User Manual#
RemoteSIM Configurations
User Manual
June 2025
Introduction#
Peplink has developed a unique technology called RemoteSIM, which allows SIM cards to remotely link to a cellular router. This can be done via cloud or within the same physical network. There are a few key scenarios to fit certain applications.
The purpose of this manual is to provide an introduction on where to start and how to set up for the most common scenarios and uses.
Requirements#
- Cellular router that supports RemoteSIM technology.
- SIM Injector.
- SIM card.
Notes:
- Always check for the latest Firmware version for both the cellular router and the SIM Injector. You can also check for the latest Firmware version on the device’s WEB configuration page.
- A list of products that support RemoteSIM can be found on the SIM Injector WEB page. Please check under the section Supported models.
SIM Injector reset and login details#
How to reset a SIM Injector:
- Hold the reset button for 5-10 seconds. Once the LED status light turns RED, the reset button can be released. SIM Injector will reboot and start with the factory default settings.
The default WEB login settings:
- User: admin
- Password: admin
- IP address: the device only has a DHCP client and no fallback IP address.. Therefore, it is advised to check every time what IP address is assigned to the SIM Injector.
Notes:
- The SIM Injector can be monitored via InControl 2. Configuration is not supported.
LED Indication#
There are 8 SIM LED indicators and a Status LED indicator. The statuses indicated by the LEDs are as follows:
| LED indicator | Light behavior | Description |
| Status | Blinking GREEN | Obtaining IP address |
| Solid GREEN | Ready | |
| Blinking RED | Upgrading Firmware | |
| Solid RED | Restoring Factory Defaults | |
| SIM | Off | No SIM inserted |
| Blinking GREEN | SIM in use | |
| Solid GREEN | SIM standby | |
| SIM Injector
(Left Ethernet LED) |
Off | Port is not connected |
| Blinking ORANGE | Data is transferring | |
| Solid ORANGE | Port is connected
without traffic |
|
| SIM Injector
(Right Ethernet LED) |
Off | PoE is disabled |
| Solid GREEN | PoE enabled | |
| SIM Injector Mini
(Middle Ethernet LED) |
Off | Port is not connected |
| Blinking GREEN | Data is transferring | |
| Solid GREEN | Port is connected
without traffic |
Configuring Custom SIM Cards Settings#
For applications when the SIM Injector is used, sometimes there might be a need to set custom cellular settings (e.g. APN, enable Roaming, etc). This is done on the router which is getting the RemoteSIM from the SIM Injector.
- To start go:
- For a Balance router, go to the Network (Top tab).
- For a MAX router, go to the Advanced (Top tab).
- Then Under Misc. settings (Left-side tab) click on RemoteSIM Management.
3. Click on the Add RemoteSIM button.

Next, fill in all the required info. The setting will apply only to a single SIM which is inserted in the SIM slot as defined in the settings.

This section allows defining custom requirements for a SIM card located in a certain SIM slot:
- Enable/Disable roaming (by default roaming is disabled).
- Add Custom mobile operator settings (APN, user name, password).
SIM Server – Serial Number > Enter SIM Injector S/N
SIM Slot > select SIM Injector slot to which SIM card the settings should be applied.
Data Roaming > enable data Roaming. By default Roaming is disabled.
Operator Settings > select Customer to enter custom settings.
- Repeat configuration for all SIM cards which need custom settings.
5. Click Save and then Apply Changes to take effect.
Scenario 1: SIM Injector in LAN of Cellular Router#
Setup topology#
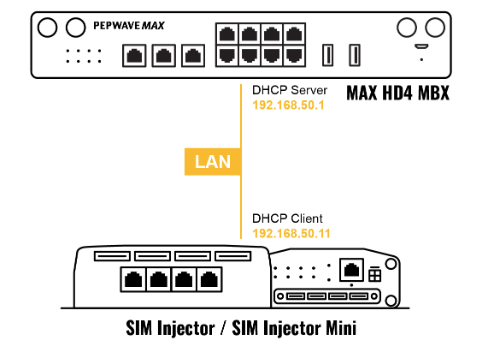
This is the most basic scenario in which the SIM Injector / SIM Injector Mini (hereinafter referred to as SIM Injector) is connected directly to the cellular router’s LAN port via an ethernet cable. This allows for the cellular router to be positioned for the best possible signal. Meanwhile, the SIM cards can be conveniently located in other locations such as the office, passenger area, or the bridge of a ship. The SIM Injector allows for easily swapping SIM cards without needing to access a cellular router.
IMPORTANT: Cellular WAN will not fallback to the local SIM if it is configured to use the SIM Injector.
Configuring the SIM Injector / SIM Injector Mini#
1. Connect the SIM Injector to the LAN port of the cellular router.
2. Insert SIM cards into the SIM Injector. The SIM cards will be automatically detected.
IMPORTANT: SIM cards inserted into SIM Injector must not have a PIN code.
Note 1: The SIM Injector gets its IP address via DHCP and doesn’t have a static IP address. To find it’s address, please check the DHCP lease on the cellular router.
Configuring the Cellular Router#
Step 1. Enable the SIM Injector communication protocol.
1. Under Misc. settings (left navigation bar) find RemoteSIM Management.
2. In RemoteSIM Management, click on the edit icon next to RemoteSIM is Disabled
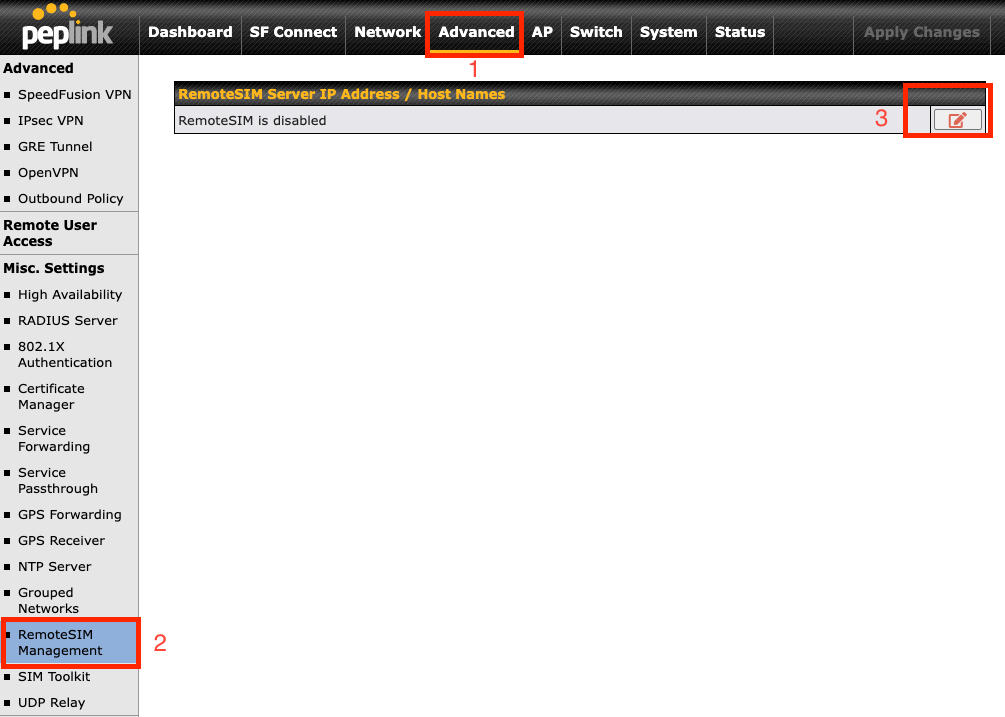
3. Check the Auto LAN discovery checkbox and click Save and Apply Changes.

4. Click Save and then Apply Changes.
Step 2. Enable RemoteSIM for the selected Cellular interface.
1. Go to Network (top navigation bar), then WAN (left navigation bar) and click Cellular. This will open the WAN Connection Settings page.

2. Scroll down to Cellular settings.
3. In the SIM Card section, select RemoteSIM.

4. Enter configuration settings in the RemoteSIM Settings section. Click on Scan nearby remote SIM server to show the serial number(s) of the connected SIM Injector(s). Available configuration options for cellular interface are shown below:
A. Defining SIM Injector(s)
- Format: <S/N>
- Example 1: 1111-2222-3333
- Example 2: 1111-2222-3333 4444-5555-6666
B. Defining SIM Injector(s) SIM slot(s):
- Format: <S/N:slot number>
- Example 1: 1111-2222-3333:7,5 (the Cellular Interface will use SIM in slot 7, then 5)
- Example 2: 1111-2222-3333:1,2 1111-2222-3333:3,4 (the cellular Interface will use SIM in slot 1, then in 2 from the first SIM Injector, and then it will use 3 and 4 from the second SIM Injector).

Note: It is recommended to use different SIM slots for each cellular interface.
5. Click Save and Apply Changes.
Step 3. (Optional) Custom SIM cards settings.
1. Under Misc. settings (Left-side tab) find RemoteSIM Management.
2. Click on the Add RemoteSIM button, fill in all the required info and click Save. This section allows defining custom requirements for a SIM card located in a certain SIM slot:
- Enable/Disable roaming (by default roaming is disabled).
- Add Custom mobile operator settings (APN, user name, password).

3. Repeat configuration for all SIM cards which need custom settings.
4. Click Save and in the WebAdmin top right for Apply Changes to confirm your changes.
Scenario 2: SIM Injector in WAN of main Router and multiple Cellular Routers#
Setup topology#

In this scenario, each HD Dome creates a WAN connection to the main router. A single SIM Injector is used to provide SIM cards for each HD Dome. The HD Dome can be replaced with any Peplink cellular router supporting RemoteSIM technology.
This scenario requires the completion of the configuration steps shown in Scenario 1 in addition to the configuration steps explained below.
Additional configurations for Cellular Routers#
Step 1. Disable the DHCP server.
– HD Dome 1 should act as a DHCP server.
– HD Dome 2 should be configured to have a static IP address with DHCP disabled.
– Both routers should be in the same subnet (e.g. 192.168.50.1 and 192.168.50.2).
1. Go to Network (Top tab), then Network Settings (Left-side tab), and click on Untagged LAN. This will open up the LAN settings page.
2. Change the IP address to 192.168.50.2.
3. In the DHCP Server section, uncheck the checkbox to disable DHCP Server.
4. Click Save and Apply Changes.
Step 2. Ethernet port configuration
The Ethernet port must be set to ACCESS mode for each HD Dome. To do this, dummy VLANs need to be created first.
1. Go to Network (Top tab), then Network Settings (Left-side tab), and click on New LAN. This will open the settings page to create a dummy VLAN.
2. The image below shows the values that need to be changed to create a new VLAN:

Note: set different IP addresses for each HD dome (e.g. 192.168.10.1 and 192.168.10.2).
3. Click Save and Apply Changes.
4. Go to Network (Top tab), then Port Settings (Left-side tab).
5. Set the Port Type to Access and set VLAN to Untagged LAN (see picture below).

6. Click Save and Apply Changes.
Configuration requirements for the main Router#
Requirements for the main router are:
- Configure WAN 1 as a DHCP client.
- WAN 1 will automatically get the Gateway IP address from HD Dome 1.
- Configure WAN 2 as a Static IP and set it to 192.168.50.12.
- Configure WAN 2 Gateway to 192.168.50.2. Same as the HD Dome 2’s IP address.
Scenario 3: SIM Injector in LAN of main Router and multiple Cellular Routers#
Setup topology#
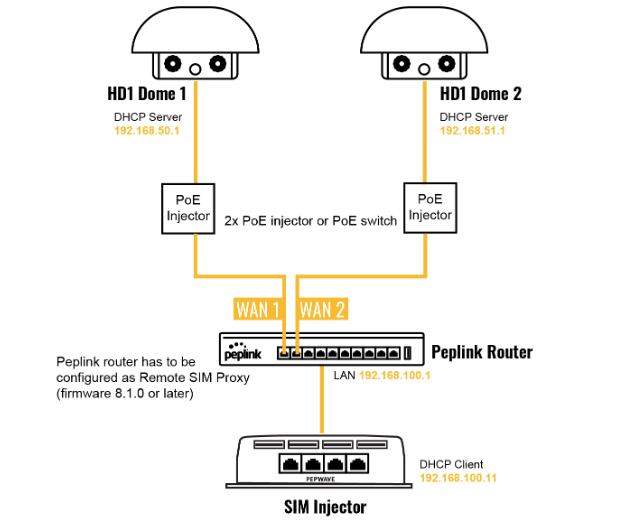
In this scenario, SIMs are provided to the HD Domes via the main router. In this example, the Remote SIM Proxy functionality needs to be enabled on the main router.
Notes:
- HD Dome can be replaced with any other cellular router that supports RemoteSIM.
- It is recommended to use Peplink Balance series or X series routers as the main router.
This scenario requires the completion of the configuration steps for the cellular router and the SIM Injector as in Scenario 1. The configuration for the main router is explained below.
Main Router configuration#
IMPORTANT: Main router LAN side and Cellular Routers must be configured using different subnets, e.g. 192.168.50.1/24 and 192.168.100.1/24.
Note: please make sure the Peplink router is running Firmware 8.1.0 or above.
1. Open the main router WEB interface and change:
From <IP address>/cgi-bin/MANGA/index.cgi to <IP address>/cgi-bin/MANGA/support.cgi.
This will open the support.cgi page.

2. Scroll down to find Remote SIM Proxy and click on [click to configure] that is located next to it.

3. Check the Enable checkbox.

4. Click on Save.
5. Go back to the index.cgi page and click on Apply Changes.
Scenario 4: SIM Injector in LAN of Main Router and Dome with Starlink#
Setup topology#
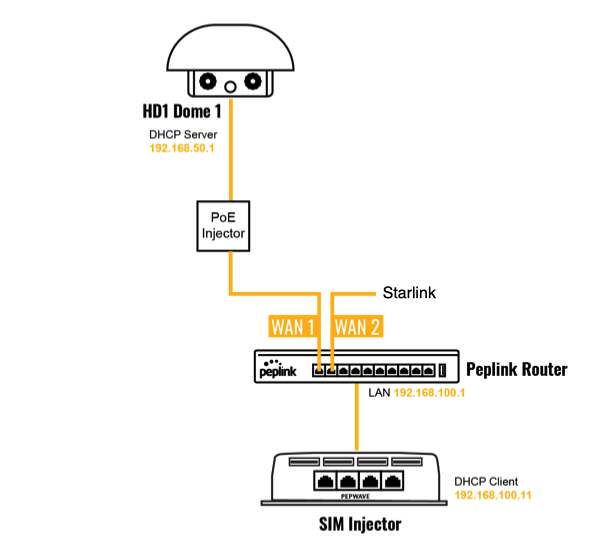
Equipment used:
- HD1 Dome Pro (MAX-HD1-DOM-PRO-5GD), FW version 8.2.1
- MAX HD2 (MAX-HD2-LTEA-W-T), FW version 8.2.1
- SIM Injector Mini (SIM-MINI-8-1E), FW version 1.1.120
Configuring the MAX HD2 router#
IMPORTANT: The main router LAN side and Cellular Routers must be configured using different subnets, e.g. 192.168.50.1/24 and 192.168.100.1/24.
Step 1. Change router subnet to 192.168.100.1/24.
-
- Go to the Network tab, then click on LAN network

- Change IP addresses to the new subnet:

- Click on Save.
- Go back to the index.cgi page and click on Apply Changes.
Step 2. Enable the Remote SIM Proxy
- Open the main router WEB interface and change:
From 192.168.100.1/cgi-bin/MANGA/index.cgi to 192.168.100.1/cgi-bin/MANGA/support.cgi
- Scroll down to find Remote SIM Proxy and click on [click to configure] that is located next to it.
- Check the Enable checkbox.

- Click on Save.
- Go back to the index.cgi page and click on Apply Changes.
Configuring the SIM Injector#
There is no need to configure a SIM Injector mini. Once the HD2 router configuration is finished you power on SIM Injector mini.
IMPORTANT: in case SIM Injector Mini was connected to HD2 before its configuration, then need to power off and then power on SIM Injector Mini.
Configuring the HD1 Dome Pro#
Step 1. Enable the SIM Injector communication protocol.
1. By default the HD1 Dome Pro IP address is 192.168.50.1. Open WEB based configuration interface and then go to Advanced tab (top navigation bar).
2. Under Misc. settings (left navigation bar) find Remote SIM Management.
3. In Remote SIM Management, click on the edit icon next to Remote SIM is Disabled.

4. Check the Auto LAN discovery checkbox and click Save and Apply Changes.

5. Click Save and then Apply Changes and reboot the HD1 Dome Pro.
Step 2. Enable RemoteSIM for the selected Cellular interface.
1. Go to Network (top navigation bar), then WAN (left navigation bar) and click Details for a selected cellular WAN. This will open the WAN Connection Settings page.
![]()
2. Scroll down to Cellular settings.
3. In the SIM Card section, select Use Remote SIM Only.

4. Click Scan nearby remote SIM server. The system must find the SIM Injector Mini serial number as shown below.

5. Click Update RemoteSIM Settings.
6. Click Save and Apply Changes.
Step 3. (Optional) Custom SIM cards settings.
1. For a MAX router, go to the Advanced (Top tab).
2. Under Misc. settings (Left-side tab) find Remote SIM Management.
3. Click on the Add Remote SIM button, fill in all the required info and click Save. This section allows defining custom requirements for a SIM card located in a certain SIM slot:
- Enable/Disable roaming (by default roaming is disabled).
- Add Custom mobile operator settings (APN, user name, password).
4. Repeat configuration for all SIM cards which need custom settings.
5. Click Apply Changes to take effect.
Scenario 5: SIM Injector / SIM Injector Mini in a remote location#
Setup topology#

Requirements for installing a SIM Injector / SIM Injector Mini (hereinafter referred to as SIM Injector) in a remote location:
- Cellular router communicates with the SIM Injector via UDP port 50000. Therefore this port must be reachable via public IP over the Internet.
- The one way latency between the cellular router and the SIM Injector should be up to 250 ms. A higher latency may lead to instability issues.
- The cellular router must have Internet connection to connect to the SIM Injector. It can be another Internet connection via Ethernet or Fiber if possible, or a secondary cellular interface with a local SIM (Ignite SIM).
- Due to its high latency, it is not recommended to use satellite WAN for connecting to a SIM Injector in remote locations.
SIM Injector configuration is the same as in Scenario 1.
Cellular Router configuration#
Step 1. Enable the SIM Injector communication protocol.
1. Under Misc. settings (Left-side tab), find RemoteSIM Management.
2. In RemoteSIM Management, click on the edit icon next to RemoteSIM is Disabled.
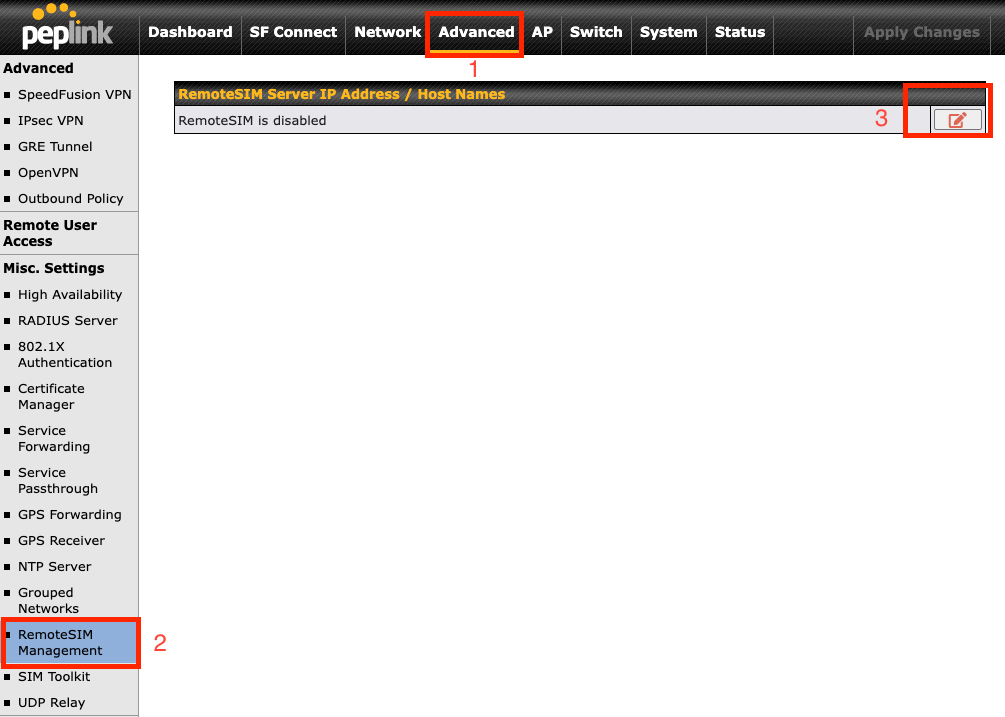
3. Enter the public IP of the SIM Injector and click Save and Apply Changes.

Notes:
- Do NOT check Auto LAN Discovery.
- Adding a SIM Injector serial number to the Remote SIM Host field is a mistake!
Step 2. RemoteSIM and custom SIM card settings configurations are the same as in Scenario 1.
Scenario 6: Dual SIM Injector on Synergized Dual Dome Solution with Balance Router#
Setup topology#
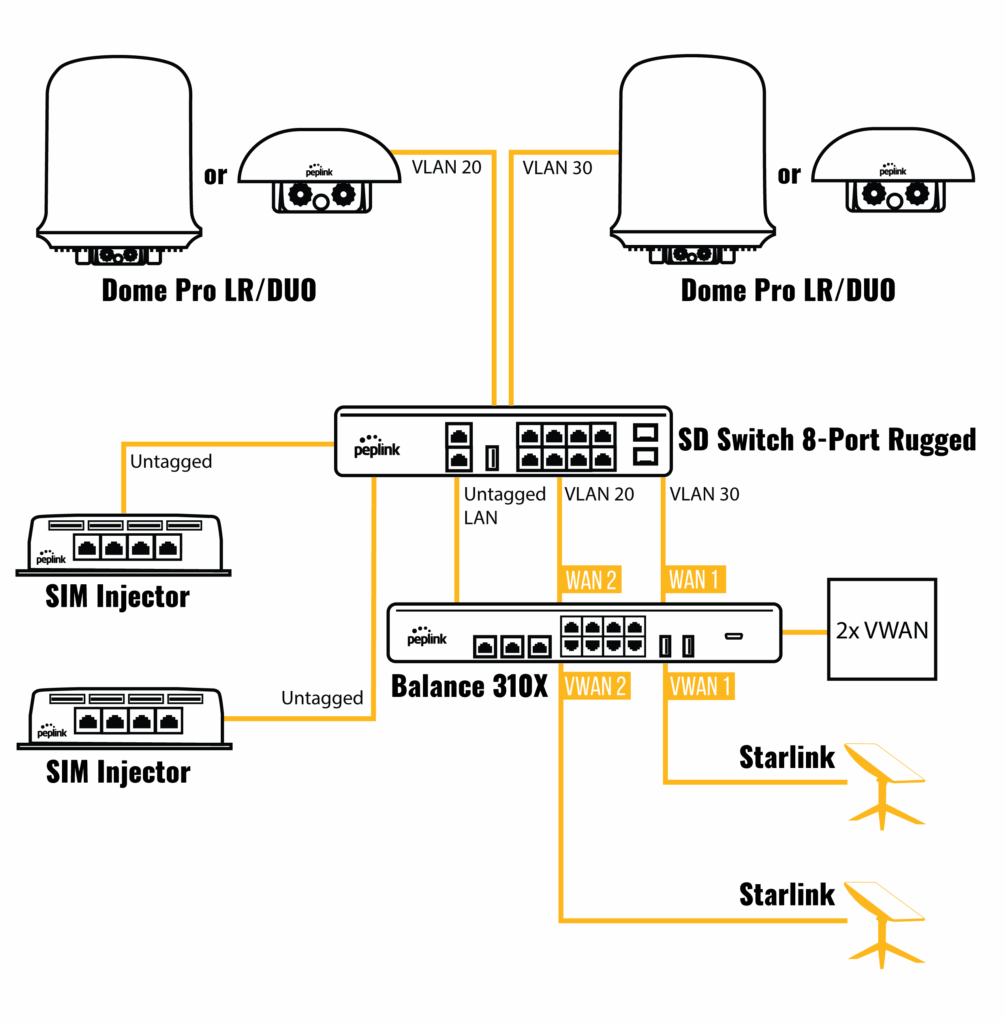
Use Synergy mode guide for setting up Synergy Mode:
Synergy Mode (Firmware 8.3.0) – Tips and Tricks – Peplink Community
Configuring SIM Injectors on Synergy Controller (Balance router)#
1: To start go to:
– For a Balance router, go to the Network (Top tab).
2.1: Then Under Misc. settings (Left-side tab) click on RemoteSIM Management.

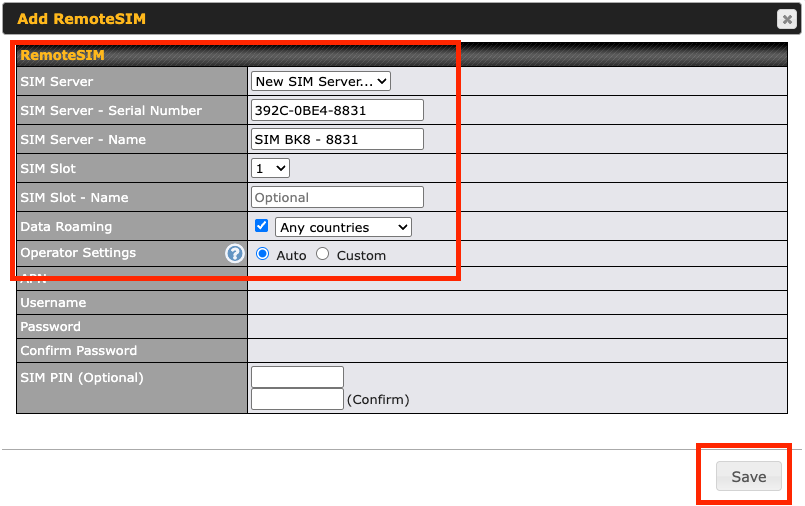
2.2: Next, fill in all the required info. This will not be Auto LAN discovery, fill in the remote SIM Server IP Addresses or Hostnames. By default the Hostname is the Serial Number.

3.1: After Apply changes. Click on the Add RemoteSIM button.

3.2: Next, fill in all the required info. The setting will apply only to a single SIM which is inserted in the SIM slot as defined in the settings.
This section allows defining custom requirements for a SIM card located in a certain SIM slot:
– Enable/Disable roaming (by default roaming is disabled).
– Add Custom mobile operator settings (APN, user name, password).
SIM Server 🡪 Serial Number > Enter SIM Injector S/N
SIM Slot 🡪 select SIM Injector slot to which SIM card the settings should be applied.
Data Roaming 🡪 enable data Roaming. By default Roaming is disabled.
Operator Settings 🡪 select Customer to enter custom settings.

4.1: Adding another SIM Injector, again you will click on add RemoteSIM:
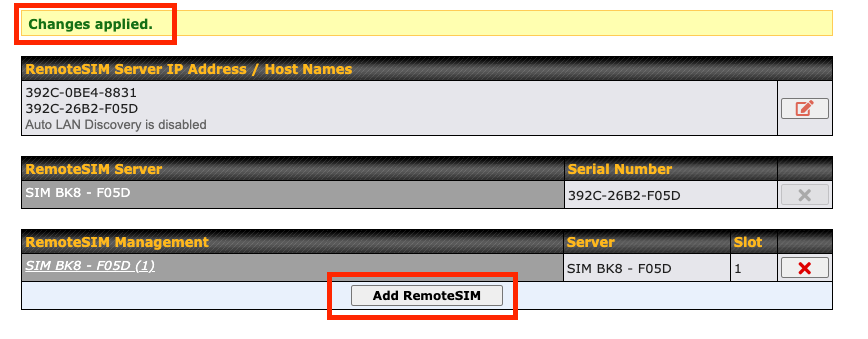
4.2: On SIM Server you will select a new SIM server from the dropdown menu. In the venster you can enter the 2nd serial number you have used previously in Step 2.
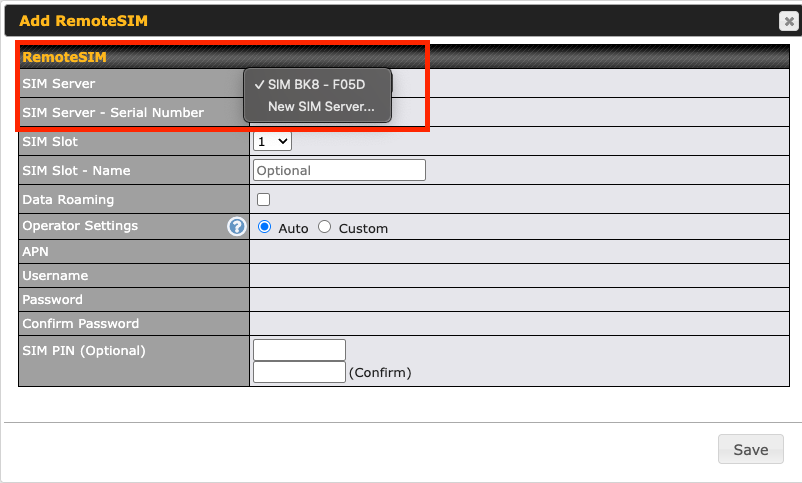
5.Next, fill in all the required info. The setting will apply only to a single SIM which is inserted in the SIM slot as defined in the settings.
This section allows defining custom requirements for a SIM card located in a certain SIM slot:
– Enable/Disable roaming (by default roaming is disabled).
– Add Custom mobile operator settings (APN, user name, password).
SIM Server 🡪 Serial Number > Enter SIM Injector S/N
SIM Slot 🡪 select SIM Injector slot to which SIM card the settings should be applied.
Data Roaming 🡪 enable data Roaming. By default Roaming is disabled.
Operator Settings 🡪 select Customer to enter custom settings.
- Repeat all configuration steps from step 3 for all SIM cards which need custom settings.
Setting up the Balance router with 2 synergized Domes#
1: Select the preferred Cellular WAN connection from the dashboard an click on the Cellular WAN Interface name:
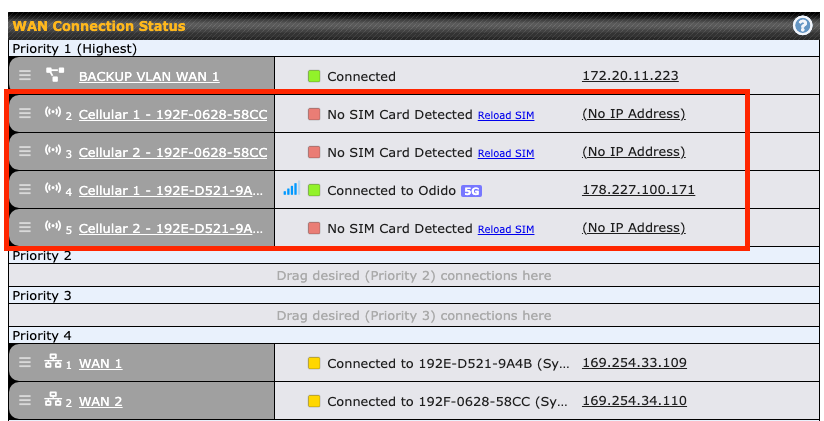
2: Select the correct priorities for your SIM Card setup and select RemoteSIM option.
Add the Remote SIM Server you assign to your Cellular WAN Interface and if needed define SIM slot by adding “:[SIM slot Number]” after the Serial Number of the SIM Injector.

3: Click on Save and Apply. Repeat this for all Celullar WAN Interfaces you want to use.
Note: If you want to use both SIM Injectors for one Cellular WAN Interface separate them by a “space” or “enter”. Define different sim slots from the same SIM Injector by separating them by a “,”
Example:
- Defining SIM Injector(s)
– Format: <S/N>
– Example 1: 1111-2222-3333
– Example 2: 1111-2222-3333 4444-5555-6666
- Defining SIM Injector(s) SIM slot(s):
– Format: <S/N:slot number>
– Example 1: 1111-2222-3333:7,5 (the Cellular Interface will use SIM in slot 7, then 5)
– Example 2: 1111-2222-3333:1,2 1111-2222-3333:3,4 (the cellular Interface will use SIM
in slot 1, then in 2 from the first SIM Injector, and then it will use 3 and 4 from the second
SIM Injector).
See picture below for reference:

How to check if a Peplink Cellular Router supports RemoteSIM#
1. Go to Network (Top tab), then WAN (Left-side tab), and click Details on any cellular WAN. This will open the WAN Connection Settings page.
2. Scroll down to Cellular settings.
If you can see the Remote SIM Settings section, then the cellular router supports RemoteSIM.

Monitor the status of the RemoteSIM#
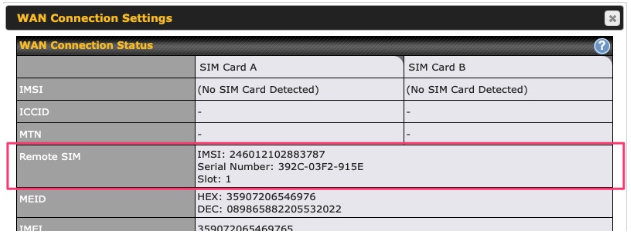
1. Go to Network (Top tab), then WAN (Left-side tab), and click Details on the cellular WAN which was configured to use RemoteSIM.
2. Check the WAN Connection Status section. Within the cell WAN details, there is a section for Remote SIM (SIM card IMSI, SIM Injector serial number and SIM slot).
Appendix A: Declaration#
Ethernet Cables
We recommend that you use a shielded cable to connect the Ethernet ports for the network.
FCC Requirements for Operation in the United States
Federal Communications Commission (FCC) Compliance Notice:
For SIM Injector
Federal Communication Commission Interference Statement
Any changes or modifications not expressly approved by the party responsible for compliance could void your authority to operate the equipment.
This equipment has been tested and found to comply with the limits for a Class B digital device, pursuant to part 15 of the FCC Rules. These limits are designed to provide reasonable protection against harmful interference in a residential installation. This equipment generates, uses and can radiate radio frequency energy and, if not installed and used in accordance with the instructions, may cause harmful interference to radio communications. However, there is no guarantee that interference will not occur in a particular installation. If this equipment does cause harmful interference to radio or television reception, which can be determined by turning the equipment off and on, the user is encouraged to try to correct the interference by one or more of the following measures:
—Reorient or relocate the receiving antenna.
—Increase the separation between the equipment and receiver.
—Connect the equipment into an outlet on a circuit different from that to which the receiver is connected.
—Consult the dealer or an experienced radio/TV technician for help.
This device complies with Part 15 of the FCC Rules. Operation is subject to the following two conditions:
(1) this device may not cause harmful interference and
(2) this device must accept any interference received, including interference that may cause undesired operation.
Industry Canada Statement
This product meets the applicable Innovation, Science and Economic Development Canada technical specifications.
Le présent produit est conforme aux spécifications techniques applicables d’Innovation, Sciences et Développement économique Canada.
This device contains licence-exempt transmitter(s)/receiver(s) that comply with Innovation, Science and Economic Development Canada’s licence-exempt RSS(s). Operation is subject to the following two conditions:
(1) This device may not cause interference.
(2) This device must accept any interference, including interference that may cause undesired operation of the device.
Le present appareil est conforme aux CNR d’Industrie Canada applicables aux appareils radio ex-empts de licence. L’exploitation est autorisee aux deux conditions suivantes:
(1) l’appareil ne doit pas produire de brouillage, et
(2) l’utilisateur de l’appareil doit accepter tout brouillage radioelectrique subi, meme si le brouillage est susceptible d’en
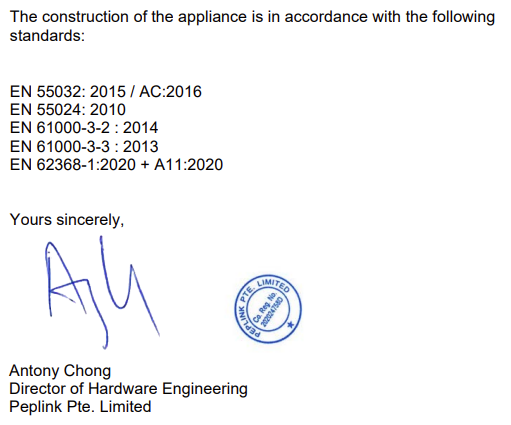
CE Statement for Peplink Routers ( SIM Injector )
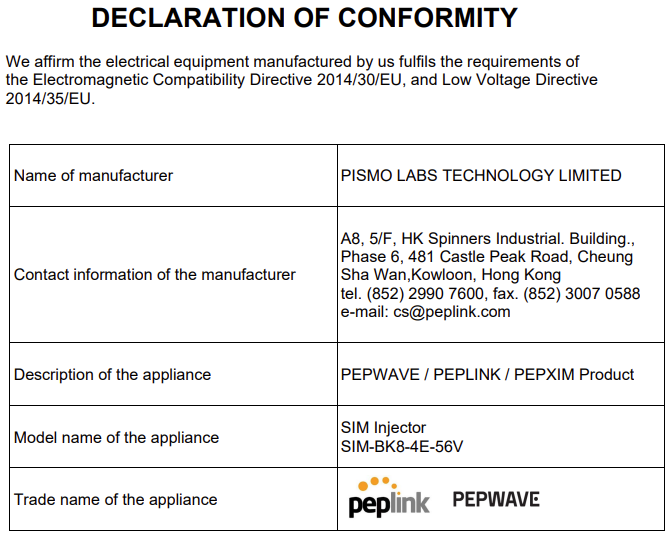
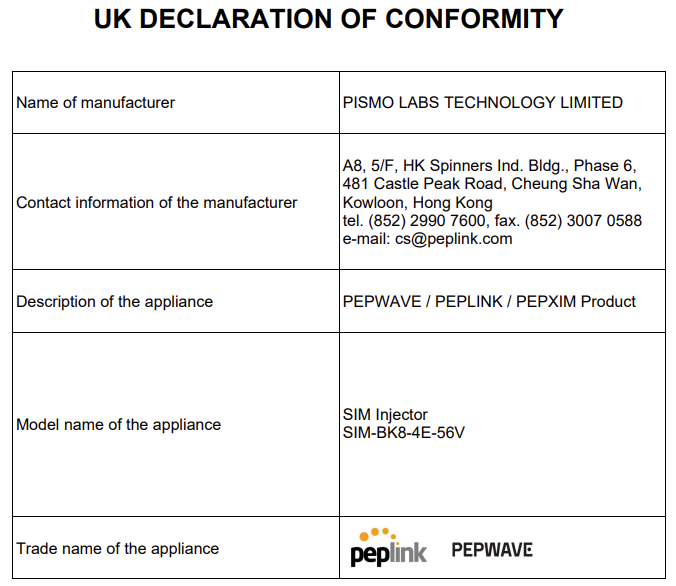
UK Statement for Peplink Routers ( SIM Injector )

FCC Requirements for Operation in the United States
Federal Communications Commission (FCC) Compliance Notice:
For SIM Injector Mini
Federal Communication Commission Interference Statement
Any changes or modifications not expressly approved by the party responsible for compliance could void your authority to operate the equipment.
This equipment has been tested and found to comply with the limits for a Class B digital device, pursuant to part 15 of the FCC Rules. These limits are designed to provide reasonable protection against harmful interference when the equipment is operated in a commercial environment. This equipment generates, uses, and can radiate radio frequency energy and, if not installed and used in accordance with the instruction manual, it may cause harmful interference to radio communications. Operation of this equipment in a residential area is likely to cause harmful interference, in which case the user will be required to correct the interference at his own expense.
This device complies with Part 15 of the FCC Rules. Operation is subject to the following two conditions:
(1) this device may not cause harmful interference and
(2) this device must accept any interference received, including interference that may cause undesired operation.
Industry Canada Statement
This product meets the applicable Innovation, Science and Economic Development Canada technical specifications.
Le présent produit est conforme aux spécifications techniques applicables d’Innovation, Sciences et Développement économique Canada.
This device contains licence-exempt transmitter(s)/receiver(s) that comply with Innovation, Science and Economic Development Canada’s licence-exempt RSS(s). Operation is subject to the following two conditions:
(1) This device may not cause interference.
(2) This device must accept any interference, including interference that may cause undesired operation of the device.
Le present appareil est conforme aux CNR d’Industrie Canada applicables aux appareils radio ex-empts de licence. L’exploitation est autorisee aux deux conditions suivantes:
(1) l’appareil ne doit pas produire de brouillage, et
(2) l’utilisateur de l’appareil doit accepter tout brouillage radioelectrique subi, meme si le brouillage est susceptible d’en
CE Statement for Peplink Routers ( SIM Injector Mini )


UK Statement for Peplink Routers ( SIM Injector Mini )


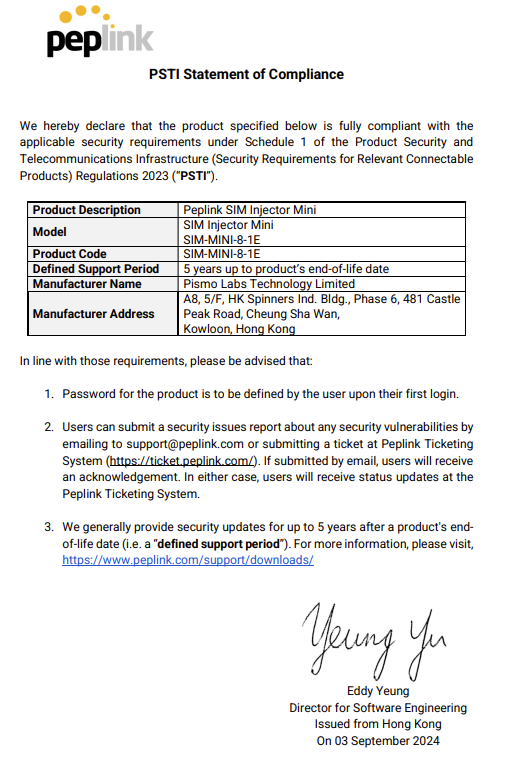
Appendix B: UK PSTI Statement of Compliance#
For SIM Injector

For SIM Injector Mini
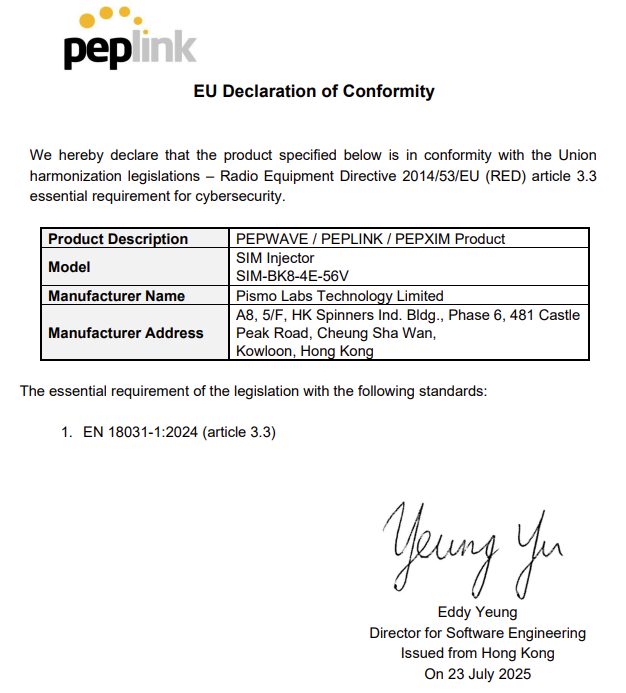
Appendix C: EU Cybersecurity Declaration of Conformit#
For SIM Injector
For SIM Injector Mini

